Reflecta Super8 scanner test report
In 1965, Kodak introduced the new film format Super8, which quickly became popular for shoots in the private sector such as family celebrations, vacations, holidays etc as it prooved to be much more comfortable in handling than the prevalent Standard 8 mm film. Instead of fiddling around with loose film, the new format allowed for insertion of cassettes filled with 15 meters of Super8 film. Not least because of this welcome change did the Super8 film become incresingly popular amongst hobby- and amateur film makers. Unsurprisingly thus, countless rolls of this medium, stored in basements and attics, are waiting to be digitized.
Devices for digitizing Super8 films have been around for decades. Until now, these retailed at five- to six-figure Euro sums. Such equipment was destined for professional deployment, not for private users. This changed with the introduction of the Reflecta Super8 Scanner in spring 2014, which comes at an affordable price for home users. Until now, home users had to rely on the low-quality method of video-taping the movies off a wall during playback, or giving away the films to a professional service. Now, one can comfortably digitize the films using the Super8 scanner at home.
The Reflecta Super8 scanner is practically unrivaled in this area, as other devices in the area of digitization of Super8 films rank in the area of professional equipment and thus are not affordable for the end user. In our test report we want to explain the functionality and use of digitization of the Reflecta Super8 scanner in detail, as well as examine the quality of color rendering and anwer the question whether the Super8 Film is really suitable for reproduction in Full-HD resolution as stated by the manufacturer.
The Reflecta Super8 scanner has been withdrawn from the market in summer 2019. There is no successor for it. As an alternative ther is the Reflecta Super8-Normal8scanner.
Equipment, scope of supply and performance data of the scanner
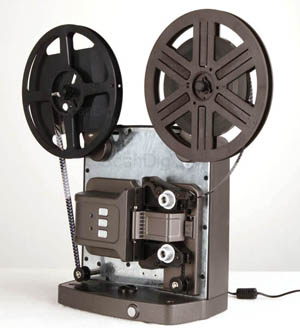
First, lets look at the data sheet of the Reflecta Super8 Scanner. With dimensions of 213 x 143 x 232 millimeters and at a weight of 2.7 kilograms, the scanner is substantially handier than every film projector. The scanner is suitable for positive Super8 silent film both in color and black and white. Since anyway it was unusual to film on negative material in the 8mm area, this poses no problem. Should one have postset music to ones films, unfortunately, the soundtrack will not be considered. On our FAQ page "video-digitization" we point out how to recognize whether the film in question has a soundtrack or not. The frame rate of the Super8 films can amount to the usual 18fps (frames per second, i.e. pictures per second) or 24fps. Other cine film formats such as standard 8mm film cannot be processed, because they have another perforation and another picture format. On our FAQ page concerning Film- and Video-digitization we explain how to spot the difference between Super8 and standard 8mm film. Lets first register one crucial limitation of the Reflecta Super 8 film scanner:
The reflecta Super8 scanner digitizes Super8 reversal silent film in color and in black and white. A soundtrack, if present, is not considered - meaning the sound will be lost during digitization. Standard 8mm film cannot be processed.
A resolution of either 1280x720 pixels (HD) or 1920x1080 (Full-HD) can be chosen. The color depth amounts to the standard value of 24 bits. On-board is a CMOS sensor, which photographs the film picture by picture whilst it is automatically transported. No need to worry about the slow advance of the film. Unlike film projectors, the Super8 scanner makes use of a LED instead of a halogen bulb. This prevents any unwanted heat generation, thus the film cannot burn in spite of standstill.
The whole photographing procedure certainly eats up some time. The producer states a scan speed of 2.5 seconds per image. This equals about 2 hours and 46 minutes for a roll containing 15 meters of film, which is 3.5 minutes of footage or 3780 images at 18 images per second.
It's important to know which video format the movies will be saved in. Reflecta states the AVI format. Since AVI is merely a container format, this Info does not tell us much yet. The critical info about which codec is contained within, is lacking. Due to the image-by-image sampling, jpegs are being produced. These image files are then processed at the end of the digitization process, resulting in a MPEG (motion-JPEG codec) film contained in the AVI file. The movies are compiled in the CyberView S8 Software, which is included in the scope of delivery and alternatively can be downloaded via the reflecta homepage.
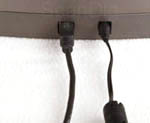
The scanner is connected to the PC via USB 2.0, power supply is external. The ports are located on the back side of the scanner. The scope of delivery includes a matching USB cable and a mains cable. Now you might wonder, why the producers did not choose to implement a faster interface such as USB 3.0 instead. Rest assured, that the data transfer takes only a fraction of the scanning time of 2.5 seconds. Hence, no gain in speed by using a faster port
Besides the abovementioned, a film spool with room for 120 meters of film is included in the scope of delivery. This is needed for rewinding the film. We would also like to point out the possibility of cleaning the film. In between the two lower two idler pulleys on the lehft side, a small cleaning gadget can be swung open. This is where the film will then run through two small faem sponges, which can be soaked in film cleaning liquid. This procedure has to be started beforehand the digitization process. To clean the film, it might as well be fast forwarded all the way. Cleaning while digitizing is not possible. We will elaborate further on the cleaning procedure in a dedicated chapter.
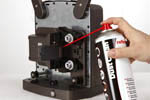
For cleaning the lens, the LED unit can be folded to the side. Before doing so, a small switch is used to loosen the locking mechanism. Now, dust and dirt particles can be removed using a compressed-air spray. If you click on the adjoining picture, a window will open showing an animation which illustrates this procedure.
In case the lens of the Reflecta Super8 Scanner gets polluted with losse dust or dirt particles, an anti dust spray or a blower brush can be used for cleaning. The air jet emitted fron the bellows is not as strong as that of the anti-dust spray
It's very important that for cleaning the lens of the LED unit, onyl pure compressed air is used. Compressed air coming from compressors used in workshops is often contaminated with tiny debris, which can damage the highly sensible parts of photographic and electronic devices. Compressed air such as the compressed air spray is specifically intended for use with film material and scanners and therefore especially pure.
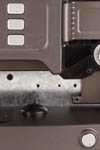
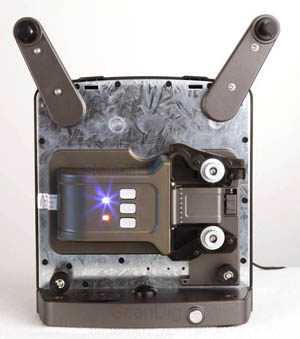
Four buttons on the front side of the scanner, are used for operating the scanner. The forward button is located at the very top, arrows pointing left. A short press of this button will make the film move ahead by one frame; a long press will make the film fast forward. The stop button for halting the film completely is located right under the forward button. Underneath this, we see the rewind button. It works just as the forward button. All the way down, on the right side, the on/off button is located. If you click on the adjacent image, you will see a close look of the four buttons. Notice that they are pictured similarly to those a video- or cassette recorder, offering intuitive handling.
Installation and startup of the reflecta Super8 scanner
First, the CyberView S8 Software needs to be installed on the computer. A red note in the scope of delivery points out that in order to obtain the best quality, the current software version should be obtained from the reclecta homepage. Download and installation is quick and easy.
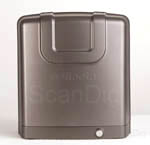
Now the scanner can be set up. First, take off the front cover and fold up the spool arms. If you'd like to see an animation of this, click the adjoining picture. The USB and power connection are both located on the rear side of the device. Once its connected the latter, it can be powered up using the silver button. Now, both LEDs on the Front of the scanner are lit. The upper one is always blue and the lower one will first flash red and then passes on to a continous green light.
The film roll is then being placed on the roll shaft to the right. It's crucial that the film roll, just like when projecting, is placed in the right direction for playback. The perforation has to be pointing forward, if looking at the scanners' front side. The beginning of the film has to exit on the right side of the spool. The film is unwound clockwise. Thanks to the small metal ball on the winding mandrel, the spool stays fixed. On the left winding mandrel, the uptake mandrel, an empty film spool is placed. This is where the film is wound up after digitization. The spool included in the delivery is rather small and seems fragile. If you still have a spool from old times, you can exchange it. Once both spools are in place, you can start scanning.
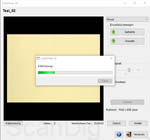
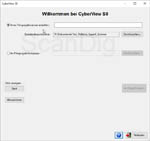
After starting the software, you will be presented with the welcome at CyberView S8-dialogue. Here, you can start a new film project and choose the saving location, or resume an existing project. Film cleaning and software update can be started through this dialogue, too. After entering the title of the new project, press start project. If this is the first time you're using the scanner, it will now be auto calibrated. According the handbook, this is necessary just the one time. In order for it to function, no film may be inserted into the scanner. After the calibration, the light source is displayed in an ivory-ish colour. Thus, the film is exposed to a halogen light rather than the cool white LED light color temperature. The light of the LED matches about 3200 Kelvin, which is a rather warm white hue. Now, you can start scanning or first perform a film cleaning.
Film cleaning with the Reflecta Super8 scanner
Super8 films are usually very old and thus, typically polluted. Dirt particles on the film surface lead to disturbing spots on the digital image. Some dirt particles can be easily blown away, others are stuck in a way that they can be removed only using liquid. Some Super8 films have been poorly kept, will inevitably have gotten moldy over time. This poses a healt risk to the operator as well as a technical risk for the scanner, which is why we generally recommend the cleaning of the film beforehand scanning.
Super-8 films are usually very old and thus, typically polluted. We recommend thorough cleaning of the film beforehand scanning.
The cleaning of a Super-8 film can be broken down to 10 steps:
- Power up the device
- Install film spools on both coils
- Press the advance / feed button, keep pressed
- Open the lid of the film cleaning
- Add film cleaning solution (not included in scope of delivery!) onto the foamed material
- Guide film through inbetween the foamed material
- Feed film to the uptake spool
- Press the stop button
- Activate CyberView S8-software
- To start the cleaning process, press clean

For field use, Reflecta advises the use of isohexan. This chemical will quickly evaporate, ensuring dry reeling. It shall be noted that isohexan is poisonous, thus harmful to health and environment. It is also highly flammable and thus has to be dealt with carefully. Certain harzard notes apply. As such, this fluid may ignite if stored in direct sunlight or next to a heater. Contact with the skin will cause strong irritation and the fumes should not be inhaled. As you see, this is no ordinary cleaning liquid. After completing the ten steps described above, the cleaning will take about 1:30 min per 15 meters of film.
After the cleaning is completed, the film is wound up on the left spool, with its end sticking out. Since the film has to be wound back to the other spool before digitizing, the end is now placed onto there. Then, the rewind button is pressed and held.
In case the film is heavily polluted, the cleaning process may be repeated. Since the foamed material pads will get very dirty and wear out over time, they can be exchanged: replacement sponge.
To be honest, the cleaning performance using the two pads is rather poor. Big dirt particles resting loosely on the film surface will adhere to the pads, but to remove persistant particles, as often present on Super8 film rolls, the film would need to be pressed more tightly onto the foam pads.
The film cleaning feature of the reflecta Super8 scanner does not yield good results, even if coupled with special film cleaning solution. This is due to the cleaning pads' structure and lack of pressure at the cleaning passage.
An alterternative and more efficient way of film cleaning would be the use of film cleaning devices. Such devices work with anti-static brushes, cleaning the film from both dust and electric charge. The fan featured in the models by KSE blows off the dust.
Digitizing Super8 films using the Reflecta Super8 scanner
If you ever operated a super8 projector, you will have an easy job of the super8 scanner. On the other hand, if you have never handled film spools or projectors before, you will need to get acustomed first, and build some routine. Once both spools are fixed on the winding mandrels, the scanner is powered up, the software open, and the scanner calibrated (first time use only), the film can be threaded.
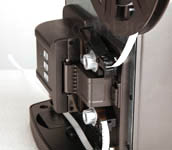
In order to thread the film, long press the feed button. Now the two matt silver film insertions will start turning. With the perforation pointing forward (as can be seen on the first photo on the right), the film enters the gap under the small, black plastic roll. After about three cm, the film guide will grip pick up the perforation and automatically forward the film through the scanner. Optimally, the film should have at least 70cm of lead, otherwise some images will be skipped at the beginning. Once appproximately 55 cm have passsed the second silver film guide, press the stop button.
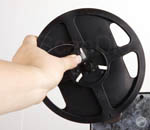
Next, place the lead around the two deflection pulleys and fix it pointing upwards in the pick up spool. If using the spool included in the delivery, shove the film through the slot in the direction of the core of the spool, then shove the small white bracket up, fastening the end of the film. For guidance, check out the alongside animation. It's a delicate procedure and does require some flair. Once you get keen at it, it'll come naturally. Next, press the forward button until the film is pulled tight. Once the film is wrapped around the spool twice, it cannot slip out any more.
If the film roll has sufficient lead, you can unhesitantingly grab it there. Basically, in no case should the exposed film be touched with bare hands, as fingerprints will mercilessly be digitized and thus lead to artefacts in the movie. Rather than using bare hands, one should wear cotton gloves when handling precious film material.
To pass by addional lead, long press the advance button until you reach the first image. It will be presented in the preview window of CyberView S8 in real time.
Settings in the scan software CyberView S8
Once all arrangements have been made on the projector itself, proceed to the software. CyberView S8 is clearly arranged. In the left section, the the current image is displayed, in the right section, certain settings can be undertaken. One can easily switch between the functions main and adjust.
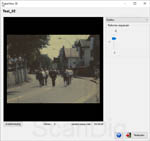
The function adjust comprises a slider for adjusting the frame. The picture detail to be scanned is determined through this function. Adjustments can be made from 2 to -2. Every adjustment is promtply displayed in the preview window. The adjoining image illustrates this. Click for a big version.
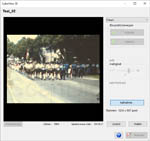
When choosing main in the dropdown menu (as shown here), you will be presented with the optional buttons upwards and downwards, by which you can advance or rewind the film just as you do by pressing the hard keys on the scanner. Furthermore, the brightness can be set up automatically using auto-brightness regulation. Also, the brightness can be manually set from -127 to 44 using a separate slider. In addition, the auto contrast function can be activated. All these settings will influence the result and all are directly displayed in the preview window.
Using the capture button, you can now start the digitization. This is where the device starts working. Image by image is being photographed and the film forwarded. A folder containing the single jpeg files is created on the hard drive. The capture button will turn into a record... button. Underneath the preview image, the counter will increase by one for every image scanned. Besides, the elapsed time is displayed next to the image count. Sadly, the remaining time cannot be displayed (this would be more informative). Of course, there is no way for the scanner to know just how much film remains on the film spool. The table below illustrates the approximate values for regular run-time of silent film with an image frequency of 18 images per second.
| diameter of film spool |
film length |
number of single images |
lenght of Super8 film |
digitizing time |
| 6 cm |
15 m |
3600 |
3:20 min |
3h 20min |
| 12.5 cm |
60 m |
14040 |
13 min |
13h |
| 14.5 cm |
90 m |
21240 |
20 min |
20h |
| 17.5 cm |
120 m |
28080 |
26 min |
26h |
| 20 cm |
180 m |
43200 |
40 min |
40h |
You will not have to leave the scanner running continuously for a near 20 ours to get 90m of super8 films digitized. The process can be stopped at any time using the button capture.... The scanner will then simply stand still and can even be powered off. If you press the film advance or rewind button and move the film manually, you can resume the process at any other time at precisely this position. This way, a long film can be digitized bit by bit, that is for example just some hours in the evening.
Possible problems with the reflecta Super8 scanner during digitization
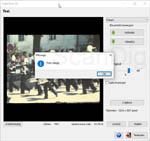
In the best case the film will be processed in the given time of the table. The condition of the film rolls is crucial here. Especially poor adhesive joints or broken perforation can cause the scanner to hault during digitization. In this case, the film is not being hauled further and the scanner simply gets stuck. The problem report film is stuck! is displayed. In this case, simply skip the flawed location manually by pressing the forward button. Depending on how long the part is, you might need to skip just a few images or you might need to skip more.
Due to the sampling of each individual picture on the roll, the feed of the scanner works so fine that during our test, we did not experience any film tear. In case you do experience one, you can either glue the film together like in good old times - or deal with the loss of a couple of meters and simply thread it manually onto the take-up reel. If a splice on the film has to be renewed, we advise the use of cotton gloves in order to prevent polluting the film with finger prints.
Wheter a film pass in one or not depends entirely on the quality of the film material. If you start the scanning in the morning and then proceed to work you might have to face coming back home finding the film to be stuck after just a couple of seconds. For this reason, we recommend to stay present during the scanning - or at least stop by to check it from time to time.
In our tests, we fount the Super8 scanner to skip some images of the film roll. It does not scan all of the pictures reliably. At first, this might sound dramatic. If a magazine scanner misses one slide out of 100, this one might well be the most important of the lot. In the case of a film however, skipping one image will only lead to a shortening of the current scene by about 50ms. It will not even be noticed and thus isn't tragic. If you wish to add a soundrack to the film later on, it might get tricky. Already ten images will cause a mismatch of about half a second. This asynchronie will be problematic in conversation scenes where movement of the lips has to match the audio.
Assembling the single images to a movie
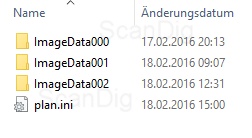
Once the film is completely digitized, the project folder will contain single folders named ImageData and an ongoing three digit number. The quantity of folders depends on how many times the digitization has been interrupted, ie. in how many sessions the film was digitized. In these folders, all the single images are saved in jpeg format. Besides the image files, the project folder contains a file named plan.ini. This is the initialization file which CyberView S8 needs in order to resume the project and match the single files to it. Another way to resume the project is to use the button resume film project after starting the software and then choose this plan.ini file.
Incidentally, this is one major advantage of the photographing mehtod. Since the Scanner digitizes all the single images one by one, storing them as regular jpeg files on the hard disc, one can easily extract good pictures from the film and use them as a photo. Before completing the movie and extracting all the single images to an avi file, one needs to know that CyberView SE will permanently delete all the single image files unasked as soon as the movie has been constructed. If you wish to keep some of these images, you have to make a backup copy of the folders containing the image files.
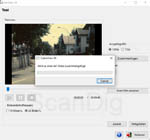
To finish the film, click the button next. Then a window with a preview of the film will open. In this window, one can choose between a frame rate of 18fps and 24fps. If you're unsure whether the original film has been captured with 18 or 24 images per second, just check out the preview film for both frame rates and you will easily understand which setting is the right one. Now, just choose the resolution for the final film, choosing between 1080p and 720p (full hd or hd-ready). Using the drop-down menu Split size you will choose whether the finished film should be divided at 1GB or at 2GB. Klicking the Button assemble will start the issue of the AVI file.
The progress of the assembling is indicated by a progress bar. Expect about two minutes of processing time per minute of film. Keep this in mind when dealing with a long film.
Image quality of the Reflecta Super8 Scanner
Lets first look at the technical details concerning the image quality. A resolution of 1280x720 pixels for HD versus 1920x1080 pixels for full HD is stated by the manufacturer. However, this is not the output format, as these television resolutions have the aspect radio of 16:9. But cine film such as the Super8 film was recorded in aspect radio 4:3, which corresponds to the conventional PAL TV image with 768x576 pixels.
To digitize a Super8 film in full HD resolution, every single image (measuring about 5.5x4.1mm each) needs to be enlarged a lot. To reach the 1080 Pixels of full HD, a scan with 6700ppi is necessary. Such resolution can not be achieved by the industries best film scanners. Taking in consideration that a very high quality and well preserved Super8 film such as the Kodachrome film offers a maximum resolution of 3600dpi, this might be well enough to obtain PAL resolution, but way too little to display it without interpolation on a full HD television.
A fine-grain Super8 film has a maximum resolution of 3600dpi and thus, cannot be played back in full HD without interpolation.
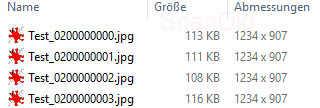
The question remains: what is the actual resolution of the Super8 scanner? Taking a look at the dimensions of the single JPEG files, you will notice they all measure 1234 x 907 pixels. Depending on the image content, file size varied between 87 KB and 157 KB. Take this as a basis for an image measuring 5,5 x 4,1 mm, this amounts to a reading resolution of about 5700ppi. Let's see whether this is actually genuine information or just interpolated by using a resolution chart. To do this, we use a USAF-1951 resoltion target. See our website resolution): for further information.
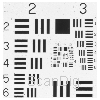
In the scan we obtained from the USAF-Target, the horizontal an vertical lines of the elements 6.3 can just be distinguished. According to our resolution chart this corresponds to an effective resolution of 4096 dpi. In the case of the Super8 image, this means a scan of 860x655 pixels, i.e. about 0,56 megapixels. The actual image is hence blown up by a near 100% before being stored on the hard drive. The actual resolution is only 13% more than necessary for PAL (768x576). A quality enhancement to full hd is thus not possibile, as the missing pixels need to be interpolated.
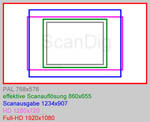
The pixel specifications can be illustrated more clearly using a diagram. The colored frames in the alongside image state the size of the respective format. The smalles imgage size is grey, matching the pal resolution. The effective resolution ascertained using our target is shown in green and the pixels generated by the scanner (1234x907) are blue. Lastly, there is the pink HD format and the red full HD format for the avi output. This chart illustrates, that for the output in full hd format, a considerable extrapolation is necessary. As you can see, this makes the full hd format pointless.
The Reflecta Super8 scanner yields an effective resolution matching approximately the PAL format. Both the HD ready and the full HD format cause for bloated files and thus therefore unreasonable.

Now we know the resolution the images are digitzed at. The avi files exported by CyberView S8 will always be HD ready or Full HD resolution, which as we eplained earlier, feature an aspect ratio of 16:9. To transform the original aspect ration of 4:3, two options are availble for scaling. As smiply stretching the film to the desired ratio would result in horrible distortion, the CyberView S8 Software makes use of a better method called Pillarbox. In this process, black beams are added left and right to the image. This method is well known from cinema films, which ofter use letterbox (beams above and below the image).
We now have a film with an aspect ratio of 4:3, which has grown to HD ready or Full HD and features 18fps or 24 fps. As the usual television breadcast features 25 or 50 whole images or 50 split images per second. This explains the 25p or 50p ("p" is for progressive and means whole images) or 50i ("i" is for interlaced). The conversion of frequency from 18fps to the necessary frequency happens on the TV or the Blueray-Player once the AVI file has been burned to DVD.
This is where the Pal speedup process comes in. A 2:2 pulldown is used to artificially increase the image frequency. A look at data sheets of modern TVs unveils that many devices work at a frequency of 50Hz or more. This means that the device is constantly performing such conversion with the TV image.
Another means of evaluating the image quality is the color rendition. To be fair, let us call it nostalgic. Since the LED light is interpreted as a halogen light after performing calibration, the film seems to have a rather warm tone. We recommend to refresh the colors in any case. To get an optimal color rendition, postproduction is vital.
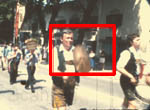
As a last means of evaluation, let us look at the sharpness of the images. It shall be noted that the sharpness largely depends on the film material itself. As we already described, not every substandard film yields sufficient resolution for a high-definition digitization. Besides, in-motion unsharpness has often been caused during capture as most films have been captured by amateurs and without the use of a tripod. The shutter speed of 18fps are not exactly benefitial in this regard. To see the actual resolution, click on the alongside picture. The demonstration correlates to the actual resolution. Look closely, and you will see the stripes on the blue skirt of the woman in the background. Even some of the granular film structure is visible when examining the house wall in the background. To us, this is perfectly adequate. But with some sharpening in post production, one will get even better results.
Color optimization of a digitized Super8 movie
Super8 movies always need to be reworked after digitization because the color rendition is rarely good enough. The color correction of a Super8 movie can be conducted at different points:
- during digitization
- before AVI export
- after AVI export
No matter which mehtod you choose, keep in mind that for accurate color rendition on the screen, monitor calibration is a must. That's why we absolutely recommend to perform a calibration using a display calibration tool.
If you perform a color correction on a Super8 film using an monitor display that has not been accurately calibrated, you might well end up with a bad result since you will be compensating the displays color deviation on top of the the movies colors. The result can be fatal.
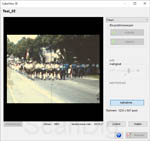
Lets start with the first option and optimize the film during digitization with the reflecta Super8 scanner. You have the option of using the Auto contrast function in the software as can be seen in the screenshot here. However, this will only have a minor impact on the color rendition and doees not yield the best result.
A second option of optimizing the colors using of a movie digitized using the reflecta Super8 scanner would be to process the individual jpeg files. This might sound very effortful regarding the multitude of scans held in one movie, but it can be expeditiously handled using custom action in Photoshop® batch processing.

Freeware programs such as IrfanView offer the possibility of batch processing images using automatic correction tools such as auto tonal value correction, auto color correction etc. Check out the animation to the side to get an overview of such possibilities offered by IrfanView.
This variant would mean an editing before assembling. With this method, you can easily reach outstanding individual results, no matter which image editing Program you use. For the best results, enhance the sharpness in the same step.
Last but not least, the classic option remains: editing the already exported AVI movie using a video editing program. You can handle your film just as you would handle any other video. The possibilities at your disposal largely depend on the program you use. There are freeware options and charged options in all price ranges. This approach has one key advantage: One can add sound all in one go (which you might want to do anyways, since the Super8 scanner cannot digitize sound).
Summary, conclusion
The Reflecta Super8 scanner is a solid, easy-to-handle device for digitizing old Super8 films. Image by image, the original film is photographed, then the resulting single images are then being assembled into a movie. As we showed in our resolution test, the scanner yields a digital movie, roughly equivalent to the PAL TV format. Since the film is being exported in HD ready or Full HD resolution, pixel-wise it is bloated.
The image quality of the Reflecta Super8 scanner is entirely sufficient for old Super8 films, but keep in mind that you ought to edit the colors of the digitized film if you want to obtain the best possible image quality. The scansoftware does offer some options for this purpose. A video editing program is the better choice, though.
One crucial limitation of the Reflecta Super8 scanner is the fact that soundtracks will be disregarded during digitization. Thus, the Reflecta Super8 scanner is dimensioned for silent film only and will make a silent film out of material featuring sound. Since the scanner will time and again skip single images during digitization, subsequent dubbing with an existent audio track is very tricky, as the lenght of the original sound track will then exceed the lengt of the digitized movie.
In this price range, the device is unrivalled. Existing alternatives are priced at a tenfold or even hundredfold.
Back to the film scanner tests index
|