The Image Processing Software IrfanView
IrfanView is a high-performance imgage processing program and viewer. Once installed, it starts automatically by double-clicking any image file in the windows explorer and offers numerous options for the view and processing of images. The possibilities offered by IrfanView are so abundant that a complete book could be filled with them. But the best of Irfan-View should be explicity mentioned: for private users, the program is free and can be downloaded from the known download pages on the internet and/or straight from the IrfanView-page www.irfanview.de free of charge.
Installation of IrfanView
The installation of IrfanView is very quick and easy. The only part where one has to pay attention is during the final dialogue in which IrfanView asks the user which file formats should be linked with IrfanView.
If one wants first to try IrfanView without any commitment, the best is not to choose any file format. If one wants to make IrfanView as one's standard viewer, a thing that I can only recommend, then one should choose all image and graphic formats. For example, by double clicking a JPG file, it is automatically opened, this is comfortable!
These adjustments, thus the file formats linked to IrfanView, can be modified afterwards in the menue configuration of IrfanView.
IrfanView as a Viewer
IrfanView is an image processing program and a viewer at the same time. If during the installation the common graphic formats are linked to IrfanView (see previous chapter), IrfanView will be started by simply double-clicking an image. These links can be also straight set in IrfanView by selecting the respective graphic formats in the configuration.
Menue Options → Menue item → File Card Extensions
Scrolling in an Image File
As a viewer, IrfanView does not get really comfortable until having an abundance of images in a file or a CD. For example, by opening with IrfanView the image Image_035.jpg, one gets easily to the next or to the previous image by clicking on the arrow keys or pressing the page down/page up keys. By this way it is very comfortable to scroll the images within a file.
Next image: Key → or ↓ or space bar
Previous image: key ← or ↑
Many times, the scanned images have a higher resolution than the screen. In order to be still able to see the full image, it is recommendable to do the respective adjustment in the Display Options:
Menue View → Menue item Display Options → Fit only big images to window
With this display option, the images that are smaller than the screen surface are shown in their original size; larger images are automatically scaled down but still kept as large as possible, respecting the original proportions.
Image Zooming
What would be a viewer without any good zoom functions? The enlarging and downsize of images can't be more easy than it is with IrfanView. By pressing the key +, the image is enlarged; the downsize is accomplished with the key -. In the menue bar, the current size is always shown. If this display disappears, the image is shown in its original size, that means that one pixel on the screen exactly equals one pixel of the image.
With the representation of the image in its original size, the sharpness with which the image has been shot/scanned ist best recognizable. The fastest way to represent an image in its original size is through a shortcut, but the original size is also soon obtained by the use of the zoom buttons + and - until the information of the zoom size disappears in the menue bar of the window.
Enlarge: Menue View → Zoon out | Shortcut: key +
Downsize: Menue View → Zoom in | Shortcut: Key -
Original size: Menue View → Original size | Shortcut: Key <Strg> + H
Image Presentation in Full Screen Mode
Those who really want to enjoy their images on screen or show them to their friends can rapidly change into the full screen mode by pressing the enter key while the image is opened. The screen gets then black and the opened image appears centrally on the black background. The scrolling forward and back in an image file works as usual. The full screen mode can be stopped by pressing the enter key or the escape key.
Menue view → Full Screen Mode
Shortcut: Key Enter
Next Image: Key → or ↓ or space bar or left mouse key
Previous image: Key ← or ↑ or right mouse key
The full screen mode is ideal to present quickly some images on the screen. The control with the mouse is very comfortable: through the left mouse key, one gets to the next image, and through the right mouse key one gets to the previous image.
Slide Show with IrfanView
Through the slide show in the full screen mode, one can generate a manually controlled slide show on the screen per keypress. But irfanview can also generate a full automatical slide show. In such a slide show one can for example adjust that every 3 seconds it is changed to the next picture, so that one can comfortably sit back and watch the slide show.
Menue File → Slideshow
Shortcut: Key W
A slide show is either started over the menue or over the key W. Then, a dialogue appears (see following illustration), in which one can choose the images for the slide show from different files. For the slide show, one can either introduce a fixed interval per each image or one can also switch manually to the next image. There are numerous possibilities to determine exactly the procedure of the slide show.
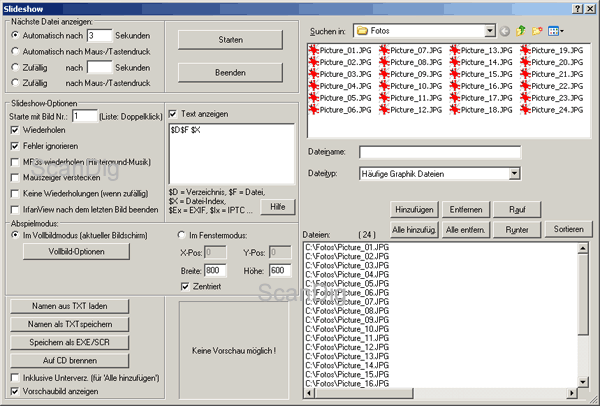
Normally, a slide show runs completely automatically, for example each 3 seconds the next image is showed. But one can intervene at any time in the slide show, for example by scrolling with the arrow keys one image forward or back. One can also scroll one image forward with the left mouse key and/or one image back with the right mouse key .
Image Information, EXIF-data, IPTC-data
Over the menue instruction Bild →, IrfanView provides information and/or through the key I some information about the currently opened image. In an information field, one can obtain all important image information as name of the image, path, graphic format, resolution, pixel measures and image size. The resolution in DPI can be also adjusted straight away.
Image information: Menue View → Information
Shortcut: key I
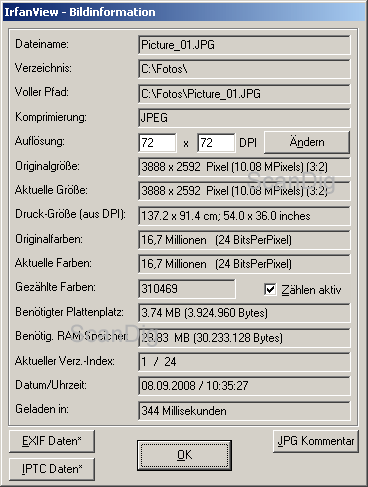
In the dialogue fields, the EXIF-data and the IPTC-data as also the JPG-comment is recallable or editable . The EXIF-data are straight generated by the camera and/or the scanner, the IPTC-data and the JPG-comment can be introduced by the user. Either the EXIF-data as also the IPTC-data are sraightly saved into the image file. The EXIF-data contain some information like camera model, resolution, date of issue, exposition adjustments, focal distance, etc. The IPTC-data contain some information about the picture as for example the copyright-owner, inage description, key words etc. The EXIF-data are only showed by IrfanView, the IPTC-data can be completely issued and/or modified in IrfanView. Therewith, IrfanView is also an editor of IPTC-data.
The big advantage in the dialogue of image information of IrfanView is that it is rapidly (by simply pressing the I - key) called up and the most important information of the loaded image is clearly shown.
Simple Instruction for the Image Processing
IrfanView offers some numerous simple and complex possibilities for the image processing. The simple image processing instructions flip or rotate the opened image. The more complex instructions apply some filters or some special effects on the image.
Horizontal Image Flip
Under an horizontal image flip one understands the image flip over at a vertical axis in the centre of the image. Said in more simple words: left turns to be right and the way around. The most comfortable way to flip an image horizontally is by simply presseng the H key.
Command: Menue Image → Horizontal Flip
Shortcut: H Key

Vertical Image Flip
Under a vertical image flip one understands the image flip over at a horizontal axis in the centre of the image. Said in more simple words: up turns to be down and the way around. The most comfortable way to flip an image vertically is by simply presseng the V key.
Command: Menü Bild → Vertical Flip
Shortcut: V Key
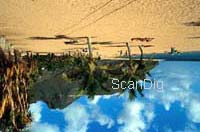
Image rotation to the Left or to the Right
Most of the times, the upright format images are scanned with filmscanners in the landscape format and have to be rotated afterwards. In most of the images it is immediately recognizable if the image has to be rotated to the left, thus against clockwise direction, or to the right, thus to clockwise direction. With IrfanView, the fastest way to rotate an image is by pressing the keys L (left) or R (right). A rotation to the right is also possible by simply pressing the L key for three times.
Command: Menue Image → Rotate Right / Rotate Left
Shortcut: R / L Keys
Changing Image Size
The maybe most simple image processing that can be made in an image is the modification of its size. How big is actually an image that is opened with IrfanView? By pressing the I key, one gets some extended information about the image that is currently opened.
Image Information: Menue Image → Information
Shortcut: I key
For the modification of the image size there is the respective menue item in the menue "Image". Here, one can introduce the desired image size, either in absolute values or as a percentage of the original image. What is important is that the checkbox Preserve aspect ratio is activated, as then the original image ratio is kept and there are no image distortions.
Menue Image → Menue item Resize/Resample
Shortcut: <Strg> + R
Image Cutout Release
It often occurs that from an image, only a small cutout is of interest. Thus, one wants to crop this part of the image. Therefore, one marks with the left mouse key a frame in order to determine the cutout of the image.
Command: Menue Edit → Crop Selection
Shortcut: <Strg> + Y
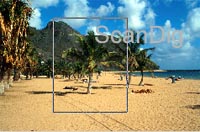
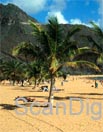
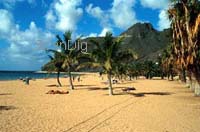
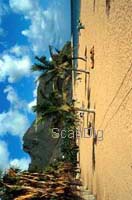
If the frame does not exactly match, it can be mnodified afterwards by moving the frame borders respectively. If the frame does match exactly, the image is cropped according to the frame by pressing the keys <Strg> + Y or by the respective menue command. In the adjoining example, from the whole image, the palm in the centre is cropped. The image of the right shows the result after the cropping, thus it is exactly the cutout that is within the frame in the image of the left.
Automatic Image Correction Functions
IrfanView offers a lot of powerful and automatic functions for the image correction. The automatic functions work very easily by pressing a key or a menue command; there must no laborious adjusments be made.
Auto-Correction
IrfanView has a very powerful function for the image correction named Auto-correction. it is about a similar function as the automatic tonal value correction of Photoshop®. As an example, there is in the following image at the left a tired cat that, late in the evening, lies on a cushion at a dark ambient light.


The photography is definetely much too dark and there is a lack of contrast. Typically, the cause for such a picture is a wrongly adjusted white balance in the camera or a much too weak exposition and/or the missing flash light. The auto-correction mearly makes a little miracle in this picture: the grey wall is converted to white, and from the cushion, some bright colours come out. Finally, the cat can be really appreciated.
Menue Image → Image Item Auto adjust colours
Shortcut: <Shift> + U
The automatic image correction is either called up over the menue "image" and the menue item "Auto adjust colours" or simply by the key combination <Shift> + U. In the case of many images, this auto-correction function leads to better images with a higher contrast; only in very few cases, this function is not adequate for the image optimization.
Batch Processing with IrfanView
IrfanView is an excellent and comfortable viewer. IrfanView is also a very good and easy to handle image processing program. But the absolute strong point of IrfanView is the batch processing of images.
We have seen above that it is a child's play to flip an image horizontally by simply pressing the H key. But if one wants to flip 100 images horizontally, one has to load 100 images, press 100 times the H key and save 100 times. For such appliances there is the automatic batch conversion of IrfanView that for example flips 100 images at once.
Batch mode: Menue File → Batch conversion/Rename
Shortcut: B Key
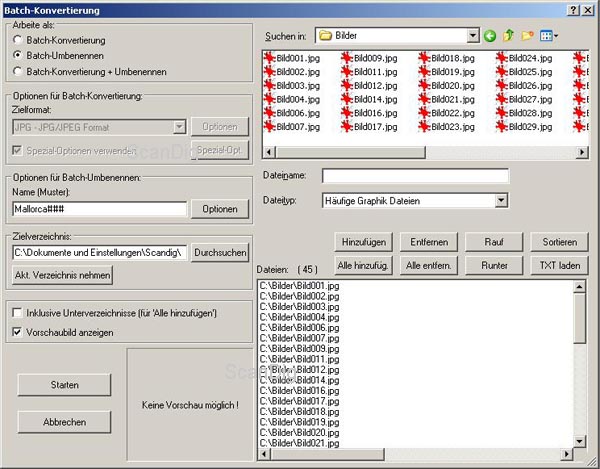
By starting the batch conversion of IrfanView, a big dialogue box opens in which numerous adjustments can be made. In the list field at the left there are those data files that have to be processed. At the upper left side, there is a small file browser from which all images can be put into the list field at the left. At the right lower side, one finally makes the adjustments that should be applied to all image files at the same time.
The possibilities of appliance of the automatic batch processing of IrfanView nearly offers infinite possibilities. In the following I describe some of the typical appliances into the detail.
File Renaming
In order to describe the renaming of a series of files, we suppose that we have 13 JPG-image files that are named as image001.jpg, image002.jpg, image003.jpg etc. But we want them to be named with such file names as Mallorca51.jpg, Mallorca52.jpg, Mallorca53.jpg etc. No problem with IrfanView!
First, one starts the batch-mode and adds the 13 JPG-files into the selection list at the left(see image above). Thus, these 13 files will be renamed in the following. Then, one determines a target directory in the right side, where the images should be after the renaming (thus, in the example above D:\Data\images\). In a third step, one clicks the radio button Batch-rename. And finally, one clicks at the very bottom on the options for renaming button.
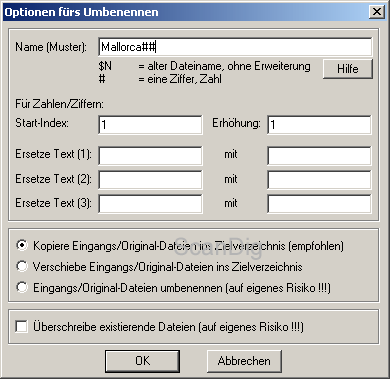
A small dialogue window is then opened in which one can introduce at the very top the desired name. In our example, it is Mallorca##. Both ## stand for two digits, as we want to obtain some file names as Mallorca51.jpg. With the start-index, one determines with which number the numeration should start, thus in our case 51. I recommend the beginners to choose the option copy entry files into the target directory during the first intents of the automatic renaming with IrfanView. For the case anything goes wrong, one has still the original files in the directory of origin. Now, all adjustments are made and the automatic renaming is started by pressing the start-button at the left upper side. That's it!
What I still want to mention is that with such a tool, one can not only rename automatically the image files. There is nothing to be said against renaming the Word-files by this way. Moreover I would like to mention that IrfanView always numbers the files consecutively. If, for example, one has three image files image001.jpg, image003.jpg und image004.jpg, one can simply renumber them with the text pattern Image### into image001.jpg, image002.jpg and image003.jpg.
Konversion from TIF to JPG
Many people let scan their images into the lossless TIF-format, but afterwards they want some smaller JPG-images for a screen presentation. Thus, each of the TIF-images have to be opened and saved again as a JPG-image. A prime case for IrfanView!
Exactly as it is the case of the renaming of the files, in the batch-mode, one first chooses the files to be converted and puts them into the left selective list. All these files will be converted in the following. In the text line target directory, one selects the directory in which the files should be saved after the conversion. Then one selects the radio-box batch-conversion.
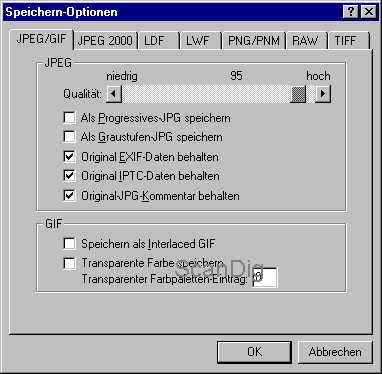
In the list field located underneath Target Format there is the select list of all possible graphic formats. Here, one chooses now the target format, in our case JPG - JPEG Format. The button Options beside the select list is important. Here, one chooses, for example in the case of JPGs, the quality of the files. The lower the quality, the stronger the file is compressed. Therewith, all adjustments are done and by pressing the Start-button, the automatic conversion of the data is started.
By this way, the image files of nearly any format can be converted. But one should keep in mind that a JPG-image that is compressed with losses can indeed be converted into a TIF- or BMP-Image, but the image quality of the resulting image can not withstand with the one of the original TIF-image.
Horizontal Image Flip
It oftenly occurs that one has scanned 100 slides and afterwards, one notices that all images are inverted. Either one has put the images wrongly into the scanner by mistake, made a wrong adjustment in the scanner or scanned intentionally the images invetedly, as there was no other possibility to put the slide frames or the filmstrips into the scanner. Many times, one notices by the text line of the images that they have to be flipped. This is not a problem for IrfanView, as with some clicks one can flip hundred, thousand or ten thousand images vertically or horizontally at once.
The basic procedure is the same as already described above: first, the files that have to be converted are put into the left selct list of the batch-mode window of IrfanView and one determines the target directory for the files to be converted. What is important is that the target directory differs from the original directory, as one should avoid the overwriting of the files.
Then, the radio-button batch-conversion must be activated and the desired target format has to be put into the lower select list. With the button options one can choose the saving options for the target format. Until know, everything is already known from the previous chapter.
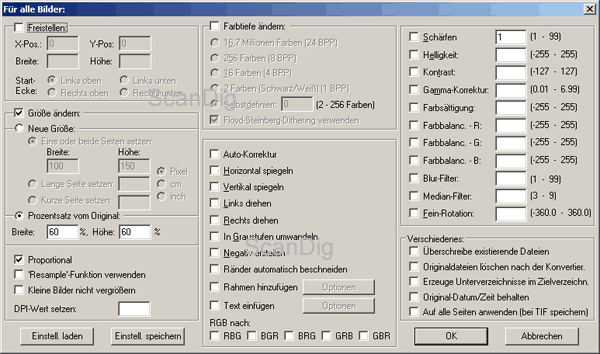
What is new now is the application of the special options. Therefore, one has to activate the respective checkbox and opens a dialogue box by clicking the button Special Options. In this dialogue, one finds at the upper right side a checkbox Horizontal Flip. This has to be activated, then the dialogue box has to be closed and the batch conversion is to be started by pressing the button Start. Now, all selected files are automatically flipped horizontally. It's as simple as that!
In the dialogue for special options there are numerous other possibilities for the conversion. The automatic vertical flip works analogically to the horizontal flip described above. It is also possible to select two options at the same time, as for example the horizontal and vertical flip, a thing that equals a rotation of 180°.
Image Rotation to the Left or to the Right
As known, filmscanners only have the landscape format, that means that the images have to be scanned edgewise and afterwards rotated by 90°. The procedure is exactly the same as the above mentioned horizontal flip of files.
During the batch-mode, all files that should be rotated are moved into the left list field. It is important to choose as a target directory a different one than the original directory. Then one chooses the mode Batch-Conversion and determines the target format (JPG, TIF etc.). Then, the control box Use Special Options is to be activated and the dialogue Special Options is opened if one clicks on the same named button. In this dialogue, one finds at the right side the options Rotate Left and Rotate Right.
Annotation: a 180°-rotation is not explicity offered in the special options. But one can obtain such a rotation by activating Horizontal Flip and Vertikal Flip simultaneously.
Automatic Change of Size
Normally, poeple do their scannings with very high resolutions in order to get the most out of the slide or the negative. As a result, one gets very large files that exceed the screen resolution multiple times. Moreover, as loading such kind of scanned files is highly time consuming, thus it would be desireable if one could scale down the images automatically for a screen presentation. This can also be done with IrfanView in the batch-mode:
In the batch-mode dialogue, one for example moves all image files of a directory into the left select list. As target directory, a different directory than the original one has to be chosen. Then the radio box Batch-Conversion is activated and the target format Format JPG - JPEG is adjusted. Then the control box use Special Options is activated and the button Special Optionsis to be clicked.
In the dialogue of special options, there is at the left side the option Change Size. Here, one can either introduce the desired size of the image straight away or introduce a percentage of the original one. What is Important is that the option Preserve aspect ratio is applied, as this is the only way the original propotions of the image are kept.
For example, in order to convert some big scanned files to the normal screen size, in the field width one puts a value of 1024 pixel (full screen width) and leaves the field for the height empty. By activating the control box Preserve aspect ratio, the images are proportionally reduced to the desired width. Of couse, by this way, image files can also be enlarged.
Colour Correction
By the same way it is possible to adjust the colours in IrfanView for each image individually, it is also possible to do the image manipulations for complete series of images automatically. Such proceedings are also possible in the dialogue for special options.
The colour depth can be changed, a colour image can be converted to an image in grey scales ar a negative can be converted to a positive. Also, all images can be made brighter, darker or with less contrast. With the colour balance values it is even possible to correct purposefully colour fogs. If, for example, a scanned series of images have a slight bluish cast, it can be recuced and/or modified for all images at once.
More Possibilities with IrfanView
As already said in the beginning, the possibilities with IrfanView are nearly infinite. And as IrfanView is permanently further developed, the features increase from version to version. The urge to discover and experiment is practically without limits.
I herewith would like to emphasize that IrfanView, despite its huge dimension of functions, stands out by the fact that the basic functions are of a rapid and comfortable use. Some other commercial programs, no matter from which area - could take an example from that.
Colour Management with IrfanView
I would like to point out here a limitation that concerns IrfanView: IrfanView has no colour management capabilities as for example Adobe® Photoshop® does. This means that the image files are always shown in the sRGB-colour space and that the colour profiles are not considered by the image files and devices. This is the reason why some images look different in IrfanView than in Photoshop®.
Back to the index software tests
|