Test Report Scanner Microtek ArtixScan F1
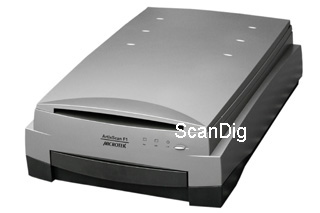
At the end of the year 2007, Microtek introduced the ArtixScan F1 as the successor of the ScanMaker i900 to the market. It is a flat bed scanner with autofocus, that with its structure - contrary to most of the other flat bed scanners with a simple transparency unit that is integrated in the cover - it is specialised in the digitalization of film material.
The so called E.D.I.T. Technology facilitates the scanning of films without any glass between the original and the CCD-sensor, a thing that can result in a considerable increase of the quality. As per the manufacturer's data, the ArtixScan F1 is focused on professional users as graphic artists, photographers and publishing companies. Out test report is supposed to demonstrate if the scanner can fulfil these requirements.
Equipment, Accessories and Performance Data of the Scanner
The giant package in which the Microtek ArtixScan F1 is delivered contains everything what is needed for scanning film material and reflective originals. Either an extensive software package as also several film adapters and connection cables are part of the scope of supply.
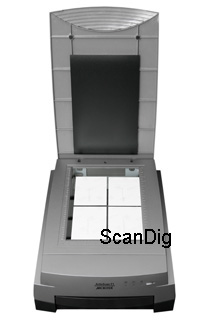
For the scanning of reflective originals (paper, photographies etc.), no further accessories are neccessary. As it is the case of all flat bed scanners, one opens the covering cap and puts the original with a maximum size of 21,6 x 35,6 cm on the glass surface in order to scan it. The cover cap can be also removed completely, so that also books or thick items can be put on the glass surface. Microtek declares an optical resolution of 4800 x 9600 ppi, thus useable 4800 x 4800 ppi. This resolution is completely sufficient for reflective originals. But the resolution in case of the digitalization of transparent originals is to be evaluated differently. If one wants to enlarge a small picture slide or small picture negative to 20x30 cm with the current resolution of 300 ppi, the original has to be scanned with at least 2500 ppi. We will come later on to the actual resolution (effective resolution).
The ArtixScan F1 disposes of a dust and scratch removal Digital ICE that is based on the hardware and therewith, it differs from the ArtixScan M1 that is available in the US and that is delivered without a correcting procedure due to some legal licensing reasons.
In the scope of delivery is a film adapter for four filmstrips of small image up to 6 images each, one of up to 12 framed small image slides, one for a medium format filmstrip with a length up to 22cm as also an adapter for two cut films sized 4x5 inch. For other film formats there is a glass plate in the package, on which, with the help of the also supplied vinyl adhesive strips, all flat transparent originals up to a size of 25,4 x 20,3 cm can be fixed. Therewith, the ArtixScan F1 is a real omnivore concerning transparent and reflective originals up to the mentioned sizes.
The Microtek ArtixScan F1 provides a maximum density of 4,2 and a colour depth of 48 bit. Thus, with the optical resolution of 4800 ppi one can expect some high quality scans. As additionally also the IT-8 calibration templates either on the film as also on the photo paper also belong to the scope of delivery, there are also true original colours and tonal value distributions to expect. With SilverFast Ai Studio, the currently best scan-software of the market is included in the scope of delivery.
The E.D.I.T. System works with glassless adapters that are put into the main adapter. This adapter is then pushed into the scanner underneath the glass plate for non-transparencies. The autofocus enables the exact focusing at the level of the original. To the contrary, most of the times, the scanners with a fixed focus level generate for example in the case that the originals do not lie completely planar or in the case of specially thick slide frames, some images that are out of focus due to the lack of depth of field, as they normally focus exactly on the glass surface.
What is also worth to mention is the possibility of operating the scanner in the network of windows so that several users can access to the scanner from their respective computers.
Installation and Starting Up
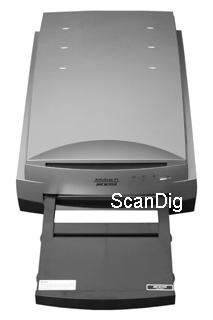
Once the ArtixScan F1 is released from its package, the size of the carton gets clear: compared to the other DIN A4 (21x29,7 cm) flat bed scanners, the scanner is a giant. With the measurements of 567mm x 385mm x 158mm, it needs relatively much space and with its weight of 12kg it also needs to stand on a stable table. There is also to consider some space of approximately 50 cm in front of the device, in order to pull and/or push the draw of the transparency unit.
During the unpackaging of the heavy package one finds a full collection of several parts, from film adapters to cables and CDs up to several instruction manuals and patterns of calibration. It is advantageous that Microtek attached a parts list, so that one can immediately check if all parts are really included in the package.
In the case of the ArtixScan F1, the adjusment of the hardware and the software is exemplarily documented. Thus, immediately after unpackaging, the yellow stickers/adhesive strips that are fixed at the respective parts and with which the first four steps are clearly marked immediately catch one's eye. They make clear that after unpackaging, first the software should be installed, then the transportation safety device of the scanner has to be unlocked with the help of a screw driver or a coin, and then one has to connect the device to the power supply system and per USB 2.0 to the computer.
During the software installation, the screen instructions lead to the whole installation procedure including the connection to the scanner. At the end of the installation, the software offers a small introduction into scanner basics. Only the silverFast-scansoftware has to be installed separately. This works without any problem, and after the final release of the serial number, this program is also ready to scan.
If one starts for the first time the scansoftware of Microtek, ScanWizard Pro, one is immediately advised that the scanner is not profiled yet and can straight execute the calibration over the Microtek ICC Profiler. Therefore, the LaserSoft Imaging-targets that are attached to the SilverFast software can be applied. Thus, for the configuration of the individual input profile, one can either use the Mikrotek ICC Profiler as also the IT-8 calibration function of LaserSoft Imaging that is integrated in SilverFast.
More information about SilverFast and of the IT-8 calibration is available on our SilverFast-Information Page.
The attached software
As already mentioned above, Microtek delivers the ArtixScan F1 with two scan programs: the in-house ScanWizard Pro and the renowed scansoftware SilverFast Ai Studio of the company LaserSoft Imaging.
At the beginning, the handling of the ScanWizards is a little unfamiliar. At first sight, the program's structure reminds on SilverFast. There is each one separate window for the different program elements as image settings, image preview and densitometer, as it is known from the professional software of LaserSoft Imaging. But the procedure does not run as smooth as it is the case with SilverFast, but it can be a matter of getting used. What is more serious are the differences in the image results - but we come later to this.
Beside the scansoftware itself and the Microtek Scanner ICC Profiler, there are some more programs in the package. Thus, one finds on the CDs also the media administration program Intervideo MediaOne Gallery, the OCR-software ABBY FineReader Sprint, and the Adobe® Arcobat Reader for reading PDF documents. Also the image processing software Adobe® Photoshop® Elements is included - but in the case of our test device, unfortunately only in the meanwhile dated version 3.0. Concerning the appealed target group of professional users, these software-additions are any how only to be considered as some nice gimmicks.
Most of the programs are included in versions either for Windows as also for MacOS X. Only the Intervideo MediaOne Gallery is only available for Windows and also the network functionality is not available to the Macintosh-user. The latter can result in an annoying deficiency for professionals, as they take the most benefit of it but often work with Apple Macintosh computers.
Scanning Reflective Originals
The Microtek ArtixScan F1 is indeed a flat bed scanner but its main appliance is still the digitalization of film material. In the case of the ArtixScan F1, the scanning of reflective originals is only to consider as an additional side appliance, and this task is also fulfilled as well by other devices that only cost a fraction of that what the ArtixScan costs.
The scanning of paper originals works in the usual way as it is usual of any flat bed scanner: position the original on the glass surface, close the cover, create a pre-view in the scanning program, determine the scan area, adjust the settings and scan. Paper originals, by which normally low resolutions are used, are scanned in an acceptable speed whereby there are clearly cheaper flat bed scanners with clearly higher speeds.
The batch processing can be adjusted, either with SilverFast as also with the ScanWizard and also for the scanning of transparent originals, so that several originals that match together on the scanning surface can be proceeded at once. Thereby, each of the scanning frames have to be set manually - the automatic image recognition is not available. This is annoying, as the cheap competing models as the Canon CanoScan 8800F disposes of this pleasant feature of the image recognition. There is nothing more comfortable than putting 5 paper photographies on the glass surface, let the scanner search for each of them and scan in the batch processing. It is a pity that such an expensive device as the ArtixScan F1 does not offer this comfortable function. But let us concentrate on the scanning of film material in the following chapter.
Scanning Transparent Originals (film material)
Now we come to the most important appliance of the Microtek ArtixScan F1: the digitalization of film material. In principle, it works as per the following way:
First, the film material to be scanned is implemented into one of the film adapters. This film adapter is put into the main adapter that is then pushed at the front part of the scanner into the device. The adapter, and therewith the film material are then located underneath the glass surface for the reflective originals. Thus, there is nothing except air between the original and the sensor. By this way, the quality is considerably increased, as the possible impurenesses of the screen are omitted and no newton rings can be formed that result by putting two flat surfaces on each other. Moreover, principally all mediums through which the scanning light gets through have a negative effect on the copy quality.
Therewith, this system offers, in combination with the autofocus, the best conditions for high-quality scans. Only for the scanning of other film formats as those for which the special adapters are provided, a glass plate has to be used. It has the same shape as the main adapter, and in the place of the cutout for the film adapters there is a glass plate on which the film material is positioned. In order to fix it on the glass plate, Microtek attachs 10 vinyl-adhesive stripes that stick on glass and other smooth surfaces, but can be also removed without any residues and also easily re-used. The glass plate is pushed into the scanner instead of the main adapter.
Scanning of Framed Small Image Slides
In every film adapter for slides sized 35mm, up to 12 framed slides of small image can be also inserted. They are fixed at the left and at the right by a small guiding rail. With the help of a spring mechanism of plastic, each slide is fixed. Either the inserting as also the removing of the slides works comfortably and without any problem. But I do not dare to say how long these plastic springs last. If one spring breaks, the complete adapter has to be replaced and/or one has respectively less slots for scanning.

As a beginner, one runs the risk of touching the film surface by inserting and/or removing the slides. This is why I recommend to use some cotton gloves in order to avoid some unwanted impurenesses and damages of the positives.
As the ArtixScan F1 has an autofocus, the thickness of the slide frames does not play any role. The slide adapter can take any standard frame. The thick frames do not fit any more underneath the small plastic plates that are located at the underside of each slot and protect the slide from gliding upwards. But this does not matter, as by this way, the spring remains more tensed, as it cannot push the slide backwards underneath the plates. But then one should take care of not turning the loaded slide adapter as otherwise the slides would fall off.
Once the film adapter is in the main adapter and the main adapter is in the scanner, after a pre-scan, the whole contence of the scan surface is visible. By drawing the scan frames, one can now determine one or several areas of scanning, and set the image configurations either for all together or for each one. Once satisfied, there is only the fine scan to start.
Scanning of Small Image Filmstrips
The filmstrip adapter for small images captures four filmstrips with up to six images each. The strips are fixed in position by one guiding rail on each side, so that they have to be pushed inside. As the rails run over the full length of the flimstrip-cutout, here, the risk of scratching is very high. Thus, caution is advised here!

But this system has the big advantage that also very curved and/or rolled film material is firmly fixed in position, and also the scanning of several short film pieces in one slot is possible without any problem. Specially by removing the filmstrip one inevitably touches the film surface, so that the usage of some cotton gloves is highly recommendable. With the cotton gloves, the filmstrips can be straight touched without causing some impurenesses and scratches. An also very helpful tool are some professional tweezers with flattened ends for the safe touching of filmstrips.
Here, one also gets with the pre-scan a full picture of the complete scanning area and it is possible to scan up to 24 images at once.
Scanning of Medium Format Filmstrips
In the filmstrip adapter for roll films of 120/220, a filmstrip up to 22cm length fits in. Respectively, four images of the format 4,5x6, three images of the format 6x6, two of the format 6x7 (in case of very narrow image spacings three images), 6x8 and 6x9 or one of the format 6x12 put at once. As here, the scanning frames are also manually adjusted, special formats as for example the 6x17 cm panorama-format can be also scanned - maximum up to 6x22 cm, as it is limited by the length of the film adapter.

Therewith, the Microtek ArtixScan F1 has a unique feature that is to scan medium format images of the size 6x12 cm or 6x17 cm without any glass. The professional medium format scanner Nikon Super Coolscan 9000ED can only process medium formats up to a size of 6x9 cm.
Contrary to the filmstrip adapter for small images, the film is here not put in position and fixed by some guiding rails. Here, a flap machanism is applied that is pushed ahead during the clapping and clicks in there. By putting the film at the very edge, at the side where the flap hinges are, thus it is put together with the cover in the right position during the closure. Thereby, the sides of the cover that are arranged with rubber at the undersides move outwards, so that the film is tensed. A very effective way to tighten the film material that is therewith kept as tightened as possible. Kudos from our page for this successful construction!
Scanning of 4x5inch Flat Films

The film adapter for films of a large format can hold two 4x5 inch flat films. Unfortunately, the films of a little smaller format 9x12cm cannot be applied. The Microtek ArtixScan F1 is, according to our knowledge, currently (Spring 2008) the only scanner below 1000 euro that can scan large format films sized 4x5" without any glass. Unfortunately, the glass-free scanning is limited on 4x5" films; for other large format films there is unfortunately no film adapter available, so that they have to be scanned with the help of a glass plate. It would be nice if the Mikrotek film adapter for other large formats was offered at least as an optional accessory.
The two slots have the same flap mechanism as the adapter for medium format filmstripes (see description in the previous chapter). During the closing and the therewith resulting pulling apart of the cover sides, the film is put in position and tightened thereby.
Scanning of other Film Formats
With the help of the glass plate, also other film formats as the ones described above can be digitalized. On the glas plate there is space for some flat and transparent originals up to a size of 25,4 x 20,3 cm. They can be fixed with the attached vinyl-adhesive stripes without leaving any remainings or also with all other kinds of adhesive stripes. Thus, therewith, the glass free scanning is not possible any more.
Thus, one will have to struggle apart from the unavoidable damages of the quality due to the glass plate also with the newton rings. These could be avoided by the wet scanning. But the glass plate is not structured for this: the high edges around the glass plate make the recording uncomfortable and laborious specially in the case of big formats, and in the cleavage between the glass and the border, some scanning liquid can get in that cannot be removed simply by washing it away.
Image Quality
The most important criterion of a film scanner is and remains the image quality. With its promising technical data and the focus on the professional use that is also reflected in the scan-software, the Microtek ArtixScan F1 arouses great expectations. We will see if it can fulfil them.
Let us start with the resolution: during a test with the USAF-testchart, the horizontal lines of the element 5.1 and the vertical lines of the element 5.4 can be barely distinguished. This results in a medium resolution of only almost 2000 ppi. This is a very weak value for a device of third price level. There are much cheaper filmscanners that also reach such a value or even exceed it. For 4x5inch films, the resolution might be sufficient in many cases but with the ArtixScan F1 the smaller film formats cannot be digitalized in a sufficient high resolution for strong enlargements without any losses of details. Thus, the scan of a small image slide with the highest resolution effectively barely provides 5 megapixels, a very weak value compared to other filmscanners. Most of the digital cameras provide more image information than this scanner.
Anyway, I have to say appreciatively that many flat bed scanners of the cheaper price level provide some effective resolutions in the range between 1000 dpi and 1600 dpi. Compared to other flat bed scanners, thus, the Microtek ArtixScan F1 provides an acceptable value with its 2000 dpi. But the similarly priced filmscanner Nikon Super Coolscan 5000 ED provides a resolution of 3900 dpi; in contrast, the Microtek ArtixScan F1 comes off badly.
Concerning the density range, the thing looks a little better. If one scans with SilverFast, the scans of the ArtixScan F1 have still relatively much details, either in the lights as also in the shadows. But the shades appear to be a little washed out - here, no clean tonal value separation takes place. The high-quality film scanners as for example the Nikon Super Coolscan 9000 provide the more defined shadow details. If one can handle a little the Photoshop® program, the problem can be removed by some few clicks. But the attached elements version of the image processing program due not really help due to the missing possibilities of correction - therefore, one of the full versions is needed.


The just described situation is only applied for scans with SilverFast. Microteks in-house scan-software ScanWizard Pro provides clearly worse results! The lights bloom out sooner and the dark shade portions drown. Thereby, ScanWizard Pro applies a much too strong definition on the whole image, so that the result clearly looks oversharped. This also applies despite an inactivated definition!
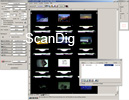
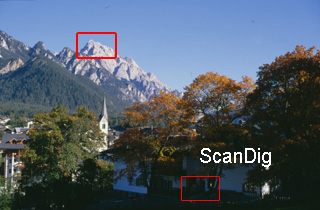
In order to make the difference clear, we have scanned the shown motif once with SilverFast Ai Studio and once with ScanWizard Pro. We have included the picture portions marked red of the picture above as 100% cutouts, so that by a click we can look at them in the original size. The opening picture changes any two seconds between the scan with SilverFast and the scan with ScanWizard, so that the differences are clearly visible.
If one additionally activates the ICE dust and scratch removal that is not available in SilverFast, the image result deteriorates again to a great extent. In the darker image portions there is no definition at all, and the image appears extremely blurred, whereby the with this software unavoidable and subsequent unsharp-mask that is much too strong also generates here some ugly edges.


With an activated ICE function, the fine details are practically not recognizable any more. The result seems as the dust and scratch removal would merely be accomplished by the software and with a very badly adjusted filter. There is nothing to notice of a correcting procedure based on the hardware with infrared ray. Here, we also added some 100% cut-outs in order to show the difference between the scan with the ICE and the scan without it.
Thus, in order to get some good results one should in any case make use of SilverFast that fortunately is included in the scope of delivery - Microtek will know why. As the supposed ICE function is anyhow useless, there is no reason to use ScanWizard.
The image quality of non-transparency scans is alright - there was nothing else to expect. In case of non-transparencies, the resolution of 2000 dpi will practically never be used, and also the range of density is sufficient for some normal photo copies. But the ICE dust and scratches corrector does here also not work any better. Fine details get lost and the shadows drown.
In summary there is to say that the image quality of the Microtek ArtixScan F1 is disappointing - also if it is scanned with SilverFast. It does not fulfil the high expectations that the supposed professional device arouses. Therefore, the resolution is much too low and also the range of density is not specially high.
Scan-Speed
For the detection of the following times of scanning, the scanner was connected by an USB 2.0 to a computer with a single-core pentium 3.2 GHz processor and 2GB memory.
As the ICE-function is not useful, we abstained from listing the scanning times with an activated dust and scratch corrector.
| Format / ResolutionR |
Positive-Scan |
Negative-Scan |
| Small Image 2400ppi |
1:31 min |
1:54 min |
| Small Image 4800ppi |
2:50 min |
3:31 min |
| 6x7cm 2400ppi |
2:24 min |
3:00 min |
| 4x5 inch 2400ppi |
5:15 min |
6:15 min |
| Reflective original 10x15cm 300ppi |
0:22 min |
- |
| Reflective original 10x15cm 600ppi |
0:32 min |
- |
| Reflective original DIN A4 (21x29,7cm) 300ppi |
0:25 min |
- |
| Reflective original DIN A4 (21x29,7cm) 600ppi |
0:44 min |
- |
As one can see, the ArtixScan F1 is not a sprinter. Before each scan procedure, thus also before the pre-scanning, the scanner accomplishes an initialization that takes more than 2 minutes in case of transparent originals. This can be very annoying, if, for example, one notices after the first pre-scanning that the original has to be moved a little and that one has to wait again two minutes for the next pre-view. In case of transparent originals, the pre-scan takes 2:20 min due to the long initializing phase, and in case of reflective originals 1:25 min.
For the sake of completeness there is still to mention that the scanning times of course considerably increase with an activated ICE-function. Thus, the scanning of a small image negative with 4800ppi takes instead of 1:54 min some long 3:25 min.
Resume, Conclusion
The Microtek ArtixScan F1 offers with its autofocus and the glass-less scanning of film material the best conditions for highest image quality. Unfortunately, these are not used: the much too low effective resolution and the relatively small range of density make this device for professional users which are the group of users Microtek actually focuses to, useless. Also the long initialization phase before each scanning is a very annoying factor.
There are partly much cheaper filmscanners on the market that provide some better results than the ArtixScan. By this way, even the practical details as the film adapter with a gripping mechanism for the film material do not help the ArtixScan F1 to get our purchase recommendation. The autofocus and the possibility of glass-less scanning of film material make the device much too expensive for the results it can provide. What a pity.
Filmscanner-Purchase
Visit our Filmscanner-Shop, the only shop in the internet that is specialised in filmscanners and accessories. We can provide you every filmscanner at a very attractive price and provide you also after the sales with accessories as film adapters or optional adapters.
Back to the index Filmscanner-test reports
|
)
)
)
)
)
)
)
)
)
)