Test report film scanner Reflecta x³-Scan: Detailed review
With the x³-Scan, Reflecta already introduced the third model of the x-Scan series into the market. The x³-Scan works, as its previous models, with a CMOS Sensor, that, differently to other filmscanners, photographs the image at once instead of scanning it line by line with a CCD sensor.
The Reflecta x3-scan has been replaced by its successor Reflecta x4-Scan in December 2009. The performance data barely differ from the previous models. Reflecta has expanded the x³-Scan with some new functions that make the device applicable independently from a PC. Now, with the integrated display, it is possible to view the inserted slide or negative immediately and save it in the integrated memory or in an optional SD-card. The device can even be connected to the TV so that one can view one's analog images straight at the big TV screen.
In the following test report we want to show if the Reflecta x³-Scan is a practical multifunctional device with which some good image results are achievable or if it is rather a toy with which it is possible to view the images.
Equipment, accessoires and performance data of the film scanner
In the scope of delivery of the Reflecta x³-Scan there is everything needed for the operation with the scanner. Thus, one finds in the small package beside the scanner itself a film adapter for up to three framed slides of small format and a film strip of up to 6 images. The included power supply has an USB-box so that the scanner can be straightly connected to the electricity net through the also included USB cable. Thus, the device can be operated without any separated electricity connection; once the device is connected to the PC it will be provided with electricity by it. Moreover, there is also a video cable for the connection to the tv or a video- and/or DVD recorder.
On the attached CD there is, as it was also the case in the previous model, the image processing and image vewing programe ArcSoft PhotoImpression 6. Beside this software, there is only one more driver for Windows 98 (by having all the new windows versions, one does not need an extra driver) as also DirectX 9 that is needed for the operation with PhotoImpression.
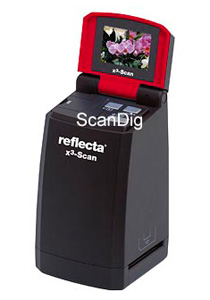
According to the producer's description, the scanning speed is for one image about one second, as it was the case of the previous models. Therewith, this mini-scanner would be 100 times faster than some of the professional filmscanners. Also the resolution of 1800ppi, a thing that results in approximately 5 megapixels in the case of a small format scan, has not changed. But the internal data depth is of 24 bits instead of 30 bits. This promises a higher dynamic range compared to the x-Scan and the x²-Scan. The automatic dust and scratches remover as ICE or iSRD is technically of course not possible. Thus, only according to the nominal data of the producer one cannot expect too much from the image quality of this device.
Regarding the connectivity there is unfortunately, compared to the previous models, a regression: while either the x-Scan as also the x²-Scan can be connected to the PC via USB 2.0, the x³-Scan only supports the old USB 1.1 standard. It is good that the USB-standard is downwards compatible, so that the device can be anyway connected to a PC through an USB 2.0 Port.
As it already was the case in the x²-Scan, in this case, there is also a small brush included in the package with which the sensor in the interior of the device can be carefully cleaned. It consists on a plastic holder with a material similar to microfibre at the end that is very soft and therewith very gentle to glass and absorbs dust lints or similar things. Due to its position, the sensor that is right under the orifice for the film holders, is hardly protected against the dust, so that the brush is oftenly needed to clean the sensor. This works perfectly with the brush and without damaging the glass.
A multilingual instruction manual is also included in the scope of delivery. But now we come to the big novations of the x³-Scan: the scanner is designed to be meployed independently from a computer. Thus, at the top side of the device there is a foldable LCD that being closed serves as a coverage and covers all the handling elements of the scanner. The display shows an image in real time that captures the CMOS sensor. Thus, the x³-Scan can be used as a slide viewer.

Here is also the big disadvantage of the x³-Scan: the scanner cannot be controled over he PC. The USB connection is only considered to transfer the images from the internal memory or the SD card (in this case, the device works as a card reader) to the PC. If with the previous models it was still possible to view the life-image of thew CMOS sensor with the twain-driver software on screen and make a snapshot of it - the "scan" - , this is not possible anymore in the case of the x³-Scan. Thus, the connection to the computer is only needed for the data transfer of the image data that already are filed in the internal memory or in the inserted SD card.
The internal memory of the x³-Scan is of 32 MB. With the optionally available SD-cards it can be expanded practically at will.
At the back side, one finds, beside the USB connection a 2,5mm sized jack plug over which the scanner can be connected per phono plug with the attached cable at the other end with the TV or another device with the video-input. Thereby, the images can be viewed, instead of on the small integrated also on a big TV screen.
Installation and starting up
With the Reflecta x³-Scan, one can immediately start to scan without having to install anything. First, the scanner has to be connected through the USB cable that is included in the scope of delivery with the power supply and then it is connected to the network. By opening the coverage, a red LED lamp signalizes the operational readyness of the device.The display immediately shows the live-image of the CMOS sensor, that can be saved by a simple click on the start button. The LCD that is integrated in the coverage serves as a power control: if it is closed, the scanner is off, by opening the coverage, the device is automatically started.
At the PC, there is not much to install for the x³-Scan, as the scanner, as mentioned, is designed as a stand-alone solution. By inserting the attached CD, an installation window appears that enables the user to install three different components: the software of PhotoImpression, DirectX 9 and a driver for Windows 98. Thus, the latter is only needed for Windows 98, as here there is still no driver integrated for the USB mass storage devices. Also DirectX 9 only needs to be installed if the system is not at the current status.
In order to install all the three components, only the instructions on screen have to be followed that guide the user through the process. There are no problems in this concern. By connecting the x³-Scan to the PC and closing the LCD, the system immediately is recognizing immediately as a new drive. One can access it the way it is usually done for example from a USB-stick, an external hard disc or a memory card.
The insertion for the SD card is located sidely at the upper side of the device beside the three control elements. If one wants to save into the SD card instead of the internal memory, after inserting the card, one first has to open and close the display so that the card is recognized by the device. The internal memory is then deactivated and one only can access the SD card.
Scanning slides and negatives
In order to scan the x³-Scan, first, one first has to adjust in the menu that one does not want to scan a negative but a slide. The menu is opened by pressing the function button that is double assigned as it is the case in all the buttons of the device. Here, one has to select the film symbol and then one can choose between a negative film in black and white, a coloured negative film and a slide film. once the configuration of the slide is selected, it has to be confirmed by pressing again the function button and then one is again in the scan modus automatically.
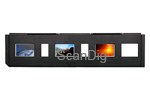
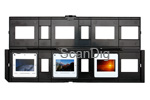
Now, the slides still have to be inserted in the respective film holder. Therefore, one has to open the construction that is not of a very valuable apprearance at the longitudinal side and put the slides true sided, thus the way they are viewed, and close again the adapter. This can be then inserted into the scanner from the right. This does not work from the other side, the film holders can be only inserted from the right to the left through the scanner. the right direction is marked by some arrows on the film adapter and on the device itself.
On the display the image that is captured by the sensor is visibe in real time. This means that it is also visible how the film adapter is moved. Beside the adjusted type of film shown at the upper left side, at the right of the lower side it is shown on the display how many images one has already saved and how many still can be saved in the used memory. The internal memory has a capacity of 56 images.
The film holders are provided with some index marks, so that they always catch when they are in the right position, thus when the image is located completely at the front of the sensor. If, during the sliding of the film holder it arrives at a list item, it cannot be moved back anymore. If one wants to save the image that is currently visible on the display, pressing the start button is enough. In one second, the image is either saved in the internal memory or on the inserted SD card.
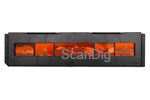
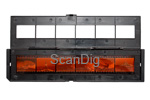
The scanning of the negatives does not differ form the scanning of slides. one only has to configurate the film type before scanning. Also the film adapter for film strips is provided with some index maks and catches at the right positions.
If one prefers to control the device over the TV, the x³-Scan must be connected with the provided video cable at the Line-In of the TV. Now, the same image is not anymore visible on the integrated display but on the TV screen. In the menu one simply has to configurate if the video signal should be emited in the European PAL-standard or in the american NTSC-standard.
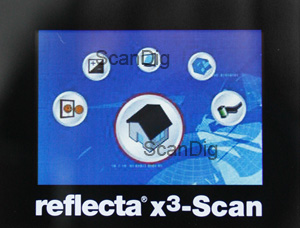
Beside the selection of the film type and the video standard there are more functions that can be called up. Thus, there is the possibility to configurate the image brightness. It can be corrected in 1/2 steps from -2EV to +2EV. There is also a function for (Drehung und Spiegelung) of the images as also a function for (Formatierung) of the memory.
A very important (Einschränkung) in the habdling of the x³-Scan is hat the scanner only works as a stand-alone device: if the scanner is not connected to the power net but to the PC it is not possible to work with it. All functions and even the display are inactivated. Connected to a PC, the x³-Scan can be only used as a memory and/or as a card reader. In order to scan with it or to view the images, the device has to be separated from the PC and be connected to the power supply. Thus, the feature to be able to use the scanner independently from the PC is not an option but the only possibility to use it.
Viewing the saved images
With the Reflecta x³-Scan it is of course possible to view the images afterwards, either over the integrated LCD or a TV.
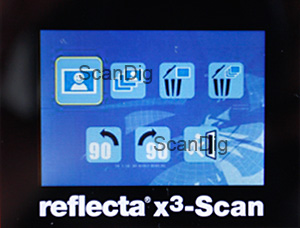
In order to view the saved images, one has to switch to the playback modus by pressing the repeat button. The last saved image immediately appears on the display and one can scroll through all the saved images. After switching from one image to another, the image information is shown for approximately two minutes: image number, image size and the adjusted value of the correction of the disposition.
The play back modus has an own menu over which the following functions can be called up: it is possible to change between the viewing of single images (that starts automatically by switching to the play-back-modus) to the slide show that shows all saves images subsequently for approximately five seconds. It is possible to delete the images individually or all at once and each of the images can be turned to the left or the right in stages of 90°.
The provided software
As described above, the software equipment of the Reflecta x³-Scan is limited to the PhotoImpression 6 from ArcSoft. It is a small but nice tool for administering, viewing and processing of digital images. It is possible to issue some slide shows with or without background music, images can be turned, sorted, printed, sent as an email, renamed and converted in the batch modus, add frames and cliparts to the images and make some simple image processings.
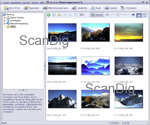
The image processing function that are therefore provided are subdivided into several groups. Under "Adapting", one finds some tools as for example the adjustment of brightness, contrast and sharpness, colour corrections, the automatic or manual correction of red eyes and the cutting and stageless turning of images.
The tool group "Retouching" includes the tools healing brush, clone stamp, illuminate/darken, sharpening and soft-focus effect, and all of them can be adjusted in the size of the brush and in the intensity. Moreover, there is a paint brush, a function for drawing some lines and an eraser. Under the group "clipboard" there are some optional tools with which one can mark some parts of the image, copy them into the clipboard and reinsert them from there into any other image.
ArcSoft PhotoImpression 6 is of a simple handling ad it is very funny to beef one's images up with this software.
Image quality
Actually, the most important criterion of a scanner is the achievable image quality. But in case of a device as the x³-Scan, this regresses a little. Finally, it is - and this is even more true in the new model than in the previous ones - not designed for the archiving of high quality and valuable originals. Nevertheless, the image quality of such a device must be good enough to be able to at least being able to view them properly on screen, specially because the device with the TV-output is oftenly connected to very big TVs.
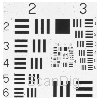
Lets start with the resolution. During a test with the USAF-testchart, the horizontal and the vertical elements of the element 4.4 can be barely distinguished. This results in a resolution of approximately 1150ppi. Therewith, the resolution is, compared with the previous model, a little lower: the x²-Scan achieved approximately 1300ppi and the older x-Scan even 1500ppi. It is very unusual that the previous models of a series achieve an increasing lower resolution as the respective previous models and, according to my opinion, not understandable. With 1150ppi, the x³-Scan only achieves about 64% of the nominal resolution. If a small format slide on a small format negative is scanned with an effective value of 1150 dpi, the resulting image files are of approximately 1,8 megapixels. Today, images with such less megapixels are only produced by some mobile phone cams and very old digital cameras. If one considers that a high quality slide or negative contains approximately 20 millions megapixels, not even 10% of the original image informations are obtainable. Therefrom it gets noticeable that with the Reflecta x3Scan, no films can be archived but maximally digitalized for the quick viewing.
Additionally, the device treats the images with a much too strong sharpening so that the edges of the images appear to be very rough and unnatural. With such an exaggerated sharpening it has been tried to hide the low resolution and this is a thing that does not work. This trick might work on the small integrated LCD, but already on a small tv, the image looks terribly sharp-edged.
But there are good news concerning the image quality: due to the increase of the internal data depth, the density actually also increased in the practice. In the bright areas and the shades there are more details visible than it was the case in the previous models. But unfortunately, this is not really helpful due to the terrible image quality.
Scanning speed
The scan of a slide or a negative takes, as promised by the producer, only approximately a second. As the data are not immediately trasferred to the PC, there is also no additional time added yet.
Only when the desired slides and/or negatives are scanned, the data can be loaded on the hard disc of the PC. By having stored the images in the internal memory of the x³-Scan, one is obliged to connect the device straight to the PC.. The transfer speed is then respectively low due to the USB 1.1 standard. If, to the contrary, one has inserted a SD card into the scanner and saved the data on it, the card can be introduced into a card reader that is connected to the PC or integrated and transfer the data with it. Then, given the case, one has the fast data transfer of the USB 2.0.
As the images are only saved as JPG-data and each is if the size of only about 750 KB, the speed of the data transfer is only important if one has scanned a lot of images. If for example one has scanned only 10 slides, these are rapidly transferred to the computer despite of the USB 1.1.
Resume, conclusion
As it was to expect, the Reflecta x³-Scan is not suitable for the demanding archive of one's valuable collection of slides and negatives. Both previous models were designed to bring the slides and negatives rapidly to the computer in a modest quality in order to send a picture to friends or to issue a web album. But the x³-Scan is also not really apt for this usage, as the data can be only brought to the computer hard disc in a complicated way, that is, via an extra data transfer.
One application for which the x³-Scan seems to be apt is the connection to a TV so that one can view the slides enlarged on a big screen. By this way, one can view the old slides with friends or the family without having to take the proyector and the screen out from the cellar and assemble it. Unfortunately, already for this function, the image quality is not sufficient. The images only look good on the internal display - but on a LCD with only 6 cm screen size, it is also not really fun.
Another possibility to use the device that is explicity advertised by the producer is the saving of the images on the SD card for the straight transmission of the images into a digital frame. One can also view the old slide or negative collection and save those images that one wants to be shown on screen on the SD card by pressing the button. Once finished, one simply takes the card out of the device and puts it into the digital frame - ready.
Filmscanner purchase
Visit our Filmscanner-Shop, the only shop on the internet that is specialised on film scanner and accessoires. We can provide you every filmscanner to a very attractive price and can also provide you with accessoires as film holders and optional adapters during the after buy period.
Back to the film scanner tests index
|