Test report CMOS-scanner Reflecta ImageBox
Keeping the tradition of the x-Scan film scanner series, with ImageBox, Reflecta introduced another scanner into the market that does not scan the photos as the common scanners with a CCD-sensor line by line but photographs them with a livebild CMOS-sensor.
Differently to the x-Scan devices, the ImageBox can ditalize beside the 35mm film material also non-transparent materials up to a size of 10x15 cm. Thus, Reflecta has put the x-Scan into a bigger case, built in a transparency unit and modified the sensor unit in such a way that also the non-transparency area can be captured. The result is a quite voluminous plastic case - as the image is practically photographed, there must be enough space between the template and the sensor in order to secure the right distance for the focus of the optical elements. The Reflecta ImageBox is the first film scanner that can also digitalize some paper templates; the way around that is a flat bed scanner capable to process also film material already exists since long ago.
As principally, it is the same technique as in the case of the x-Scans, we assume that the modest image quality has not improved very much. The following test report will show if this assumption will be confirmed and how the handling of a transparent and specially the now possible non-transparent material is.
Equipment, complements and performance data of the scanner
In the scope of delivery of the Reflecta ImageBox there is everything needed in order to start immediately with the scanning: beside the scanner itself there is in the box in which the device is delivered a film adapter for each up to four framed 35mm-slides and for film strips for up to a length of six pictures and also an image holder with some adjustable magnetic supports for the paper photos. In the attached DVD there is the TWAIN-driver, the image processing program Adobe® Photoshop® Elements 5.0, and the user manual which is laudably also available in print form in German language as also in five other languages. Last but not least, there is also the USB-cable with which the device is connected to the computer and provides it with power simultaneously.
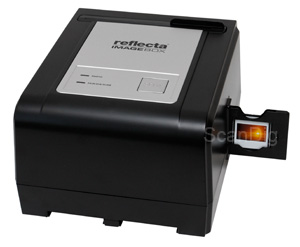
The user panel is located at the upper part of the ImageBox. Respetively to the range of functions of the scanner, the panel only consists on three elements: the big scan botton as also a blue LED for the display of each of the adjusted type of template (Photo and/or. Film/Slide). At the lower part of the device there are two insertion shafts for the storage of the film adapters when they are out of use.
As it is already the case of the x-Scans, the scanning time is, according to the producerīs statement, one second. This also applies to the non-transparent materials. Therewith, concerning the velocity, the scanner is worlds better than every normal film- and flat bed scanner that scans the template line by line. The performance data for the scans of transparent materials correspond to the ones of the x³-Scan: a 1800dpi scan resolution with a colour depth of 24Bit and a maximum density of 3.0 Dmax. Paper images are scanned with a resolution of 400dpi. This is sufficient for most of the non-transparent templates.
What applies for the x-Scan models also does for the ImageBox: The technical data of the producer do not make a professional quality to expect. By scanning a realistic image area with the maximal optical resolution of 1800dpi declared by the producer, approximately 4 megapixels remain. A scan of a non-transparency with a template size of 10x15cm with 400dpi results in an image file of approximately 3,7 megapixels. The maximum density of 3,0 Dmax results in a range of density of approximately 2,5; this is much too less in order to exploit the details in the shadows and the lights. And an automatic dust and scratch correction as ICE or iSRD is of course also not possible due to technical reasons. Thus, only due to the nominal data of the producer one cannot have much too high expectations in the image quality of the device.
Thus, the ImageBox is also not a scanner for the professional archiving of slides or negatives but rather a device to get quickly the images into the PC in an easy way in order to, for example, view them at the computer or send them per email. But for the price indicated there is also no professional device to expect.
Installation and starting up
The installation of the ImageBox does not differ from the installation of most of the other USB-devices: First, one installs the software and connects then the scanner to the computer. As the scan software is exclusively available as TWAIN-driver, if necessary, first the Photoshop® Elements software that is also included in the scope of delivery must be installed. But if one has already installed another TWAIN-compatible image processing program in the computer, one can, if wanted, abstain from installing Photoshop® Elements on the computer. The installation of both programes is easily accomplished over the installation menu that opens as soon as the DVD is put into the drive.
Once eveything is installed, the scanner is simply connected to the computer per USB 2.0. Now, one can, for example, start the TWAIN-driver over the Import-menu of Photoshop® Elements. During the first start up, the scanner is calibrated. Before the calibration, a warning message appears on the screen advising that there must be no template in the computer as otherwise the calibration does not work in good order. But if needed, the calibration can be repeated as much times as wanted by simply pressing the calibration button in the scan software. Now it can be started to scan.
Scanning framed slides
For the scanning of slides, a slide adapter is attached. This adapter can take up to four framed 35mm slides at once. Contrary to the film adapters of the xScan-models, the slide adapter does not work anymore by a folding mechanism but takes the slides in from some insertion orifices at the top. Thereby, the slides are kept in position by some plastic springs at the sides. All together, the slide adapter makes a valuable impression. Due to its design, one is not limited by the thickness of the frame: All common slide frames with a thickness up to 3 mm can be inserted without any problem.
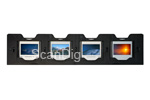
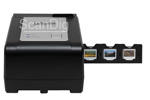
The loaded slide adapter is pushed on edge from the right into the scanner. The adapter is removed at the left side. It is possible to move the film adapter within the device in both directions, so that it is possible to move back an adapter that has been pushed too far without having to push it through, remove it and reinsert from the other side. The adapter is kept in position by some dots so that it always snaps in exactly in front of the sensor. In order to have a more comfortable workflow, we recommend to purchase a second Slide Adapter that can be loaded while the other is still in the scanner.
For scanning, one clicks in the file-menu on Photoshop® Elements 5.0 on the menu option Import, and chooses then CyberView CS - ImageBox. The scan software immediately shows the image captured buy the camera. For the slide scans, one has to choose the template Film overneath the prevision image and then activate the film type Positive underneath the preview image. By clicking on the scan-button in the software or by pressing the print key of the device, the live-image of the sensor shown in the image display is transferred to the image processing software in its full resolution.
As we will still precisely describe in the following chapter Image Quality, the scanner does not have any hardware-based dust and scratch correction so that the dust particles, fluffs and scratches on the film surface are scanned 1:1 and therewith are clearly visible on the resulting scan. There is nothing to do against the scratches but retouching them afterwards. It is possible to blast away most of the dust from the slide by means of a Air Compressed Spray, a thing we herewith highly recommend.
Scanning film strips
The film strip adapter can take some strips of a length up to six images. Therefore, one opens the adapter, positions the film strip in a way that its bars are congruently laying on the bars of the film adapter and closes it. Fortunately, also the film strip adapter makes a very good impression.
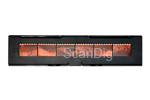
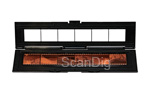
Differently to the film adapters of the Reflecta xScan-series, the film strip adapter of the ImageBox does not have any guide pins that catch the perforation of the film strip and fix it at the right position. This makes the insertion of the film strips, specially in case they are curved or bent, a little more uncomfortable. One has to fix the film strip somehow with the hand during closing the adapter so that it does not slip away and the pins of the adapter do not match anymore to the ones on the film strip. In case of a single and plain film strip this is more or less possible, but in case of waved film strips or several short film pieces, this can result into an annoying fiddling. Wearing some Cotton Gloves is very recommendable during the insertion of the film material so that one can firmly hold the film strips without damaging them.
Also for the scanning of the film strips it is very recommendable to purchase a second Film Adapter so that one can load one film adapter while the images of the second one are scanned in the scanner, in order to have a more comfortable workflow. The procedure of the scanning of film strips does not differ from the scanning of the framed slides. If one wants to digitalize some negatives, one has only to choose the film type Negative and/or Black and White and then one already sees the positive image in the preview that, after clicking on the scan-button, is transferred to the image processing software.
Scanning non-transparent documents
The scanning of non-transparent documents as paper images is as easy as the scanning of film material. Put the template into the adapter - the software shows a live-image of the image area captured by the sensor - and by clicking on the scan-button, it transfers a still image with 400 dpi to the image processing software.
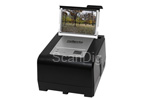
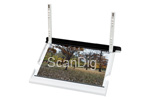
Differently to the flat bed scanners, the ImageBox also has a holder for the non-transparent documents of a very smart construction: the holder consists on a white plate on which a template sized up to 10x15 cm is fixed by means of adjustable magnetic cover strips. This fixation is indispensable, as also the holder for non-transparent documents is inserted into the scanner on edge - but from above, not sidewards.
The insertion of the template into the holder is very easy: One puts on the image at the lower edge that is a little elevated, pushes both cover strips together up to the side edges of the image and folds them down to the bottom where they are magnetically fixed. The disadvantage of this construction is that one can always scan only one template, even though it is small enough that several of them would have space on the holder.
Of course, it is possible to avoid this circumstance by fixing the templates with adhesive strips. But this makes then the matter very laborious, considering one would have then to cut out the image afterwards, as the scan software does not permit any manual determination of the scan area by means of a scanning frame, let alone the opening of several scanning frames - basically, the whole image area is scanned. In case of non-transparent documents, only an automatic cutting can be activated.
What is appliable for the slides and the negatives is also appliable for the digitalization of the paper images: the dust and the fluffs that are laying on the paper foto are digitalized 1:1. As the scanner does not have any dust correction based on the hardware, one should always clean the paper documents before the scanning. This is for example possible by simply blasting the dust away with an Air Compressed Spray but also by brushing it away with an Airbrush or by carefully brushing it off with an Antistatic brush.
The provided software
The software equipment of ImageBox is limited to the TWAIN-driver software CyberView CS and the image processing software Adobe® Photoshop® Elements in the version 5 that is not up to date anymore. The surface of CyberView CS is very simply structured. Even though one might never have handled a scanner, this software is not a mistery to the user: During the scanning, one practically does not have to make any adjustments except the choice of the type of the template, and the surface of the TWAIN-software is very clear. The live-preview image takes a major part of the program window of the sensor. On top of it at the left, one chooses over two buttons whether one wants to digitalize a paper image or some film material, at the right at the top there is the Demo-button over which a quickstart-instruction is displayed and with the info-button, the software-version is shown.
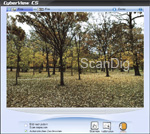
The film type can be adjusted underneath the preview-image: One can choose between Positive, Negative, and Black/White. Thus, for the scanning of slides one chooses here Positive respectively. By clicking on the scan-button right beside the film type selection, a still image with 1800 dpi of the image captured by the sensor is generated that is then straightly transferred to the image processing program. The scan-button of the device located on the top does accomplish the same function.
Over the Calibration-button, the calibration of the light source and the sensor that is automatically executed during the first start up is manually initiated, and by clicking on the exit-button at the very right, the scan program is finished. At the left of the film type selection there is a checkbox where one can determine by a checkmark if the image should be manually adapted right after the scanning.
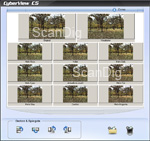
Once the option is activated, a window opens up after the scanning in which the colour and the brightness of the scanned image can be adapted and where the image can be rotated and/or reflected. The upper area shows a before-after view of the image while in the lower area one can adjust the colour and brightness over some small preview-thumbnails. Thereunder there are at the left side some button for rotating and reflecting the image while with both buttons at the right the modifications can be confirmed or rejected. By clicking on the confirmation-button, the modified image is transferred into the image processing program. But it is just this program (thus the Photoshop® Elements program that is normally attached) with which the corrections can be adjusted more specificly and finer, so that it is recommendable to accomplish the corrections preferrably with this program, specially due to the reason that after the scanning, the image is anyway loaded straight away into the image processing program. As the correction over CyberView CS is only a posterior correction of the finished image, there is actually no reason to accomplish it with the scan software.
Adobe® Photoshop® Elements is a widely spread image processing software of a high quality. As a clearly reduced version of the full versions of Photoshop®, it offers a fully sufficient range of functions to the home user. Unfortunately, the software is attached to ImageBox in the version 5 that is not up to date anymore.
The image quality Reflecta ImageBox
As from a technical view, the ImageBox is a X2-Scan that is expanded by the possibility of scanning non-transparent documents, one cannot expect that the image quality of the film material considerably differs from the results of the xScan-models. But we want to know it exactly.
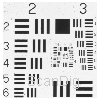
Thus, let us first look at the achievable effective resolution: In a scan of an USAF-test chart, the horizontal and the vertical lines of the elements 4.6 can be bearely differentiated. According to our Resolution table, this results in an effective resolution of approximately 1450ppi. This is barely 81% of the nominal resolution of 1800 ppi. By this way, in case of a scan of 35mm one obtains an image file with effective 3 megapixels. This is of course less than any common digital camera provides. Thus, as expected, the resolution value is on the xScan-level. Some good film scanners achieve some resolutions in the range between 10 and 20 megapixels in case of a 35mm format. Due to the low resolution it gets already clear that the Reflecta ImageBox is not apt for archiving slides and negatives, as during the scan, too much image information remains unconsidered.
For the ImageBox, Reflecta declares a maximum density of 3,0, so that the range of density is of approximately 2,5. This value is much too low in order to scan film material in a very good quality. Some good film scanners have a range of density that is 10 to 100 times bigger. This is also prooved in practice: during the scanning of slides and negatives, the reduced range of density is very noticeable. In very dark and very bright image areas, there are almost no details recognizable as at such spots, the scanned image is simply white and/or black. Thus, in this case, the image information contained in the film gets lost.
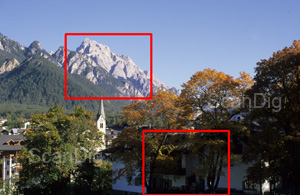
We want to visualize this circumstance by means of a scan of the exemplary image shown at the left: By clicking on one of the two thumbnails thereunder, the respective image cutout marked in red opens up to its original size. Then, the opened images switches any three seconds between the scan of the ImageBox and a scan with the Nikon Super CoolScan 5000 (Nikon LS-5000). The Nikon Super CoolScan 5000 is a high-end-scanner that we use within our Scan Service. We of course do not intent the straight comparison of a Reflecta ImageBox with a Nikon LS-5000; the class- and price differences are much too massive between these both devices. The comparison is only supposed to show the image information that is actually contained in such a slide and which share the Reflecta ImageBox exploits of it.

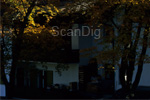
It is clearly visible that the scan of the ImageBox barely shows some drawing in the light- and shadow areas, although they exist in the slide. Also the achievable image sharpness can be well evaluated by means of the 100%-crops. While the outcut of the Nikon-scan of the dark image area and in the far located trees in the outcut with the bright image area offers many recognizable details in the leaves, the scan made with the ImageBox apperasr to be very faded and unsharp - although both scans have been accomplished with a resolution of 1800dpi.
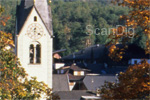
In order to demonstrate how the low resolution of the ImageBox effects compared to the high resolution of the LS-5000, we have digitalized the above shown test slide with both scanners and also in the respective highest optical resolution: Thus, in case of the ImageBox with 1800dpi and in case of the LS-5000 with 4000dpi. The adjacent image shows another amplification of an outcut of this slide that also switches any three seconds between the results of these both scanners. As you can see, in case of the digitalization with the ImageBox, the image shows an extremely high loss of the details. The fine structures cannot be differentiated anymore. By such an example it gets clear that the Reflecta ImageBox is not a film scanner for the permanent archive of slides but only a device to bring one or two slides quickly into the computer in order to, for example, insert it into a website or send it to friends.
Moreover, in colour and brightness gradients, specially in the dark image areas, some very disturbing discontinuities of hue appear that convert the gradients in rather ugly and rough colour graduations. You can recognize this effect very well in the above shown outcut amplification of the shadow areas at the walls of the building.
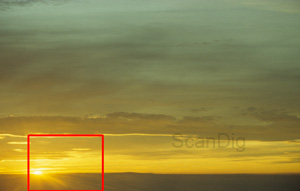

The lack of a hardware-based dust and scratch correction in case of the Reflecta ImageBox is system-related and of course has a negative effect on the image quality. The adjacent image shows the scan of a slide with a wildly-romantic sunset. By looking at the small image beside it, one sees an amplification of the outcut of the red marked area in original size. This shows that in case of a scan with ImageBox, in contrast to the scan with a hardware-based automatic dust and scratch correction (Nikon-scanner) there are many disturbing dust particles and fluffs visible on the picture. The posterior retushing of these many dust spots with Adobe® Photoshop® Elements is a very laborious matter that never leads to the results provided by the scanners with an infrared-based dust and scratch correction.
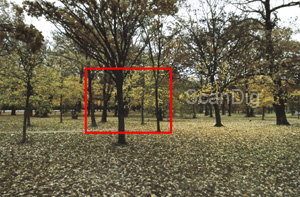

How is the quality in case of a scan of a non-transparent document? In this concern, ImageBox also cannot shine. Even compared to very cheap flat bed scanners with a CCD-sensor, the Reflecta-device comes off badly. The scans of non-transparent pictures appear unsharp and also have some clearly visible discontinuities of hue in the gradients. By clicking on a thumbnail, a 100%-view of the red marked image cutout appears. Thereby, the view switches every three seconds between the scan done with ImageBox and a comparison-scan with the Epson Expression 10000 XL, that we have issued in order to show you the extent to which the template can be exploited. Both scans have been made with a resolution of 400dpi. This resolution is sufficient for most of the non-transparent templates.
As one can see, the Reflecta ImageBox is not apt for archiving oneīs valuable image material or for creating some scans for high-quality photoprints. The area of application is and clearly remains the digitalization of film material for the quick transfer per email, in order to, for example, show oneīs friends the snapshots of the latest holiday, or in order to bring some film material to the computer for the image selection and later on, amplify the selected pictures or scan them properly.
The scan speed of the Reflecta ImageBox
As it was already the case of the xScan-series, the scan speed is system-relatedly unequal higher as in case of conventional scanners. For the transparent and also non-transparent materials, the creation of a snapshot only takes approximately 1 second as also announced by Reflecta; only a snapshot is made and not a line-by-line scanning.
But the creation of a finished image file that takes place after clicking the scan-button, takes, depending on the computer performance, again some 30 further seconds. This is also achievable by a good scanner in such a low resolution. Therewith, the Reflecta ImageBox is not really fast; one should not be deceived by this announced second, as this only applies for the preview of the image. After all, there is no scanner able to generate a preview-image within one second.
Resume, conclusion
The Reflecta ImageBox is a CMOS-scanner for scanning some slides and negatives with an additional reflected light source for the scanning of paper templates. Due to the low resolution and the low range of density, one cannot expect too much from the image qwuality. Any flat bed scanner generates some better scans of paper images and any film scanner generates some better scans of film material.
Thus, why should one purchase the ImageBox? On one side, the very low price is a reason; other scanners which can digitalize either non-transparent as also transparent templates cost more. Moreover, the simple handling according to the scheme inseret template - press the button - ready is very comfortable. This of course inevitably leads to the fact that nothing can be adjusted.
Thus, those who can live with a modest image quality and the missing possibilities of adjustment will obtain with the Reflecta ImageBox a scanner to a small price with which it is possible to pass the pictures to the computer in a fast and easy way.
Purchase of a film scanner
Visit our Film scanner-Shop, the only shop in the internet specialized on scanners and scanner equipment. We provide you with any scanner to a very attractive price and also provide you with accessoires as film adapters or optional adapters after the purchase.
Back to the film scanner tests index
|