Test Konica Minolta DiMAGE Scan Elite 5400 II
When the Minolta DiMAGE Scan Elite 5400 came onto the market in the summer of 2003, experts initially did not really know how to classify the new device, because it was not a worthy successor to the then Minolta DiMAGE Scan Elite 2. Although it turned out to be a great resolution miracle with its 5400 dpi, it turned out to be extremely slow tortoise and caused many technical problems for the users (see numerous posts in our forum), so that many units had to be replaced or sent in for repair.
Konica-Minolta completely stopped the film scanner business in March 2006. SilverFast is still available for this device.
It is therefore not surprising that the Konica Minolta DiMAGE Scan Elite 5400 II was launched in March 2005 - less than two years after its predecessor. This is a very short lifespan for a film scanner: buyers of the previous model suffered a loss in value and many retailers were left with the older devices. It is to be hoped that Konica Minolta learned from the mistakes of the previous model, so that the new model really brings progress. My subsequent test report will show this.
Equipment, accessories and performance data of the film scanner
The slide scanner DiMAGE Scan Elite 5400 II is supplied as a complete package: A newcomer to the field of film scanning receives everything that is needed to create and edit his scans: film scanner with slide holder and film strip holder, CD with Konica-Minolta's own scan software , Image processing program Adobe® Photoshop® Elements 2.0, power cord and USB cable. This gives you everything you need to digitize your slides and negatives and then edit them. There is always a plus from me if you buy not just a device but a complete package.
The name of the film scanner already reveals its highlight: 5400 dpi is the optical resolution of the Minolta DiMAGE Scan Elite 5400 II. Minolta thus doubles the resolution of many conventional slide scanners and even beats the top models from Nikon, with their flagship model having just 4000 dpi. If you scan a 35mm slide with a resolution of 5400 dpi, you get an image with approx. 5200 x 7800 pixels with a total of 40 million pixels. Below we will see whether this sensational DPI number is actually achieved in practice.
Of course, you must seriously ask yourself whether it makes any sense to make a scan with 40 megapixels from a 35mm slide. After all, most camera-lens-film combinations only reach 10 megapixels in 35mm format. And even the most expensive SLR cameras in combination with fixed focal length lenses and very fine-grained films barely reach 20 megapixels. With which camera equipment do you want to bring 40 million pixels onto a film?
Of course, a 5400 dpi optical resolution is also a marketing matter. Just as many people imagine that a computer with a 3.6 gigahertz processor must be faster than a computer with 2.5 gigahertz without looking at other components such as memory, front side bus or hard disk, many people hold a slide scanner with 5400 dpi simply for better than a device with 4000 or 2700 dpi.
If you scan an image with the highest resolution, you get an image file of approximately 100 megabytes in size. To post-process such an image, you need a decent computer with a lot of main memory. The Minolta Scan Elite 5400 II offers the possibility to save images with 48 bit color depth; such an image file becomes over 200 megabytes in size at 5400 dpi. Minolta specifies a density range of 4.8, which of course is only a theoretical value, which is derived from the 48-bit color depth. The density range is therefore not a correct performance criterion.
If you read the scan times specified by Konica Minolta on their data sheet, you can immediately see where the Elite 5400 II has clearly improved in comparison with its predecessor. While the first DiMAGE Scan Elite 5400 was like a slow snail, the DiMAGE Scan Elite 5400 II can be likened to a real sprinter. The following tests will of course examine this. The film scanner offers the possibility to make 2-fold, 4-fold, 8-fold and even 16-fold scans. This means that an image is scanned several times. Of course, the scan time is multiplied, but multiple scans can effectively suppress the image noise - a commendable feature of this slide scanner and a property that distinguishes good film scanners from simple ones.
White LEDs are used as the light source - this is standard with good film scanners these days. LEDs do not become warm during continuous operation, so that an inserted slide cannot heat up and pop as a result. The device is connected to the computer via a USB 2.0 interface. One can see where Konica Minolta has saved on the successor model: The first DiMAGE Scan Elite 5400 had an additional Firewire interface. Many owners of Apple computers particularly will miss that, so this scanner is no longer shortlisted. It's a shame that Minolta has rationalized away the IEEE 1394 interface and the cable that was previously part of the standard scope of delivery.
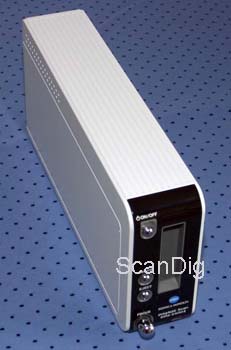
Speaking of savings, the anthracite-grey housing with silver front flap of the previous model was replaced by a simple black and white combination. While I praised the previous model as a designer piece, the current model gives a totally cheap impression externally. The white plastic casing does not live up to the demands of a professional film scanner. Unfortunately, the holder in which the scanner could be placed in the previous model no longer forms part of the scope of supply. This means that a 16 cm high device stands on a 7 cm wide support surface - a little push and the device falls over.
With a resolution of 5400 dpi, multiple scanning options, a maximum color depth of 48 bits and the well-known correction methods ICE (automatic dust and scratch correction), ROC (automatic color restoration), GEM (automatic film grain smoothing) and SHO (contrast and exposure optimization), everything also summarized under Digital ICE4, and a steep price, one may expect scans of the highest quality - so lets get to the tests!
Construction, installation and commissioning
The Konica Minolta DiMAGE Scan Elite 5400 II has the dimensions 70 x 165 x 345 mm, which is a normal size for a film scanner, but with a weight of 1.5 kg it is an absolute lightweight. While you get a large, heavy box with a Nikon or Reflecta film scanner, the Minolta is well packaged in a small, compact box that is easy to transport thanks to the handle. The box is so light that when you buy it, one is inclined to look to make sure that the scanner is in it.
When unpacking, you can quickly see why the box is so light: there are no manuals, not even on CD. The two film holders are only in plastic sleeves and the scanner is also very lightly packed. When I pulled the scanner out of the protective packaging, I was a little disappointed to begin with. This is a cheap, unsightly plastic housing that sounds as if the device is completely hollow when tapped on it. What a step backwards compared to the previous model!
There are four rubber knobs on the underside of the device so that the device cannot slip on the desk. When setting up, however, you quickly notice that the scanner has no firm hold at all. It is only 7 cm wide but almost 17 cm high, which is an extremely shaky affair despite the rubber knobs on the underside. One might put the device on its side on the desk, but it slides around on its smooth side like a bar of soap in the wet sink. In the previous model, a holder was included in the scope of delivery, so that the device found a secure hold, but it is unfortunately no longer supplied.
At this point, I would like to warn every buyer of this device against free placement on the desk. The device is so unstable on its small surface that it can be clumsily handled when inserting a film holder, when switching on, or the like, falling completely on its side. Therefore, I strongly recommend leaning the device against a printer or a wall or making your own holder for it. An optical device should not fall over, as there is no warranty for such things.
The connection and installation of the device was quick for me: A sticker on the back explains to the user that he should first insert the CD with the scanning software before connecting the device to the computer via USB cable. Unfortunately, when installing the driver under Windows XP, there was an error message that the Windows logo test had not been passed and the installation was discontinued. Here you can safely continue the installation - this error message does not hinder the operation of the scanner under Windows XP. So, Konica Minolta needs to modify the driver a bit, because I know these error messages from the early days of Windows XP and thought this issue was long gone.
Nevertheless, the scanner was ready for use within 10 minutes and the first image could be scanned. For me as an expert, the installation was child's play, although the error message was a distraction. For an absolute novice, a simple installation guide would have been an advantage - it was just not provided. At this point it should be predicted that the scanning software also has extremely poor HTML help. So I wonder if this device was only built for the professional, who already knows everything and doesn't have to read anything more, or if you should buy the device with the SilverFast software straight away, so that you can use very good software with very good documentation.
General information on operating the film scanner
The Konica Minolta DiMAGE Scan Elite5400 II has a batch mode, in which up to four framed 35mm slides or up to 6 pictures on a 35mm film strip can be automatically scanned in one process. While you are sure to carry out your first attempts with the scanner in individual operation, you scan your film collection in batch mode. This is a convenient matter, since you can leave the film scanner alone for a while after loading and starting it and then find your pictures on the hard disk in ascending order.
Batch mode is even more important since it is not a pleasure to sit on the computer while the scanner is in operation, because the device saws, rattles, squeaks and buzzes so loudly that it really scares the first time. While many flatbed scanners have become so quiet that you can hardly hear them anymore, film scanners are still so loud that it is unreasonable to place them close to people.

There are three ways to start a scan: Professionals who need individual scans start the scan software directly from Photoshop® and receive the image directly after the scan as an image window in Photoshop®. The second option is to start the scan program directly from the start menu and save the scans as a file. There is a third option, and for this, the DiMAGE Scan Elite 5400 II gets a big plus from me: On the front of the slide scanner there is a quick scan button with which you can start the scan software automatically. With the Quick-Scan Launcher you can determine which part of the scan software you want to start at the push of a button. This is a convenient feature and sets Minolta apart from its competitors. I hope that they will follow suit in any future models.
The Scan Elite 5400 II can only process framed slides or film strips (positive or negative). No matter what type of film you scan, one always inserts a film holder into the scanner. After removing the film holder, the front cover of the scanner should close again, because the calibration of the device does not work when the front cover is open. Unfortunately, the automatic closure of the front flap keeps cycling. Minolta supplies a small special tool with which one can release the lock so that the front flap closes again. Other manufacturers have much better solutions.
The slides or film strips to be scanned are always placed first in an appropriate film holder, which is then inserted into the scanner. In this process, the new Scan Elite 5400 II has made significant progress compared to its predecessor: You place the slides / negatives in the film holder so that you can see the real picture when you look directly at them. The correct insertion of the film holder is carried out using simple markings on the film holder. Here the pictures are upside down, but that shouldn't bother you. It is important that the images are viewed in the same orientation when inserted and when viewed on the screen, i.e. not mirrored or rotated.
At the front of the slide scanner, a round rotary knob stands out, which is used for manual focusing. Most images are scanned with autofocus, but you can influence the sharpness yourself with this rotary knob. However, advanced this button may appear, it turns out to be superfluous in practice, because the same functionality could just as easily be achieved with a software controller. So much has been rationalized away in the DiMAGE Scan Elite 5400 II, why not this button too?
How do you quickly and effectively scan a large series of slides or negatives? First you make a preview of an image and carry out all settings such as resolution, scan area, ICE on/off etc. These are then saved so that they can be applied directly to all inserted images when a film holder is inserted. There is also an easy-to-use batch scan utility in the Minolta software. It is of course an advantage if you have two pieces of each film holder, because you can load one in peace while the other is currently in the scanner.
Scan framed slides
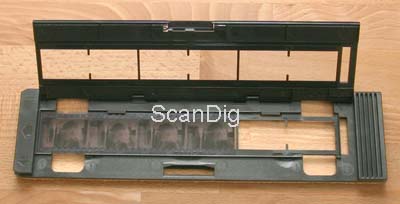
The new Minolta 5400 II has also got new film holders. The SH-M20 slide holder (previous model SH-M10) is suitable for holding up to four framed 35mm slides. The slide holder is securely closed and easily opened using two snap locks. The individual slides are placed in four separate slots. Guides on all four sides ensure a safe, straight placement of the individual slides. The fourth slide on the outside of the slide holder is held by only three guides. The reason is that the fourth slide can be removed with the slide holder inserted and replaced with another. The slide holder can also be permanently inserted in the scanner and you can easily insert and remove individual slides one after the other without having to pull the slide holder out of the scanner and open it.
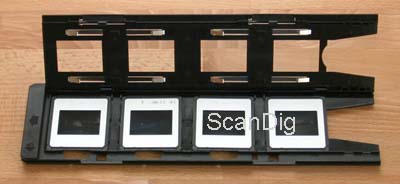
After closing the slide holder, the four slides are held by two metal springs. Minolta specifies a thickness range from 1 mm to 3.2 mm for the slides to be inserted; Minolta also recommends not using glass-framed slides. However, I see no problem with slide frames that are only 0.7 mm thick or with glass-framed pictures. The film holder has no problem with it, so it is a real all-rounder. The scanner automatically pulls the film holder in and positions it according to the image to be scanned.
Incidentally, the old slide holder from the previous model SH-M10 cannot be used, not because it has a point on the front instead of a flat edge, but because it lacks gear-like transport teeth on the underside. Otherwise, the new slide holder has not changed compared to the previous model. It is very easy to use; inserting and removing the slides is done in a safe and convenient way without running the risk of accidentally touching the film.
The Minolta Scan software is so extensive and versatile that you have a whole range of options for digitizing individual slides: from a simple beginner tool to a batch tool to a professional tool, you have practically all options (see chapter Scan- Software). With the professional scan utility, scans are carried out according to the proven index scan, pre-scan, main scan scheme. After the pre-scan, you can make the usual settings (color changes, scan area, ICE etc.).
To scan speed: According to Konica Minolta, this is where most of the changes over the previous model are found. After all, the old DiMAGE Scan Elite 5400 was so slow that you could not only drink a coffee during high-resolution batch scans but also eat an entire meal or watch a television program. This was tolerable for occasional scans, but an entire slide collection could hardly be digitized at this speed in a reasonable time, so that the scanner was not competitive.
That has now changed, as the measured times show. After only 16 seconds you have an index scan, which can take place automatically depending on the setting when a film holder is inserted. However, the index scan does not only deliver thumbnails, but also full-format scans, so that important settings such as the scan area can be defined. This is a great advantage, since you can save yourself the time-consuming preview for the most part, unless you still want to make colour adjustments.
If you look at the measured scan times, you can immediately see that the new Konica Minolta has indeed become a fast sprinter. A high-resolution scan with ICE in one and a half minutes is commendable and top class. Of course, one might argue that Nikon's Super Coolscan 5000 ED competitor is still faster, but the difference has become considerably less. It is interesting that a scan with the Nikon resolution of "only" 4000 dpi takes practically the same time as a 5400 dpi scan. Why is that? The stepper motor must perform its smallest steps even with a 4000 dpi scan and the software must interpolate. At a resolution of 2700 dpi however, the stepper motor can skip every second line, so that the time is reduced - an effect that can be observed with almost all scanners.
| Process |
Duration |
| Index-Scan 4 Slides |
0:16 min |
| Preview 4 Slides, Autofocus on |
1:15 min |
| Autofocus |
0:11 min |
| HR scan 1 Slide at 5400 dpi, ICE off, Autofocus on |
0:46 min |
| HR scan 1 Slide at 5400 dpi, ICE on, Autofocus on |
1:30 min |
| HR scan 1 Slide at 4000 dpi, ICE off, Autofocus on |
0:45 min |
| HR scan 1 Slide at 4000 dpi, ICE on, Autofocus on |
1:28 min |
| HR scan 1 Slide at 2700 dpi, ICE off, Autofocus on |
0:37 min |
| HR scan 1 Slide at 2700 dpi, ICE on, Autofocus on |
1:18 min |
All in all, it can be said that the scanning time for framed 35mm slides is excellent. With these times, the DiMAGE Scan Elite 5400 II is among the top scanners. In general, scanning slides with this slide scanner is now a well-rounded affair. It is easy to digitize large quantities of slides in an acceptable time, especially if you use a second SH-M20 film holder so that you can fill it while the first is being processed in the scanner.
Scanning film strips
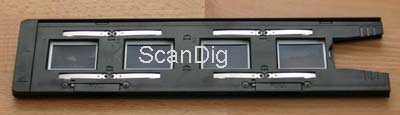
With the film strip holder FH-M20 you can scan up to six negatives or positives at once; Compared to the previous model FH-M10, the tip of the holder and the underside have changed slightly: gear-like teeth are attached to the lower edge, with which the film holder can be transported in the scanner. This small difference ensures that only the new film strip holder FH-M20 can be inserted in the current Minolta DiMAGE Scan Elite 5400 II; the old FH-M10 cannot be retracted because of the missing spikes, even though the size is identical.
When scanning film strips, it does not matter whether it is a film strip with 6 pictures, two strips of three or even individual pictures. Of course, positive and negative or color images and black-and-white images must not be mixed, since you can only set one film type in the scan software.
The film strip holder is opened with a single snap in the middle and closed by simply pressing it shut. An inserted negative strip is properly locked by guide rails at the top and bottom. There are two further stops on the left and right so that the strip is inserted correctly. Whilst the left stop is very helpful for the exact positioning of the film strip, the right stop conflicts when a strip of six is not precisely trimmed. In this event, trimming will be required.
Of course, any adhesive tape on the negative strip, which are often attached by laboratories when ordering pictures, must be removed before inserting them into the film strip holder. Loading normal film strips is not a problem. The strips can then be precisely aligned using tweezers. Narrow bridges between the individual images serve this purpose, which of course also serve as a support for the film strip.
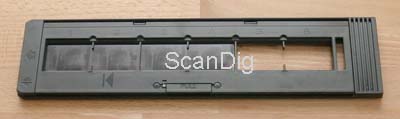
Loading a heavily curled film strip becomes a little more difficult. In this case, you do not select positions 1 to 4 of the film holder but fields 2 to 5. Above the second and fifth fields there is a small groove under which you can insert the film strip, so that the negative strip is thereby held flat. The Minolta film strip holder deserves special praise for these two small extra guides, because many manufacturers do not offer any noteworthy relief for curled or wavy film strips.
The film strip holder from Minolta however has one small defect: Once the snap lock is closed, the film strip can no longer be moved. There are other solutions where a subsequent fine adjustment is possible. Often, it is only after the film material has been inserted that one realizes that a displacement of, for example, half a millimeter is necessary. The actual scanning of negative strips or positive strips is done in the same way as digitizing framed slides. The necessary settings must be made in the scan software before you can batch scan up to 6 images at a time.
| Process |
Duration |
| Index-Scan 6 Negatives |
0:23 min |
| Preview 6 Negative, Autofocus on |
2:20 min |
| Autofocus |
0:12 min |
| HD Scan 1 Negative at 5400 dpi, ICE off, Autofocus on |
1:20 min |
| HD Scan 1 Negative at 5400 dpi, ICE on, Autofocus on |
1:55 min |
| HD Scan 1 Negative at 400o dpi, ICE off, Autofocus on |
1:15 min |
| HD Scan 1 Negative at 400o dpi, ICE on, Autofocus on |
1:45 min |
| HD Scan 1 Negative at 2700 dpi, ICE off, Autofocus on |
1:02 min |
| HD Scan 1 Negative at 2700 dpi, ICE on, Autofocus on |
1:30 min |
If we look at the measured scan times, it is also noticeable in the case of negatives that the new DiMAGE Scan Elite 5400 II has increased considerably in speed compared to the previous model. While the time for a high-resolution scan with dust and scratch correction was extremely long for the old Elite 5400, it is remarkably short for the new Scan Elite 5400 II. The fact that the scanning times for negatives are higher than for positives is the case for all scanners, as documented separately.
All in all, the Konica Minolta DiMAGE Scan Elite 5400 II receives high praise from me when it comes to scanning film strips. The film holder is very good, and scanning is quick. Since much of the time is spent loading the filmstrip holder, it is advisable to work with a second filmstrip holder so that you can fill it while the first is in the scanner. In this way you can quickly and effectively scan large quantities of film material.
Scanning APS films
While there is an optional APS film holder available for the small Minolta DiMAGE Scan Dual 4, this option is completely missing from the DiMAGE Scan Elite 5400 II. An APS adapter can no longer be installed in the slim housing. The Scan Elite 5400 is therefore limited to scanning framed or unframed 35mm film material.
I could imagine that Minolta recognized that the need for APS film scanners is very low and that it is not worthwhile to make a film scanner as beautifully styled as the DiMAGE Scan Elite 5400 II wider and more shapely just because of one or others want to digitize a few APS films with it. On the other hand, the scanner would of course have more stability due to its larger width and would not tip over as easily.
Since the small Konica Minolta DiMAGE Scan Dual IV cannot keep up with the DiMAGE Scan Elite 5400 II in the least, Konica Minolta does not offer a professional solution for scanning APS films. If you want to scan APS films in excellent quality, you must use a Nikon film scanner with APS adapter.
The included software
Minolta delivers the DiMAGE Scan Elite 5400 II with a two-part software package consisting of scan software and image processing software.
The photo editing software Photoshop® Elements from Adobe® is delivered in version 2.0. This bundle version is fully entitled to update to the new version. The Elements version of Photoshop® has now become so extensive that it is enough for many professionals as the main tool. The immense surcharge for the full version is only necessary for very special applications. With Photoshop® you get a tool that offers you almost unlimited possibilities for image editing.
The actual scanning software essentially consists of three parts. The Scan Launcher is just an intermediate program from which you can call up the individual tools. If you start the scan program using the quick scan button on the front of the film scanner, it is best to call up the scan launcher and then select the desired application. However, what exactly happens when the Quick Scan button is pressed can be conveniently set using the software.
Beginners who have never scanned photos will enjoy the Easy Scan Utility Tool. This simple tool guides the newcomer step by step through a complete scanning process. With this tool, basic settings such as rotating an image or switching on the dust correction ICE can be carried out, but advanced settings are kept from the beginner, so that confusion and perplexity cannot arise at all. You need such an entry-level tool not only as a beginner to get started quickly with film scanning, but also as an advanced user if you just want to do a single scan quickly without large settings.
I already know the DiMAGE Scan Utility from earlier Minolta film scanners. The tool is now mature. Crashes like I often got in the past no longer occur today. The user guidance is satisfactory, although it is a little unusual that status messages are not recognized in a status line at the bottom of the window, as is usual in Windows, but in a small text window at the top right. As a beginner you are put off by the numerous buttons and controls, but there is always the Easy Scan Utility.
The professional scan software offers the usual setting options, from simple color corrections to complicated pixel polish functions. The auto-crop function is a Minolta specialty and is very helpful if it works properly, but the cropped image area is often not the area you really want, so you must rework it. Professional setting options based on histograms and gradation curves are commendable, but this includes some experience in the area of ??scanning and image processing.
Before performing a scan, you can choose a preset from a large standard list. Individual settings can also be saved and applied directly to new scans. This makes it easy to batch scan many images.
The Batch Scan Utility is a real hit: If you start this program, up to four slides or six negatives can be digitized automatically with the default settings made at the push of a button. While I sharply criticized the batch scan utility of the previous scanner model, I now praise it very much, because Minolta has fixed the errors and weak points, so that you now have a very well-functioning tool for fast, automatic scanning of slides and receives film strips.
Overall, I congratulate Konica Minolta for their own scanning software. I've known the software for years. At first it had major weaknesses, but it has been continuously developed, is stable today and makes a solid, good impression. Both beginners and professionals can easily find their way around the setting options, which is a big plus on my part for the scanning software. There is a big minus point for the primitive help pages. Instead of a professional help tool with search function, favorites, etc. you get blunt HTML-formatted text pages without any graphics for illustration. Such poor and primitive facilities are in no way worthy of professional scanning software. Maybe one day Konica Minolta will add more.
Picture Quality
A film scanner that scans its originals with a resolution of 5400 dpi, has a color depth of 48 bits (theoretical value), allows multiple scans up to a factor of 16, and also shines in all its technical data, should deliver image quality that meets the highest demands enough. Let's start with the resolution, which should be an outstanding criterion for the Konica Minolta DiMAGE Scan Elite 5400 II.
With the scan of a USAF-1951 test chart you can measure the resolution of a scanner (by the way, everyone can carry out this test on their own scanner with the help of such a USAF test chart and the resolution table). The picture on the left shows the inner section of the scanned USAF target. A resolution test on the Konica Minolta DiMAGE Scan Elite 5400 II shows an effective resolution of 4200 dpi.
The enlarged picture shows groups 4 and 5, in which all elements (the horizontal and vertical bars) can be clearly distinguished from the white background. The inner square of the picture shows groups 6 and 7. The horizontal black bars are clearly recognizable up to element 6.4 and even, just about, element 6.5. In the resolution table we find a value of 4598 dpi for element 6.4 and a value of 5161 dpi for element 6.5. Vertically, only the black bars of element 6.2 can still be clearly seen; with element 6.3, the contours blur into a gray area. For element 6.2 we read a value of 3649 dpi from the table.
The Konica Minolta DiMAGE Scan Elite 5400 II as tested, shows a resolution difference of approximately 1000 dpi in the horizontal and vertical directions. If an approximate mean value is formed from the two measured values, the result is an effective resolution of 4200 dpi. Measured against the nominal resolution of 5400 dpi, this is only 78%, so rather a poor result. Compared to other film scanners at this time (April 2005), however, this value means the highest resolution I have ever measured with a film scanner.
The measurement of the resolution on my Konica-Minolta scanner has a small flaw: A first resolution test, which I carried out after several hours of continuous operation of the film scanner, showed an extremely modest resolution of only 2900 dpi. This value could also be reproduced by several new scans of the USAF test target. I only achieved the high resolution values ??of over 4000 dpi after a restart after a break of several hours for the scanner. I cannot explain this effect because the film scanner works with LEDs that do not heat up and do not wear out.
In other journals, even lower resolutions down to 3600 dpi were measured for this device. This is of course a disappointing value, especially since there are 4000 dpi scanners from Nikon that just reach the nominal resolution.
When evaluating the image quality of the scanner, as with almost all devices, a distinction must be made between whether the device is operated with the standard software from Minolta or with SilverFast Ai. Anyone who operates the device with SilverFast Ai will find an IT-8 calibration slide attached to the SilverFast software. It is well known that this colour calibration of the scanner brings quality advantages. After all, you start with a colour management process and do not calibrate a series of scanners but your individual piece of hardware.
When evaluating the colors and the density range, the DiMAGE Scan Elite 5400 II did not do what I expected from such an expensive device. Without being able to substantiate the result with measured values, the range of density seemed to me to be insufficient. Sometimes I missed some drawing in dark and light areas. However, the Elite 5400 II scans normal leisure images with magnificent, vivid colors.
I was happier with the SilverFast software, not only because the software offers several professional setting options, but also because the range of density seems a bit higher than when scanning with the standard scanning software. The effect that SilverFast contributes to increasing the density range was only known to me from extremely inexpensive scanners. With SilverFast I also get very good negative scans if you have previously set the exact film type in the Negafix dialog.
Scanning speed
The differences of the new Konica Minolta DiMAGE Scan Elite 5400 II are so small compared to the previous model that one would almost like to call the new model a slight upgrade, if it weren't for the greatly changed scan times. Konica Minolta has managed to turn a lame turtle into a quick cheetah, and this achievement deserves respect. The new DiMAGE Scan Elite 5400 II is not the fastest in the field but is now one of the top film scanners when it comes to scan times.
The time measurements with framed slides and negative strips in the tables above were carried out on a fast computer with very good equipment: A DELL workstation was used with a Pentium IV processor with 3.2 GHz and a fast main memory of 2 GB. The scanner was connected to a USB 2.0 port, so that fast data transfer was guaranteed.
My measured scan times are sensational. It should be noted that apart from ICE (unless otherwise stated) no further settings have been made. Every additional filter, every colour correction, processes such as ROC or GEM drive up the scanning time. In the case of multiple scans, the scan time is even multiplied, so that a scan time of one hour per image can be achieved with a 16-fold scan.
The excellent scan times make effective, fast work possible. The DiMAGE Scan Elite 5400 II is therefore suitable for archiving larger photo collections. The only way to make digitizing your photos even more effective and faster is to work with additional film holders. If you load one slide holder while the other is being scanned, you save a lot of time because you then keep the scanner in permanent operation.
Summary, conclusion
The Konica Minolta DiMAGE Scan Elite 5400 II is a very good film scanner, especially if it is operated with the SilverFast scan software. Even if the effective resolution is far below the nominal value, the achievable performance is enough to get all the pixels out of a small picture.
The increase in speed compared to the previous model and the batch operation of up to 6 pictures on film strips or 4 framed 35mm slides are commendable. To criticize is the cheap, unstable housing, which can easily tilt the scanner.
Many thanks to Peter E J Spencer, who translated this review into English!
Back to the film scanner tests index
|
)