Scanning Kodachrome Films
The scanning of framed slides (positives) and negative films belongs to the standard tasks of every filmscanner. And in every film scanner in which it is possible to put in a common slide it is also possible to put a framed Kodachrom-image and scan it as a normal positive. But most of the times, the scan results are somewhere between dissatisfactory and totally disappointing. Due to this reason, some scanners offer some special configurations/colour profiles for Kodachrome models in order to produce some satisfying results. This page is supposed to provide some insights into the matter of the Kodachrom films and the digitalization of such film material.
Information: some pictures in this page were kindly provided by Manfred Jagoda from Ismaning. He of course does have the copyright.
What is actually a Kodachrom-film?
Kodachrome films were originated - as it can be already derivated by the name - from the company Kodak and from a little film family with the family members Kodachrome 25, Kodachrome 64 and Kodachrome 200. The numbers representate the ISO-sensitiveness of the film. Kodachrome films are also called colour reversal films.

The Kodachrom family is, in principle, already a very old film family that, thanks to its very special features, is still alive and multiple used. Kodachrome films are caractirized by their extreme fineness of grane and a high capacity of resolution. This is why Kodachrom films do provide more details as many another professional films. Moreover, a Kodachrom film is brilliant at its colour fastness: even after decades, the image keeps (provided it is stored respectively) its colours.
It is exactly this feature of colour fidelity that I repeatedely notice in our Scan-Service: while, in the case of 30 year old normal slides, one likes to work with a colour restauration procedure as ROC, after scanning kodacrome slides that are 30 years old one gets some images as they were made yesterday. Thereby, 30 years are still nothing for a Kodachrom film, as it is supposed to keep the colour up to 60 years.
Now we come to the film itself. Malicious tongues state that the Kodachrom film is a black and white film that has to be helped along with chemistry, so that it can reproduce the colours. What is behind this? In fact, Kodachrom is not a common colour film but it has three black and white layers that turn later to red, green and bluen. The colours are not generated until the procedure of the development, thus, not immediately during the exposition. This is why a Kodachrom film cannot be developed in the photo shop around the corner (normal E6-process), but it has to be sent to Kodak. For the development of Kodachrom films there is the special K-14 process.
Which advantages does this special process of development have? The colours of the Kodachrom images are all the same for all kinds of film, this means that a green meadow thas has been pictures with a Kodachrome 25 has the same colour as the image of a Kodachrome 64. During this K14-development process, the film is dipped into more thn 30 baths, each for a determined period of time. In each bath, the colour slowly diffuses into the film. In this process, some very stable colourings can be applied, so that a long colour fidelity is guaranteed
How does one recognize Kodachrome films?
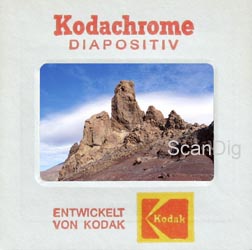
In Europe, the Kodachrome slides have normally a thin paper frame, on which Kodachrome is written in thick letters (see image above). Thus, by sending them straight to the laboratory of Kodak, one gets them back framed. In other countries like the US there are also non-framed Kodachromes, thus the framing was a matter of the photographer. Also in Germany it was possible to get unframed Kodachromes by cutting off a corner of the return adress field of the envelope.
A Kodachrome slight is normally recognizable by the address at the lower side of the film: There, one finds some abbrevations like KM (Kodachrome 25), KR (Kodachrome 64) or KL (Kodachrome 200), eventually a prefixed P (Profi-Version). Eventually, one also finds an abbrevation for the frame.
But Kodachromes can be also recognized without these codes: the film has a significant relief on its layer side; it is so distinctive as it was engraved. At the bright image zones, the film is very thin, at the darker ones a little thicker. Thus, the film can also be touched, but please only with Cotton-Gloves.
Is Ektachrome equal to Kodachrome?
Many a photographer never lived the bloom of the Kodachrome films and even do not know what a Kodachrome film is at all. They will probably come across to such a special kind of film for the first time when they want to scan a film of Ektachrome that sounds similar.
At this point there is clearly to mention that Ektachrome has nothing to do with Kodachrome, even if both terms sound similarly. Ektachrome is a very normal film family with different rapidities (ISO 100, 200, 400...). An Ektachrome film is developed in the very common E-6 developing process as all other slide films too. Everything written on this side about Kodachrome films does not apply to Ektachrome films, as they are two complete different matters.
The same applies, by the way, for similar sounding films like Agfachrome or Fujichrome. These sort of films are also conventional slide films (E6-developing process) and have nothing to do with Kodachrome films.
Only where Kodachrome is written there is also Kodachrome inside. Similar sorts of films like Ektachrome, Agfachrome or Fujichrome have nothing to do with Kodachrome.
Scanning Kodachrome films
As already mentioned in the beginnning, each filmscanner that can digitalize normal slides can also scan a Kodachrome image. But the scanned image is not really satisfying, as it requires some refinishing in the image processing program. The following two pictures show a picture of a beach taken with a Kodachrome film. The slide was scanned with a Nikon Super Coolscan 5000 ED, once as a very normal positive and once with a special configuration for Kodachrome slides.


If a Kodachrome slide is scanned with a normal configuration for positives, the image gets a bluish cast that really plagues the eye. While the colour of the sky and the water can be more or less corrected with Photoshop®, one fails miserably trying to provide a natural green to the plants. There are images in which these effects are even much more extreme as in this example. In order to digitalize Kodachrome images in a good quality, one already needs during the scanning some special configurations and/or some colour profiles that are adapted to Kodachrome.
Kodachrome films are not only used due to their sharpness and meticulousness but also due to their brilliant colours and the abundance of colour shades. A feature of Kodachrome films is the fact that black is really black and not something between dark grey and black. The slide scanners with a low density have big problems with the black image areas in which the black shades are also strongly differentiated. In order to digitalize Kodachrome films in good quality, the slide scanner in use should have a high density.
In the case of scanners with low density, in the dark image areas, the pixel noise has of course an effect, that means that some single pixels do not appear to be black but contain some unpleasant defective colours. Such effects can be efficiently handled by doing multiple scans. For example, in a fourfold scan, an image in a scanner is scanned four times right away. The pixel noise can be compensated very well by the digital image material that was determined four times.
For the digitalization of Kodachrome films a filmscanner with a high effective resolution and a high density is needed. Moreover, the scanner software should offer the possibility to choose a special colour profile for Kodachrome films.
Kodachrome scans with the ICE dust and scratches remover
High quality scanners feature an integrated dust and scratces removing procedure that is based on the hardware. The approved ICE technology is applied in many filmscanners. More details about the ICE proceeding can be found in this Page. A short introduction of the ICE proceeding: an infrared light source scans additionally the inserted slide and recognizes the dust and the scratches by means of mountains and valleys on the film. An infrared ray does not penetrate dust particles.

As known, the ICE does not work in black and white films. Now I mentioned in the beginning that in principle, a Kodachrome film -Film is a black and white film that does not get any colour until the developing process. In fact, the Kodachrome film contains similar substances (for example silver) that are also contained in black and white films and are impermeable to an infrared ray. The ICE proceeding fails with such kinds of particles.
As an example, the image of this subchapter shows a Kodachrome slide that was scanned with the Nikon LS-5000 in the Kodachrome mode with the dust and scratches remover ICE activeted. At first sight, the scan seems to be good and acceptable.


But the devil is in the details, that means in the zoom. One does not discover the signpost of the little bar on this before zooming the original image(5780 x 3950 Pixel) to the 100% size. One clearly recognizes how the actually clear font gets washy by the ICE proceeding. The second image cutout is at the very right of the original image. The balustrade is zoomed to original size, that means a pixel on the screen equals an pixel of the scan.


Also in this zoom cutout it is recognizable how the balustrade is missinterpretated by the ICE proceeding as an imperfection in the blue sky and due to this reason it is partly removed by a retouche. At this point, the capacity of resolution of the Kodachrome film is to be considered! Thousands of such mistakes can be found by zooming the scan to 100%. To be fair, it should be also mentioned that in ICE scans, no dust particles or hairs that were on the film material are refound.
Finally I would like to mention that the unsharpness and the blurrings caused by the ICE procedure in the Kodachromes are far not as big as the ones in case the black and white images.
The normal ICE dust and scratches remover (in SilverFast, partly iSRD) does not work in the case of Kodachromes; image imperfections an unsharpnesses are caused.
Scanning Kodachromes with the Digital ICE Professional
With the arrival of the new Nikon Super Coolscan 9000 ED in April 2004, for the first time, a new ICE-proceeding with the addition Professional came into the market, that was supposed to provide better results specially for Kodachrome films. After numerous Kodachrome scans with the Nikon 9000, I came to the conclusion that with the digital ICE Professional in fact, Kodachromes can be scanned very well. The following example will demonstrate the differences to the common ICE-proceeding.


The following series of three equal images shows the bow of a little boat; it is about a cutout of a harbour panorama photo zoomed to 100% of the size and is very useful to show the differences betwenn a scan without ICE, a scan with the common ICE and a scan with ICE Professional. This image was cleaned with compressed air before scanning, so that there were only few dust particles left on the picture. On the first image, dirt and dust is clearly recognizable by looking at the white surface of the retracted sail.
On the second picture, these dirt particles on the sail disappeared thanks to the ICE-proceeding. But much more disappeared: several cross braces at the front side apparently dissolved traceless in the water. The handhold on the door in the foreground seems to have lost its side fixings. And by looking in detail to the little water waves then, - as described in the previous chapter - is it recognizable that a lot of sharpness got lost.
Finally, picture 3 shows the same cutout of a scan made with the Nikon 9000 with the activated Digital ICE Professional. it is visible that the dust particles were effectively removed and that the important image details did not get lost by this, thus a fully satisfying scan of a Kodachrome image.
The common dust and scratches removers (ICE, iSRD) do not work in the Kodachromes in a satisfying way. Only the Digital ICE Professional does remove the dust and the scratches without producing unpleasant side effects.
The ideal filmscanner for Kodachrome films
The demos and explanations above make clear that it is better not to scan Kodachrome images with a cheap scanner. Thus, what does a filmscaner be able to in order to provide some good results in the case of Kodachrome slides?
- The filmscanner should have an effective resolution of at least 3000 dpi in order to be able to capture the detailed image information that the Kodachrome images have.
- The scan-Software has to have some special configurations available for Kodachrome images. These configurations of course must be linked to the respective colour profiles.
- The slide scanner needs a very high density in order to be able to differentiate the typically strong black areas of the Kodachrome images.
- The filmscanner should offer the possibility to do multiple scans in order to reduce the pixel noise in the dark image areas.
- The dust and scatches removers based on the hardware like ICE or FARE must not be activated in the case of Kodachrome images. Exception: ICE Professional (Nikon 9000)
According to this, the Nikon Super Coolscan 9000 ED \is currently the only filmscanner that is fully suitable for the digitalization of the Kodachrome images. In all other devices that are available in the market, one has to take some drastical limitations in the image quality.
Clear recommendation for the scanning of Kodachromes: Nikon Super Coolscan 9000 ED
Information about our scan-service
If you give us some slides to be digitalized, you have to mark on the order form if it is about positives, negatives or Kodachroms. Therefore, it is neccessary so separate the normal positives and the Kodachroms, also if they are in the same magazine. Kodachromes can indeed be scanned with a series of conventional slides, but some bluish cast images result as shown above.
Back to the index Know How
|