Test report Epson Perfection V700 Photo
One of the few flatbed scanners, which we would like to present on our website is Epson's Perfection V700 Photo. Usually flatbed scanners are only somewhat good for the scanning of film material, since their picture quality doesn't come even close to the quality of a "real" film scanner. The results from affordable flatbed scanners, which are for marketing reasons equipped with a cheap transparency unit, are mostly miserable.
Comparing the scans of a high-quality film scanner with those of a flatbed scanner with transparency unit, one can determine clear quality differences, which are similar to the difference between the results of a small digital compact camera and a big digital mirror reflex camera with the same resolution.
With the Perfection V700 Photo, Epson offers a flatbed scanner, whose technical data at least on the paper come up to those of a film scanner. The price also is in the range of an affordable film scanner. So there's nothing opposing a comparison.
However it cannot be expected that a flatbed scanner, which is designed to mainly scan reflected light material, will yield as good results when it comes to scanning film material as a pure film scanner, e.g. from Nikon or Canon. The test is thus only to show whether the Epson V700 as all-in-one solution produces useful data when digitizing film material, so one could perhaps avoid spending the purchase costs for a film scanner.
In the following I will describe my experiences with the Epson Perfection V700 Photo - mainly about the scanning of negatives and positives. We tested the device extensively in the summer of 2007 and wrote the test report on this page.
The Epson Perfection V700 Photo has been replaced by its successor Epson Perfection V800 Photo in November 2014.
Equipment, accessories and performance data of the film scanner
The Epson Perfection V700Photo offers a scanning surface in the size of 20x30cm. The maximum theoretical resolution is 6400 dpi for film material, which becomes scanned using corresponding film holders, and 4800dpi when scanning opaque images or film material, which is being placed without holders on the scanner's surface. These high resolutions make only sense with negatives or slides - with images on paper or similar it's not useful at all. The scanner works with a so-called Dual Lens System, meaning there are two lenses - the Super Resolution Lens for the scanning of film material in film holders and the High Resolution Lens for non-transparent images and film material with the film area guidance.
Into the cover of the Epson Perfection V700 Photo there is an integrated lamp, which optionally shines through the film material, and which has to be covered with a pre-installed white screen when scanning non-transparent images. This is done by simply pulling a small handle, and the screen can also be re-mounted just as simple.
The delivery box of the V700 Photo includes various film holders for the different film formats. They can simply be placed on the glass surface and are being held in place by two pins at the right side of the scanner, so nothing can slip. There is a film holder for up to four 35mm film strips with 6 pictures each (thus max. 24 pictures), one for up to 12 framed 35mm slides, one for up to two medium format film strips (à 3 pictures 4.5x6 and 6x6 and/or 2 pictures 6x7 to 6x9), and one for up to two 4x5 inch flat films. That makes the Epson Perfection V700 Photo nearly an all-rounder. There is however no film holder for 9x12cm flat films (somewhat smaller than 4x5 inch). This film format is (respectively was) common mainly just in Europe. Furthermore there is an approximately 20x25cm film area guidance, which allows scanning of films up to a format of 8x10 inch. This film area guidance is not a film holder in the regular sense, it's just a frame, which determines the scanning area for film material, which is then placed directly on the glass surface. So the V700 is prepared for nearly all eventualities when it comes to film holders.
The device can be connected to the computer either using USB 2.0 or Firewire IEE1394. Both cables are included in the delivery. Also included are the power supply and a CD containing software and the manual. Unfortunately there is no printed manual, and the digital version can also not be easily printed, since it's a HTML document, where one has to click through like on a website. In my opinion Epson saved a little bit too much here, because a device in this price range should have a printed manual delivered, particularly since not every beginner is experienced enough with scanners, that he can start without a manual or at first search online for the installation manual and assistance.
Installation & start-up
The Epson Perfection V 700 Photo comes with a locked transport securing. To unlock it, one has to use two sliders - one at the back of the device for the optical unit and one on the inside of the cover for the transparency unit. This transport lock is nowhere mentioned, so it could happen easily that one does not unlock it and risks to damage the scanner. In addition the cover is held in place with adhesive strips.
Before connecting the scanner to the computer and switching it on, one must install the provided software, since the scanner otherwise won't be correctly recognized by the system. This too is mentioned nowhere.
The installation of the software works comfortably with only one main installation process, where one can select, which components are to be installed. After installation the computer must be re-started, before the scanner can be used.
For people with PC experience the installation is not a problem. Those, who however lack this experience, might have difficulties because of the missing installation manual. Not even the CD contains an installation manual.
Scanning reflected light material
The main intended purpose of the Epson Perfection V700 Photo is the scanning of non-transparent images, meaning photos, documents and other flat, light-reflecting targets. However we want to talk here (as already mentioned) mainly about scanning of negatives and slides, so that I would like to deal only briefly discuss the digitization of non-transparent images and just describe fundamental characteristics of the scanner.
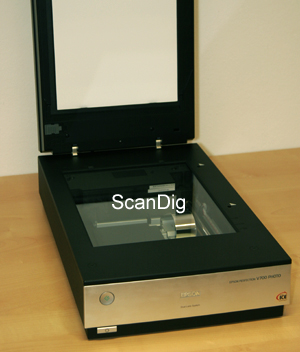
The large, heavy cover of the scanner, which contains the transparency unit, looks like a second scanner on top of the first one. The cover remains in position only with an opening angle greater than approximately 60° - with smaller opening angles it simply shuts close again. Other manufacturers solved this better in devices of this price range. Thus one needs much space upwards, to be able to scan papers with this scanner. If the scanner is positioned somewhat farther back on the desk, one must stand-up in order to open the flap securely and carefully, which is uncomfortable.
The cover is connected to the device by two joints, which are movable upwards. One can also remove the cover completely. Through this it's also possible to place thicker, opaque material, for example books, on the glass surface and the cover remains nevertheless in horizontal position. If one removes the cover completely, one can place practically everything on the glass surface.
There are three possibilities to start the scanning procedure: through the TWAIN interface of an appropriate program; by starting the scanning software directly or by pushing the start button at the front of the scanner, whereby the scanning software is being started as well. Other devices offer here more comfort through several programmable keys, where one can e.g. create a PDF of the current document by pressing a key or send a copy directly to the printer by pushing a button. Whether one needs or wants these keys, is however a question of preferences. Often such little things make working with such a device easier. Who frequently needs copies, very much appreciates such a copy-button at the front of the device, because one can copy a page by a simple push of a button and must not first scan the target and then print it.
In the set-up of the scans one has the choice between three operating modes: In the fully automatic mode one cannot adjust nearly anything at all - the software does everything by itself. In the standard mode one can chose the type of target, the desired resolution as well as picture correction procedures (like dust and scratch removal) to be switched on or off. The professional mode offers the full range of adjustment possibilities, like for example gradation curves and tonal correction. Using this mode, one should truly know what he is doing. Except in the fully automatic mode, scanning works according to the well-known pattern: pre-scan, specify scan area, make adjustments, fine-scan.
One test of scanning paper pictures was particularly important to me: does the scanning software automatically recognize individual pictures, which I placed all over the glass surface? In practice one would often like to digitize a photo collection consisting of different formats; one then simply places 3-6 photos (depending on the size) on the glass surface, makes a preview and would like to scan the placed photos in a batch. There are flatbed scanners, which recognize the individual pictures automatically and auto-set several scan frames, so that one just needs to click "start" and receives automatically several scans. Unfortunately the Epson V700 Photo doesn't have this function, what a pity!
Scanning framed slides
Before one can scan transparent images with the Epson Perfection V700 Photo, one must first remove the white protection screen from transparency unit, which is integrated in the cover. As soon as the right film holder is filled with the right film, one inserts it into the scanner by inserting the guide pins of the film holder into the appropriate openings at the scanner. The film holder is thus automatically correctly positioned and placed firmly on the scanner's surface. All included film holders are being inserted the same way into the scanner.
The film holder for framed 35mm-slides offers space for 12 slides. These can be inserted comfortably, whereas taking them out is less easy. With bigger fingers one has difficulties reaching the inserted slides and risks leaving a permanent fingerprint on the film layer. To avoid this, one should wear cotton gloves (see our page about accessories). When inserting, one must pay attention to the fact, that the slides have to be face-down in the film holder, on which however clear symbols refer to.
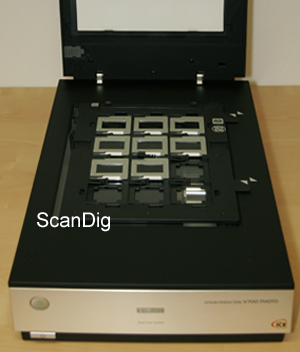 The film holder can take-in slide frames in all regular thicknesses, and can -like all other provided film holders- be equipped outside the scanner. Very comfortable.
The proceeding when scanning slides is the same as when scanning non-transparent images. After starting the scanning software either through the TWAIN interface of a picture processing program, directly or by pushing the start button on the device, and if necessary selecting the type of film, one makes a pre-scan.
Depending upon the selected preview mode are the inserted slides are either shown as individual pictures or as preview of the whole scanning surface. With framed slides one will however nearly always select the single view, since one then only has to check checkboxes to select which slides are supposed to be scanned. Because the positioning of the pictures on the scanner's surface is set by the film holder, one does not have to draw a frame for each - the software "knows" where the slides are. The scanning software automatically recognizes in which slots a slide is inserted and also shows only these - no white spaces of empty slots are shown. The pictures can be rotated individually or together at 90° and flipped vertically.
Now the desired scan adjustments can be made. This works either individually for each picture or for a selection of pictures specified by marking (thus also for all), which proves to be very useful when digitizing many slides with identical adjustments.
The fact that Epson integrated the Digital ICE technology into its flatbed scanner V700 is very praiseworthy. This proven procedure, with which also high-quality consumer film scanners are equipped, proves here too as perfectly working mean for the automatic removal of dust and scratches.
As soon as one has scanned a few slides, it becomes clear that the Epson Perfection V700 Photo wasn't designed to digitize whole slide collections. However the scanning of film material with a flatbed scanner can't be done much more comfortably, so it must be said that Epson did a good job here and offers a flatbed scanner which makes it possible to easily scan a few slides.
Scanning 35mm film strips
The delivery of the Epson Perfection V700 Photo contains also a film holder for up to four 35mm-film strips with up to six pictures each. This allows to digitize a maximum of 24 pictures on film strips in one processing step.
The film holder consists of four strip-shaped frames into which either film strips with six or fewer pictures - or individual negatives or positives can be inserted. These frames cannot be opened and closed individually, since always two are sharing one closing mechanism. This has the big disadvantage that if one would like to correct a film strip, the other one becomes lose at the same time. If one has curved or bowed film strips, this can become a huge annoyance, since inserting such films is already complicated. With the holder open, the films are only held in place at one end by two small guides - uneven film material is therefore hardly to tame. Longer guiding rails would minimize the problem, but would have however the disadvantage that the films would have to be pushed in, and one would risk to scratch them. Thus a compromise had to be found. The problem would have been better solved, if each frame would come with its own closing mechanism.
Inserting several individual negatives or positives into the film holder turns out to be extremely difficult. Since there is more or less no guidance present, the individual pictures or short film strips can be aligned only with difficulties. If they are also bowed, it's nearly impossible to insert the pictures correctly into the holder.
The automatic arrangement of the pictures during the pre-scan works great with whole film strips. It is rarely necessary to specify the scan ranges manually, except one has very dark photographs (e.g. night photographs), where the scanner cannot differentiate the bar from the hardly exposed picture area. However mostly one can select the preview with the representation as individual pictures and also select completely comfortably (like when scanning framed slides) the pictures, which should be scanned by marking checkboxes. Here too, no white fields of empty slots in the film holder are shown - the software automatically recognizes when no film is present. Individual or all marked pictures can be rotated or flipped by a mouse-click.
If one would like however to scan several shorter film strips at the same time, then the automatic picture detection nearly always fails, so that one has to make a normal preview-scan of the entire surface and then manually place frames around the pictures which are to be scanned.
While the scanning of framed 35mm-slides works quite comfortably with the Epson V700, the digitization of 35mm-film strips is rather a toilsome affair; real film scanners are doing this clearly better and more comfortable.
Scanning medium format films
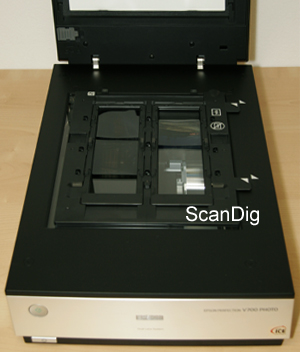
Included in the delivery of the Epson Perfection V700 Photo is a medium format film holder, which can host two medium format film strips. Strips with a length up to 20 cm can be inserted. Thus 8 pictures in the format 4.5 x 6; 6 pictures in the format 6x6 or 4 pictures in the formats 6x7 to 6x9 fit in. Of course there is also no problem with inserting different medium formats in the same time.
As it is the case for the 35mm film holder, it is here also simple to insert whole film strips into the holder. As soon as one would like to scan individual pictures, it becomes however difficult. There is no continuous guidance rail, which makes aligning the picture much more difficult. Curved film material can only be inserted properly with a lot of patience and good nerves, sometimes one fails completely at this task and gives up exhausted.
Just like with the 35mm film holder, the automatic separation of the pictures works usually just with whole film strips. When scanning individual negatives or positives, a pre-scan of the whole surface has to be done to draw frames around the pictures which should be scanned.
If one compares the digitization of medium format targets against the very expensive medium format scanner Nikon Super Coolscan 9000ED, then one determines not just clear quality deficiencies, but also differences in the handling of the film material. While the Nikon medium format scanner works without a glass surface and needs only in exceptional cases a glass plate, one has always disturbing glass in the way when using Epson. A tensing device like the Nikon medium format holder has, doesn't exist in the Epson film holder.
Scanning large format films
A film holder for 4x5" large format flat films belongs to the standard of the Epson Perfection V700 Photo. In that holder fit up to two flat films of 4x5". However 9x12cm films can't be inserted. This format is slightly smaller than 4x5" and was for a long time until a few years ago very common in Europe. Such a film would have to be placed directly on the glass, whereby one mostly gets problems with Newton rings.
The 4x5" films can be inserted very easily after opening the holder and are locked in place by closing it. The targets are held and fixed from all sides. Thus inserting of slightly curved material isn't a problem either. Since the positions of the films are clearly set by the holder, the automatic picture arranging works perfectly and one actually never needs the normal preview mode.
Scanning of other film material
As we can see, the Epson Perfection V700 Photo can digitize almost every usual film format, as well as reflected light material up to DIN-A4. In addition, unusual formats and larger flat films up to 8x10 inch can be processed too.
The provided film area guidance, which has to be placed on the scanning surface, specifies the scanning area for the film material. This range is 8x10 inch (approx. 20x25 cm). Principally every transparent image can be scanned, regardless if these are smallest film bits or giantly large formats. The problem with the thing is, however, that when working with the film area guidance, the film material must be placed directly on the glass surface and then one often gets problems with Newton rings. This could only be avoided by using anti Newton spray or something similar, which however leaves ugly traces on the film - usually also visible on the scan, and which are very difficult to remove - if possible at all. The digitization of other film formats than those, for which special film holders are provided, is therefore only possible with limitations.
Another problem when scanning with the film area guidance is, that the two glass plates, where the film material is placed in between, do not directly lay one on top of the other, so uneven film material isn't pressed flat. One would have to fix such targets with adhesive strips or something similar directly on the lower glass plate, which again increases the danger of the formation of Newton rings. The digitization of other film formats than those, for which special film holders are provided, is therefore only possible with limitations.
The included software
Our test device arrived with minimal software equipment. The only thing provided was the EpsonScan software. According to the product's brochure usually the picture processing program Adobe® Photoshop® Elements 3.0 is included too.
Epson Scan can be operated in three different operating modes:
In the fully automatic mode one can only select the type of source (film or opaque), adjust resolution and activate dust removal and color-recovery. Or one does not adjust anything and let the software do it all.
In the standard mode one has more options concerning the type of target (e.g. black&white negative, color negative, newspaper, photography...). In addition the intended purpose (use target) must be selected, meaning monitor/web or printer, according to which the resulting resolution is then set. One can also adjust the resolution manually by selecting "user-defined". Furthermore one has options for the picture correction. De-Screening (removal of grids when scanning printed images, e.g. magazines), color-recovery and Digital ICE (a hardware-based dust and scratch removal) can be activated or deactivated; contrast and brightness can be adjusted using two sliders. For the representation of the preview one can chose between a normal view, where the pre-scan of the whole scanning surface is shown or the "picture preview", where the software automatically recognizes the position of the different samples and shows them individually as already cut-out pictures.
The professional mode offers a multitude of further adjustment possibilities as for example gradation curves and tonal correction. Here all made adjustments can be stored under different names.
Altogether the included software is a bit thin, there are other devices with a much larger software package. The Epson software is simple, but very useful.
Image quality
Let us come to the most important point of our test: the picture quality. A look at the technical specifications brings up high expectations - the resolution for scans of transparent images in the film holder is stated as 6400 dpi. For opaque images the nominal maximum resolution is 4800 dpi. Those are being digitized quickly and in good quality. Scanning a good, clean photo, leads to a very satisfying result. However one will here rarely need a resolution of more than 600 dpi.
A word about the De-Screening(De-Moire) function, which one can add for non-transparent images: with this function one can automatically remove print patterns. This leads with EpsonScan however inevitably to a strong softening! So this feature has to be dealt with carefully.
Here however mainly the result of film scans is of interest to us. Upfront one thing about this:
The optical resolution of many scanners does by far not correspond to the resolution, which one obtains in practice. Few scanners reach in practice the resolution, which is printed in the brochures.
The claimed maximum resolution of 6400 dpi is higher than in most film scanners. But how much does the Epson Perfection V700 Photo really reach? In a test scan of an USAF test chart the horizontal lines of the element 5.3 and the vertical lines of the element 5.5 can yet still be differentiated. The result is therefore an actual resolution of only about 2300 dpi. That's less than 40% of the claimed resolution. The scan of a 35mm-slide or a negative using 2300 dpi, results in a file with approximately 7 megapixels. That's within the range of many common digital cameras.
This isn't quite a bad value for a flatbed scanner. Very few other devices like this one offer higher resolutions and, as already mentioned earlier, one cannot expect to reach the same values as when using a high-quality "real" film scanner. However, it is nevertheless to be seen as blinding to claim a resolution of 6400 dpi. The sensor of the V700 is able to recognize this many pixels, but the whole optical system of the scanner is not qualitative enough, in order to be able to use this resolution even nearly. Concerning this point, the Epson V700 is inferior to high-quality film scanners. There are however many affordable film scanners, which don't offer more resolution either, some offer even less.
The grain reduction must be used with caution: even using lowest adjustment leads to a loss of sharpness, which increases considerably with the effect being adjusted higher.
Regarding the density range of the Epson Perfection V700 Photo, which is indicated as 4,0 , one must say that it doesn't reach the high-quality film scanners either. Where these still yield information from very dark picture areas, everything is black with the V700, and very bright picture areas are booming out quickly. The results are however better than with most other flatbed scanners.
The hardware-based dust and scratch correction Digital ICE works likewise nicely in the Epson, and "cleans" the negative and/or slide without causing general blurring to the picture.
Finally one can say that the Epson Perfection V700 Photo is good for digitizing normal vacation pictures and similar images even directly from the film. For applications without professional requirements the scanner is very well suitable. Professionals, whom the V700 actually addresses with the possibility to scan medium formats and large formats, won't however be satisfied with the picture quality.
Everyone, who digitizes own slides or negatives with this device, should consider the resolution problem well. One can get 7 megapixels out of a 35mm-picture slide or a negative, which is today already exceeded by many digital cameras, although the slide or negative actually holds about 10-20 megapixels of information. This means through scanning one gives away valuable picture information. While 7 megapixels still sound decent nowadays, it is foreseeable that in 10-15 years only digital cameras for starters will produce so few pixels. Then the old scans will stay clearly behind the current quality and one will have to redo the scans eventually.
So the Epson V750 Pro reaches in practice just about 40% of the nominal resolution. The effect shows in the way, that one scans with the highest resolution of 6400 dpi and gets pictures of about 60 megapixels, thus files of approximately 180 megabyte (uncompressed). Then one shrinks the picture through the picture processing program and receives effective 7 megapixels and files of approximately 20 megabytes (uncompressed).
Scanning speed
The Epson Perfection V700 Photo scans non-transparent images very quickly. A preview scan is ready in a few seconds and also the fine-scan is quickly done. That's also because of the fact that non-transparent images are not being scanned with more than 600dpi. Higher resolutions just make sense in exceptional cases. For a DIN-A4 document using 600dpi the V700 takes approximately 45 seconds.
The story is different with transparent images. The scanning times naturally vary depending on the chosen resolution and eventually added functions, e.g. the dust and scratch correction ICE. Thus it lasts approximately 8 minutes until a 35mm-slide using 6400dpi and activated ICE is completely scanned. Without ICE the scanner needs about 3 minutes. Using a resolution of 2400dpi and ICE, scanning a 35mm-picture takes merely about 3 minutes.
With increasing format of the target, the scanning times are increasing rapidly. For the scan of a 6x7 medium format slide using 2400dpi and activated ICE, the V700 needs 13 minutes. The Epson digitizes a 4x5" large format slide in about 33 minutes using 2400dpi and ICE, and for the same scan but using 6400dpi one must wait a whole 80 minutes. One can only hope, that everything was adjusted correctly - being forced to repeat such a scan can be very annoying.
It is remarkable that scanning negatives doesn't increase the scanning times. The digitization of negatives takes just as long as the digitization of equally large slides. One sees thus that scanning of large quantities of films with the Epson Perfection V700 Photo is an extremely time-consuming affair. If one equips the 35mm film strip-holder completely with 24 negatives and scans them in highest resolution, one can leave his scanner to work alone for a few hours.
If one compares the scanning times with those of a real film scanner, then the Epson V700 Photo emerges as a big snail. To use the full resolution of the scanner and receive at least 2400 effective dpi, one must scan with highest resolution - the corresponding scanning times for this are almost unacceptable.
Summary, result
As mentioned earlier, when scanning film material one cannot expect the same good results from a flatbed scanner as from a high-quality film scanner. The Epson Perfection V700 Photo is designed, just like his competitors, to scan mainly non-transparent images.
If one would now and then like to digitize film material without professional requirements, then the V700 serves well too. It is great, that one can use nearly the entire surface for the scanning of transparent media and can this way scan almost everything that is transparent and flat, up to a size of 8x10". The integration of the hardware-based dust- and scratch correction ICE is also praiseworthy.
For professionals with corresponding, high expectations to a scan, and for people, who want to scan a lot of pictures, this device is not the right one. The image quality is not good enough to compete against a good film scanner, the scanning speed is extremely slow, and the effective resolution of 2400 dpi results in 7 megapixels for 35mm material, even though the files are extremely bloated with about 60 megapixels.
Buying a film scanner
Please, feel free to visit our online shop - it's the only shop on the Internet which is fully specialized on film scanners and accessories! We can provide you with any film scanner at an extremely attractive price and we also can supply you with accessories such as film holders or optional adapters.
Back to the film scanner tests index
|
)