Choice of the right projection screen - purchase advice
There are some important points to be considered for the purchase of a projection screen in order to choose the right screen that optimally fits to one's appliance. This chapter supports those who want to buy a screen step by step finding the optimal screen.
For the sake of completeness I will mention some steps as for example the decision for a front or a rear projection. Finally, there is no private person in his living-room who really has this freedom of decision, and only the fewest companies can really make such a decision for the conference room. But nevertheless, such criterion of decision are mentioned in order to get an overview of what the projection screen- and projection-market does offer.
1. Step: Type of projection
In the first step of decision, we begin with a basic question that is where the viewer sits, where the screen stands and where the light comes from. In 99,999% of all cases, this situation is obvious and logic: the viewer sits at the front of the screen or sidewards, and the light comes from the same direction as the views of the audience, thus is reflected on the the screen. This is the way we know this from the cinema, from the lecture rooms and also from the slide projector at home.
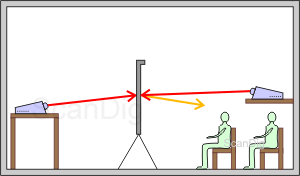
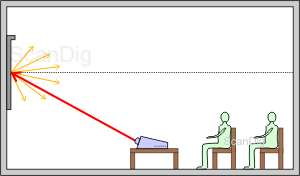
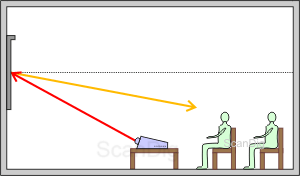
By looking at the right half of the adjoining image, we will find again exactly the same situation: at the right of the projection screen, the audience sits, and above them a beamer is radiating on the screen and the light is reflected by it at the audience. As the projector radiates frontally on the projection screen, it is also called frontal projection.
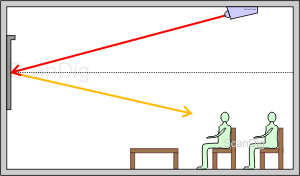
Now we look at the left side of the image and will recognize exactly the opposite of what described before: Here, the projector radiates from the back on the projection screen; the viewer sits at the other side of the screen, thus does not see the projector at all. While in the first case, the projection screen reflects the light and practically does not let anything through, in the second case, a transmission takes place, that means there is barely light reflected on the back of the screen but almost all light gets through it. This is why such a projecting procedure is also called rear projection.
In the case of a private person that wants to arrange a small private cinema in his living room or the boss of a company who wants to arrange the conference room with with some modern projection technique, the question whether to use a front or a rear projection does not arise; Usually, the projection screen stands at a room wall and behind it there are not a few metres space for the mounting of the beamer. Occasionally, one finds the rear projection screens in trade fairs or theatre stages: then, the viewer only sees an image at a projection screen but cannot recognize where the image actually comes from.
For the living room at home or for a normal training room, a normal front projection is applied. The rear projection is only adequate for very special room conditions.
2. Step: Screen model construction
Now we come to the second step for the choice that is the choice of the screen model. Here, each of the home cinema fans have to find the optimal solution for their living rooms and each of the lecturers for their conference room respectively. Basically, there is to differ between three basic types of projection screens: firmly mounted framed projection screens, extendable roller projection screens, and portable tripod projection screens. In the following we will get into the advantages and the disadvantages of these types of projection screens by means of the three following illustrations.
Let us start with a firmly mounted framed screen such as the one of the adjoining image. Such a projection screen is delivered in one piece, thus neither it is foldable nor extendable. Thus, the cloth is stretched in a firm frame. The advantage of this is that there are surely not any disturbing bends in the stretching. Thus, one guaranteedly obtains an excellent plain image without any interferences. Such a projection screen in a firm frame provides some real cinema atmosphere in the living room: on a (hopefully not a simply white one) room wall, only the projection screen frame is hanging; neither a tube above the projection screen nor a extension wire or an electrical switch. Such a situation can be also imagined in a small scale by hanging a flat screen TV of a big format on the wall. A firmly mounted framed screen provides a perfect cinema atmosphere to the living room due to the reason the screen is never removed but permanently catches the eye as a dominating wall element.
The disadvantage of such a firmly fixed solution is obvious: The wall at which the projection screen hangs cannot be used for anything else; no cupboard, no TV, no picture can take this place while the projection screen is not in use. And a big white and empty surface during the day makes the living room of course to appear trist. Thus, the firm framed projection screen is rather a solution for the home cinema in the hobby room or the roof gallery.
Now let us get to the second screen type, the roller projection screens. Such screens have all in common that the actual screen is rolled into a tube and extended mechanically or electrically in case of use. Such a tube is either firmly mounted on the wall or at the room ceiling. Most of the times, the mounting is quite easy: One has to drill between 2 and four holes and fix it with screws/dowels on the wall and/or the ceiling. In case of wall-mounting, a nice picture can hang behind the projection screen, so that the wall is not empty during the day. In case of ceiling mounting, the completely living room wall can stand behind the projection wall so that during the day, there are normal conditions in the living room. Thus, the advantage of the roller projection screens is obvious: in case of non use, they disappear in the small tube and are only extended in case needed.
Such pull-down projection screens are available in different constructions: In the case of purely mechanical constructions (also simply called roller projections screens) there is a handhold or a wire at the bottom of the projection screen with which the canvas can be manually extended and catched in different positions. The electrical construction (called motorized screen), the projection screen is extended fully automatically over a switch. And finally, there is the luxus version in which the screen is electrically extended and/or drawn in by remote control. In the two last cases, there must be of course a plug in the proximity of the screen tube. In the case of a roller projection screen, the canvas quality is very important: It has to be smooth and thick so that once extended, there are no bends or waves formed.
Now we come to the third type of projection screen that is the portable tripod projection screen. The name actually already says everything about this type: they are projection screens that are not firmy fixed on a wall or the ceiling but are transportable and easy to store. If needed, such projection screens are taken out of the cellar and mounted in the living room or also in the friend's place or in the conference room. Most of the times, these tripod projection screens have a tube at the top in which the canvas is rolled up and can be extended by a handhold or a wire. In some variants, the tube is located on the floor and the canvas has to be extended upwards. In case of such so-called floor- or table projection screens, the stability plays a major role: A projection screen on a tripod or with a tube on the floor is never as stable as a firmly mounted projection screen. A light air draught can already make such a projection screen to turn or to incline.
Such a tripod projection screen is only apt for the home cinema in the living room if one only seldom watchs a movie or a slide show, as the permanent assembling and dismantling and the perfect positioning of the projection screen and the beamer-image gets annoying after some time.
Those who arrange themselves a real cinema in the hobby room can afford the expensive and firmly mounted frame projection screen. For the living room at home, a mechanical or electrical roller projection screen is recommendable. Those who only occasionally need a projection screen in different places will be better off with a transportable tripod projection screen.
3. Step: Projection screen masking
In a third choice step we treat a very simple question: Which colour should the frame of the projection screen have, black or white? Or, differently asked, is the whole projection screen supposed to be uniformly white or should be a black frame around the actual screen surface? And if already talking about black or white, how should the back side of the projection screen actually be?
I will first speak about the back part of the projection screen. Obviously, a bright back part lets more light through from behind than a dark one. In case of a screen that is positioned right on a wall, this does not play any role, but in case of a projection screen that is, for example, hanging from the ceiling with a little distance to the wall or stands on a tripod: In this case, the light from behind can disturb and weaken the projected light. Thus, it is an advantage if the back side of the projection screen is black, so that this effect is basically omitted.


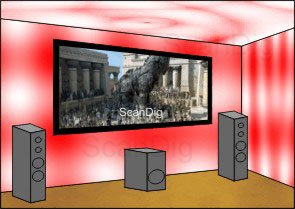
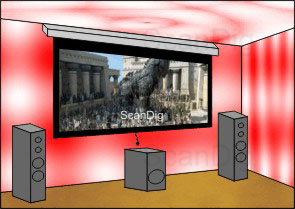
In relation to the question of the projection screen masking, we look at the two images above, once projected in a white and once in a black frame. One immediately recognizes a much more pleasant contrast to the black background than in case of the image of the left. While at the left, the clouds and the snow barely outstand from the white background, at the right side, the black frame perfectly limits the image. Thus, a black marginal frame is absolutely recommendable. For more information in this concern please look in our page about Screen Formats.
A black backside of the projection screen is recommendable so that there is no light from behind disturbing and/or weakening the projected light at the front part. A black framing of the light is recommendable in order to get a clean edge of the image with a very good contrast.
Those who arrange a real home cinema in the hobby room and completely darken the room for watching a movie (as it is done in the cinema), can abstain from a dark masking, as the projection screen surface that is illuminated is in any case already dark. But in the living room at home, there is normally a certain amount of remaining light projected so that a black framing of the projection screen is highly recommendable.
4. Step: Type of projection screen, cloth type and gain-factor
Now we come to a very important point that is the type of canvas. Those who have already looked into some projection screen prospects or type lists already heard about all possible sorts of materials for the projection screen as the pearl projection screen, the silver projection screen, the cristal projection screen, the metal projection screen, the canvas projection screen, plastic projection screen etc. There are different types of materials, each causing a very specific reflecting behaviour in the projection screen. In the following paragraphs, the possible types of projection screens are shortly presented.
In our page Screen Types, each of the projection screen types and their respective types of canvas are described in detail. Basically, there are 4 types of projection screens: The canvas of type D diffuse the incidenting light more or less uniformly to all directions, thus they do not have a marked preferential direction. The projection screens from type S reflect the incidenting light as a mirror. Projection screens of type B reflect the incidenting light back in the same direction it came from. And finally, the projection screens of type R that are designed for rear projections, thus transmit and do not reflect the light.
The light density factor, i.e. the gain-factor, respectively, is an important parameter for the projection screens. It indicates the factor with which the light is more or less intensively reflected to a certain direction than it is the case of a standard white surface. A gain-factor of approximately 1,0 to 1,3 describes a uniform radiating behaviour of a projection screen; a higher gain factor symbolizes a bundled reflecting behaviour into a determined preferential direction. There is a detailed information about this topic on our own website about the Gain factor. But now we come to each of the types of projection screens and look therefore at the following image series.
The first of the three images shows a diffuse projection screen of type D, that radiates the incidenting light uniformly to all directions, no matter of which direction the light comes from the projector. In the introducing chapter about the light density factor it is explained that such a diffuse projection screen is of indispensable need for our living room at home, as here, not only those viewers sitting on the executive chair but also the rest of the family sitting on a sofa at the side or at the dining table also enjoy a good and bright image. In case of such a diffuse projection screen it does not play a role if the projector stands on the floor or is hanging from the ceiling. Such a projection screen is also optimal for some small training and conference rooms. Such a projection screen can be also described as a standard projection screen or an allrounder. It normally consists on canvas or plastic. Such a D-projection screen typically has a gain-factor between 1,0 and 1,3, that means there is only a very slightly marked preferential direction: Those sitting at the front of the projection screen will enjoy an unperceptibly slightly brighter image as those looking from the side to the projection screen.
Now, most of the readers can get straight to the next step, as the two types of projection screens described in the following text are only assigned to very special form of use. In the adjoining image, a projection screen of type S is shown. It reflects the light back that comes from the beamer as a mirror. This mirror effect is achieved by a metal or a silver layer on the surface of the projection screen. Such projection screens have normally a gain-factor of 1,5 up to 2,0, that means that they have a marked preferential reflecting direction in direction to the reflected incidenting axis. Even though some readers will realize that this is exactly the case of their living room at home or in their training room, a standard diffuse projection screen is still enough, as the special projection screen describe in this text is mainly recommended for large lecture rooms or halls due to their strong light bundling.
The third type of projection screen B that is described here works in a similar way as the previously described type S, but the light is not reflected like a mirror but opposed. This almost unimaginable behaviour that the light is reflected in the same angle as it incidents is achieved by a cristal or a pearl surface. Also the situation presented in the image might be recognized from some readers as the case that takes place in their home cinemas or lecture rooms, but also in this case, there is to mention that such special projections screens are designated for larger rooms, where the available light quantity of the projector or the beamer has to be used in a very sparing and optimal way.
A fourth type of projection screen is of type designation R. It does not reflect the incidenting light but lets it through. Such a projection screen is needed if one choosed the rear projection procedure of the above mentioned step 1.
For a small home cinema in the living room or in the hobby room and for the small training and conference rooms, a very normal diffuse projection screen (type D) with a gain factor between 1,0 and 1,3 is the most adequated.
5. Step: Image format, aspect ratio
This step is about the image format of the projection screen. The image format is the aspect ratio of the image width to the image height. Thus, it is not yet about the actual size of the projection screen but only the proportions. The choice of the actual size takes place in the next step.
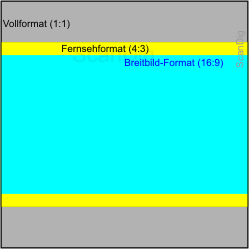
The adjoining illustration shows the proportions of the three different image formats with each having the same image width. In the case of a 1:1 full size projection screen, the image height equals the image width. It is specially apt for those users who mainly do some very normal slide projections with a slide projector, as for a 35mm image projection it is characteristical that there are either landscape images as also portraits of the same size.
The projection screens in TV- and/or computer format 4:3 are the ones of the most common use, as also most of the beamers project with such a ratio. 4:3-projection screens are perfectly apt for the living room where either normal TV as also DVDs are watched, but also for training and conference rooms, where there are mostly computer images beamed to the projection screen. If a 4:3-projection screen is used for a normal slide projection, the portrait format images are strongly reduced into the image space available. The projection screens in the 16:9 wide-screen format are specially apt for movie fans who want to watch their DVDs with a beamer. But here, there is to mention that a wide-screen is not really useful in case a common 4:3-beamer is used. Thus, in summary:
Those who mainly beam some slides with a slide projector to the wall will be best off with a 1:1-projection screen. Those who mainly beam some computer and TV images to the wall will be best off with a 4:3-projection screen. A 16:9-projection screen makes only sense if one also employs a 16:9-beamer for the projection.
Advice: We have a very detailed website about projection screen formats, in which each of the formats are described in detail. Moreover, it is shown how certain images (slides, news programe, football game, wide-screen movie) are best projected by determined projectors/beamers. By the image samples, one can best visualize how a determined image is represented on a certain projection screen.
6. Step: Size of the projection screen
Now we get to the final step for the choice that is the actual size of the projection screen. Those who already choosed a certain format in step 5 do only need to determine either the image width or the image height; the other respective measure results from the predetermined aspect ratio. In the follwing text it is constantly distinguished between the single-row and the multiple-row seating.
In the living room at home, the seating is, of course, always single-rowed, the word "seating" sounds a little uncomfortable, as here, one of course has a wide sofa or a comfortable armchair for watching TV. But in a conference room or a training room, people sit in several rows one after the other, typically on chairs and not in armchairs.
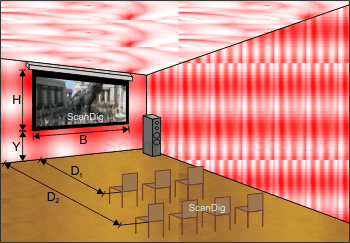
Let us first have a look at the adjoining image in which the most important measurements and sizes are drawn in. The width of the projection screen is described with B and the height of the projection screen is marked with H. The distance of the lower edge of the projection screen to the floor is measured as Y. In case of a seating of several rows, D1 is the distance of the first row to the projection screen; D2 is the distance of the last seating row to the projection screen. In the living room at home, people always sit in the first row, thus D1 = D2.


Let us start with a training room or a real home cinema room where several seating rows are arranged one after the other. In this case, the rule of thumb is that the height of the projection screen H is of approximately 1/6 of the distance up to the last row. The minimum distance to the first seating row should be of two times the height of the porjection screen, so that the viewers of the first row do not have to turn their heads permanently to the left and to the right. As an example, let us take a training room of a length of 12m in which the chairs of the last row are positioned at the back wall. Then the height of the projection screen should be of approximately 2 m; the first seating row should have a minimum distance of 4 m to the projection scree. Then, the lecturer also has enough space for moving.
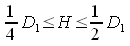
But these formulas cannot be straight applied in case of the living room at home where everybody is sitting in the first row on the couch. In this case it is recommendable to choose the height of the projection screen in a way that it is somewhere in the range between a quarter or half of the distance to the viewer. Of course, this is a personal matter of taste, depending on whether one wants to have the projected image discretely in the background or prefers to be buried by a large-size screen. In the cinema, most of the people prefer to sit in the back area; but there are also film fans who prefer to sit in the front area in order to be closer to the action. A typical German living room has a width of 4 m ; then, the projection screen should have a height between 1 m and 2 m.
Now we have detected the height of the projection screen H for two cases of appliance. As already mentioned in the beginning, the screen width B automatically results from the aspect ratio of the projection screen. Example: Those who choose a projection screen heighted 2 m with an aspect ratio of 4:3 will need a width space on the wall of approximately 2,66 m; in case of a 16:9-projection screen, the width belonging to the height of 2 m is already of 3,55 m! This example shows that also the aspect ratio has to be considered in the choice of the size.

Finally, there is still to clarify the height Y of the distance to the floor the projection screen should be hanging. Here, there is also to differ between a single row and a multiple row seating. in the living room at home, the distance to the floor is typically of one metre; in a training room, the projection screen is positioned a little higher, so that the viewers sitting in the back can also see the whole image; in this case, the height is of approximately 1,25 m. Now, let us resume the aboce mentioned in a box:
Height of projection screen in a conference room with several seating rows = 1/6 of the distance to the last row
Height of projection screen in the living room approximately 1/4 - 1/2 of the distance to the sofa
Distance of the lower edge to the floor approximately 90cm in the living room and approximately 125cm in the conference room
The width of the projection screen results from the choosen aspect ratio (Step 5)
Purchase of a projection screen
If you have worked out thoroughly the above shown steps from 1 to 6, the adequate projection screen for your living room and/or for the training room should be clearly defined. In our projection screen shop you will find different projection screen models, from the portable table-, floor- or tripod projection screens to pull-down projection screens to a reasonable price up to motorized projection screens that can be handled by remote control.
Back to the index projection screens
|