Scanner calibration with IT-8 targets
If you have decided to digitize your own pictures with a scanner on your PC the results can be very poor for the undiscerning user: The colors on the monitor can strongly differ from the actual original sample with its great and nice colors.
To understand whats going on you have to learn a few things about colour management. Every input and output device generates certain color faults when image data processing. These have to be defined with a reference color space through a comparison of set and actual values. Eventually they also have to be adjusted with ICC-profiles. This process is called calibration or profiling. If our output device the monitor is calibrated (more information on our website screen calibration) but the input device the scanner - is not, then although we have a correct display of the image file, we do not have a correct image file itself.
In order to get a correct image file the scanner needs to be calibrated. What that means and how this exactly works we want to show you on this page.
Why you should calibrate your scanner?
As already mentioned every scanner generates image files with specific color faults. This means that a picture from the scanner is not identical with the original. So you have to use an image editing software to correct those faults. But this leads inevitably to image degradation because every single change of a finished image file means a loss in image quality. If the scanner makes specific image faults these faults have to be corrected for every scanned picture in the image editing software. So one and the same image fault possibly needs to be corrected thousand or ten thousand times. There it would make more sense if this fault would be eliminated at the source - the scanner.
Now you could say: "Well, then I'm going to adjust the colours at the scan process with the scan software!". But that would make the scan process considerably more complex. Just imagine you are digitalizing a magazine with 100 slides in batch processing for example with the magazine scanner Reflecta DigitDia 6000. Then you would have to prescan, correct the color faults and finescan the image and that would mean that the batch scanning process wouldn't be one anymore. Furthermore you can not visually compare the original sample which is now in the scanner being scanned with the prescan image shown on the screen. The effort of image edit every single picture is still sustained and relocated from the image editing software to the scanner software.
"I just buy myself a professional scanner like the Nikon Super Coolscan 9000 ED. Such a device surely does not even have color faults at all!" you might say. Unfortunately that is not the case. A high-end scanner indeed has less color faults than a cheaper consumer device but it is not free from color faults either. If you compare a scanner with a watch then you know that a watch bought in a supermarket for 5 Euros has to be set every week while a swiss brand clock for 5000 Euros has to be set only once a year. But even the luxury clock needs to be set (= calibrated) from time to time.
Every scanner has color faults which can be corrected by a calibration. This applies for low priced beginner models and for professional devices.
In order to correct certain scan faults the following IT-8 calibration needs to be executed. Thus scan faults will be canceled at the source - the scanner. By the scanner calibration you get automatically correct scans and do only rarely have to edit the pictures afterwards. Because of this the scanning process is simplified and shortened extensively with better image quality results.
Basics of scanner calibration
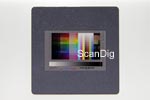
To set a clock - which means calibrating it - you need an exact time reference, for example a radio controlled clock which receives its signal from an extremely precise atomic clock. For a scanner calibration you also need a specific reference-sample which contains exactly defined color patches: the so-called IT8 target. The exposure and the construction of the target is accurately controlled. After production the color patches are measured precisely with a colorimeter and saved in a so-called reference file. The reference file is supplied together with the target. So a IT-8 target contains certain color patches whose exact values are saved in a reference file. And exactly this target is used together with the reference file for the scanner calibration.
For the scanner calibration the target is scanned and the software measures the color patches. Afterwards the set color values are compared with the actual values of the reference file. The difference of these values is saved in a specific file: the ICC-profile. This profile contains information about the color deviation of the used scanner.
It is important to know that the calculated profile applies only for the used scanner since the color deviations vary not only from manufacturer to manufacturer but even from model to model: Two exact same scanner models can have different color deviations because of production variation. Compare the bargain of two identical watches in a store: One watch is one minute fast, the other one is one minute slow. Applying the calibration from the first watch to the second - setting the clock one minute earlier - would result in a change for the worse regarding the second watch.
If you now scan any sample with the calibrated scanner, the correction profile can be assigned to the resulting image file. A professional scanning software like SilverFast Ai does that automatically if configured correctly. Then you will never see the faulty image result. As a result you will get scan files in the RGB color space which already contain correct color values.
If you do not have a scan software which assigns the correction profile to the scans you can assign the profile to the image afterwards with image editing software which is capable of color management. At the display of the image the correction profile is included from the image editing software with the result of an image with color fidelity. This of course only applies if you have a calibrated and profiled output device (please look at our websites about screen calibration and printer profiling for more information).
The IT8-standard for calibration targets
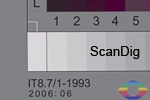
IT8 is a set of standards for color control. It exists since 1993 and was defined by the American National Standards Institute (ANSI). In the ISO 12641 the exact content of the transparency targets (IT8.7/1) and reflective targets (IT8.7/2) was defined.
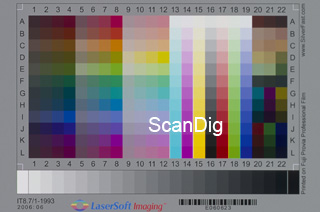
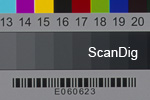
For scanner calibration the standards IT8.7/1 (transparency-targets) and IT8.7/2 (reflective-targets) are of significance. These targets consist of 264 color patches and a 24 stepped greyscale.
The rows 1 to 12 represent colors which differ from each other corresponding to the HCL color model in hue, chroma and lightness).
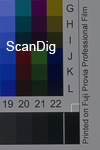
The CMYK colors cyan, magenta, yellow and key (black) are displayed in the columns 13 to 16 in various brightness levels as well as the RGB colors red, green and blue in columns 17 to 19.
The columns 20 to 22 are not assigned to any fixed colors. The manufacturer can choose here which hues he wants to take. At the lower bottom of the target you will find the grayscale with its 24 gray shades from Dmin (white) to Dmax (black).
Even lower we see that it-8 targets are manufactured in different dimensions for different types of films. But the composition of the targets regarding the color patches and the grayscale is the same for every types of targets.
What has to be paid attention to when calibrating?
In contrast to the camera profiling you barely can make any mistakes. Professional scan software like SilverFast Ai is capable of calibrating the scanner within the scan program. You only put the target into the scanner, make a prescan and click on the calibration button. A detailed description can be found in the following chapter scanner calibration with SilverFast Ai. Of course you should pay attention that the sample - in this case the target - and the scanner are tidy. This applies especially for reflective originals.
Additionally it is important to choose the appropriate reference file for the target evaluation. With SilverFast Ai this happens automatically with the help of a bar code on the target which the software can read out. The reference file is saved on the corresponding CD. If not, the software searches for a matching code on the SilverFast website. For those who want to look for reference files themselves can do this on the SilverFast website, too. When using other software you might have to determine the right reference file yourself.
Worth mentioning is the fact that the IT8 reference files have a standardized composition so that all targets with their reference files can be combined with every calibration software.
When using the scan software for profiling it will deactivate any adjusted image corrections like the brightness or the colors automatically. However when using an extra software for calibration you have to pay attention to do this manually. So put all controls back to their standard settings or you will receive a faulty profile!
When the profile is generated it can be assigned to any image file which was scanned with this used scanner and you do not have to worry about additional lossy image quality.
For users who have flat bed scanners with a transparency unit is important that the created profile only is effective for the same type of sample which the profile was created with. A profile created with a transparency target (slide) applies only for slides and a profile created with a reflective target only applies for reflective scans. SilverFast Ai automatically uses the appropriate profile because the software knows with the help of the made adjustments which type of sample is being scanned. If there is only one reflective profile then transparency originals will be output non-profiled and vice versa. Are there appropriate profiles for both types of samples than the software assigns the correct one automatically to the image file.
Targets of different film types and paper grades
There are IT8 calibration targets for reflective and transparent originals on different film types and paper grades. This makes sense because the film- or paper type affects the color faults of the scanner differently. In the ideal case you use a target which has been made on the same material like the pictures you want to scan.
However this is not possible in most cases since there is no IT8 target for each film type or paper grade. In practice it is the best way to choose a profile created on a material base of the same manufacturer like the material you want to scan. When scanning pictures of a Fuji film you use a profile which was created with a Fuji transparent target, when scanning a Kodak film you use a Kodak target, etc.
In essence you can say that through a IT8 color calibration the color fidelity of a scanner is is raised from 80% to 95%. The last percentage points can only be achieved with a professional scanner and the use of a target type fitting the film material that is about to be scanned. For example a Fuji-IT8-Target for scanning Fuji films.
At our online shop in the product category IT-8 targets you will find plenty of IT8 targets with different dimensions and different film types. For example there are transparent targets for 35 mm film (25 x 36 mm) or medium format (6 x 7 cm).
But even a calibration with only one target whose profile is being used for all scans of different film types and paper grades comes with a remarkable improvement of color display. Further information for a target selection of different film- and paper types can be found on our SilverFast website.
How often does a scanner needs to be calibrated?
Because a light source of a scanner suffers from variability which is affected by ambient temperature and light duration it is necessary for consistent good scans that the profiling is repeated regularly. The best possible result can be achieved if the scanner is calibrated every time before the actual scanning takes place.
Usually this is not necessary. A calibration once a month is adequate in practice. Only for professional devices, for example for painting reproduction, where achieving reliable colors is most important the daily calibration is required. Additionally it is recommended to calibrate a scanner if he was not used a while ago.
In any case you should not think that a scanner only needs to be calibrated once after buying. The created profile can result can lead to damaging results after a while if it does not fit the actual state of the scanner anymore.
Professional users calibrated their scanner on a daily basis. For home users it is adequate when calibrating the device once a month.
Since a scanner calibration only takes a few minutes you should make a fresh calibration once in a while for getting images with correct color fidelity.
Durability of IT8-Targets
Like every analogue photo material IT8 targets suffer from image degradation as well. The aging process causes color shifting which enhances through the years. This can lead to unusable images. People who have thirty-year-old slides at home know how this is meant.
The aging related quality loss can be slowed down with the right storage of the materials: The best way to do so is in a cold, dry and dark place. This applies for reflective as well as transparent originals. Unfortunately the aging process is not completely stoppable.
Generally the date of manufacture is printed on the IT8 targets. For best calibration it should not be older than 20 years. But even then it can still be used for calibration if it was stored like described above. But beware: Even if the target does not show signs of color alteration it can be possible that the colors are not good enough any more to ensure a good calibration with the result of creating a faulty profile.
IT8 calibration and negatives
The IT8 standard does not allow for calibration of negatives. Due to the various orange masks of negatives with the resulting higher contrast it makes no sense to calibrate a scanner for negative material. The IT8 calibration only works for positives.
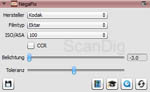
While getting obvious quality improvements from scanning positives with the help of IT-8 color calibrations, for negatives there is a special feature in the professional scan software SilverFast Ai Studio which leads to a considerable raise in image quality for negatives - the adjustments within the NegaFix dialogue.
With this SilverFast offers the possibility to adjust the film type of negative material so that certain color adjustments are made automatically depending on the chosen film type for image improvement. The benefit of image quality when scanning negative material is notable if you have chosen the correct film type. But this process has not to be mistaken with a scanner calibration since here the color faults of the device are not adjusted but simply the film characteristics are considered and used for image optimization!
Limits of scanner calibration
The calibration does not make a good scanner out of a bad one. Lack of dynamic range, sharpness and resolution can not be adjusted by a color profile.
If the color display if the scanner is originally bad a calibration does not necessarily lead to the desired result. If the colors of the scan differ very strongly from reality the profile itself can not adjust those shortcomings without creating color disruptions because a certain amount of colors drop out due to the due to the intense color changing. This is related however exclusively to the cheapest flat bed scanners which are available nowadays for a double-digit sum. The image quality of high class flat bed scanners and of course film scanners can be improved remarkably.
We already mentioned that a scanner calibration with an IT-8 target for negatives has no effect. The IT-8 calibration only brings quality improvement for positive scans of either transparent or reflective originals.
Naturally you can not expect wonders from a scanner profiling. Often enough a bad image quality comes from a bad original than a non-calibrated scanner. A picture with bad exposure, a blurred shot or a dull picture without any contrast is not going to be better with a IT-8 calibration. Such photos are still predestinated for the image editing software. But with the IT-8 calibration you can be sure that you do not have to correct the scan faults and you can concentrate on the pure image.
Scanner calibration with SilverFast Ai Studio
With SilverFast Ai Studio the business concern Lasersoft Imaging offers a professional scan software for all current scanner models. With this software a scanner can be calibrated very easily. We want to demonstrate the necessary workflow which applies likewise for transparent and reflective targets.
Step 1: Activating User-defined ICC profile names
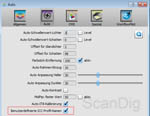
This step is not really necessary but enables the handling of multiple profiles, e.g. for different film types. For this you click on Edit, then on Preferences and choose Auto. Here you activate the option User-defined ICC profile names.
From now on you can give a name to every created profile. If this option is deactivated SilverFast will name all profiles alike which means that previous profiles will be overwritten. In this case it would not be possible to have several profiles.
If you skip the first step the steps 3 and 4 will also be redundant for you and you only have to do the next step.
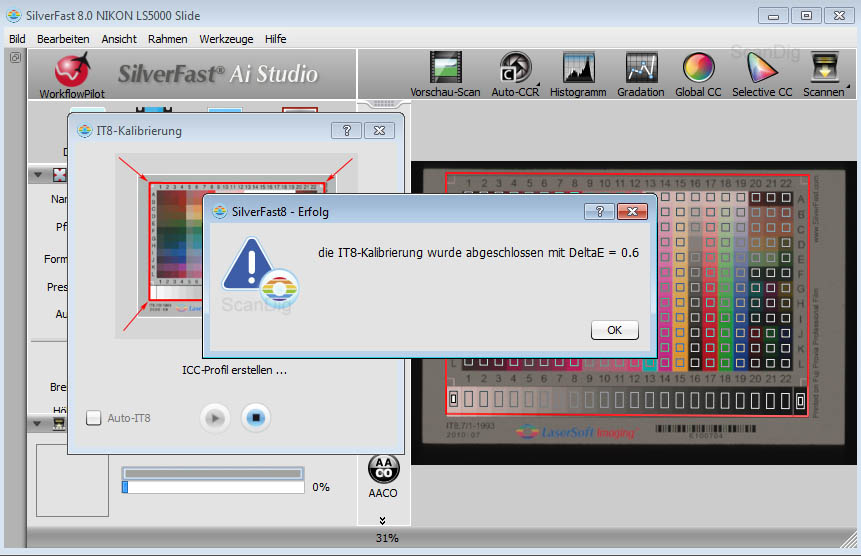
Step 2: Scanning the target and creating the profile
Now you can put the IT8 target into the scanner and prescan it. Define the scan area by dragging a the scan frame around the outer borders of the target.
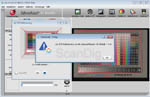
Click at the calibration button to start the process. In the appearing window you see the target again after an automatic prescan. Here you have to define the frames of the inside area which contains the color- and grayscale with the help of the four-sided dotted frame. Inside the frame are positioning markers for the color patches which are lying precisely over the color patches if adjusted correctly (see screenshot).
When now clicking start SilverFast identifies the reference file for that target with the help of the printed bar code and will create the corresponding ICC profile. If SilverFast notifies that the reference file could not be found you have to proceed like described on your questions and answers website.
Step 3: Naming and saving the profile
If you did not skip step 1 you have to name the profile for saving. It is recommended to include the scanner model, the actual date and the target type into the profile name. This way it is ensured that you get a clear overview of your profiles. For example a reasonable name would be: ReflectaDigitDia_2012_12_15_Kodak.
From now on every picture scanned with SilverFast Ai will consider this profile as long as you do not deactivate it or choose a different one.
Step 4: Choosing the right profile
Open the SilverFast preferences to choose a specific profile for the following scans. Go to the CMS-Tab → profiles for ICM → input. There you can choose the scanner profile to be used. User of a flat bed scanner with integraded transparency unit can choose between profiles for reflective and transparent originals.
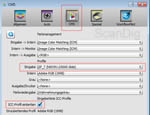
Like already said it is paying off to include all important information into the profiles name so that you can select the right profile from a list. For this the option Image Color Matching (ICM) has to be activated in the upper area Color Management → Input → Internal or a selection of the profile is not possible.
The accomplishment of the IT-8 color calibration with SilverFast Ai Studio is an easy task and does only take a few minutes. If creating different color profiles with different targets the choice of the desired profile is only a mouse click away in the preference dialogue.
The great advantage of the IT8 calibration with SilverFast is that the active correction profile will be assigned automatically to your scans. SilverFast creates from the original scan and the correction profile the final corrected scan file in Adobe® RGB color space. So you never get to see the incorrect scan file.
SilverFast is processing the original scan files and the active corretion profile automatically into the corrected scan file.
While requiring about 15 minutes for the first TI-8 calibration you will only need a few minutes as an experienced user.
Examples for image improvement of the IT8 calibration
On the basis of some scan examples we want to show how much the image quality can be improved from a scanner calibration. Please click on the following images, a windows will open which will change between the non-calibrated and calibrated image.


The first two images were scanned with the professional high class film scanner Nikon Super CoolScan 5000 ED with SilverFast Ai Studio. For the scanner an ICC profile was created and we digitized the pictures once with and once without assigning the profile to the images. You can clearly see that a professional scanner like the Nikon LS-5000 ED does a very good job even without a calibration. With the IT8 calibration, however, the colors are displayed more naturally and you save the time for image editing afterwards.

Both adjacent pictures were digitized with the low-priced Reflecta ProScan 7200 which is favoured from hobby and semi-professional photographers. Here we have created a profile with SilverFast Ai Studio as well to show you the comparison. You can see that the differences between the non-calibrated and calibrated images are strong. The non-calibrated images have a color fault and should be image edited. However the calibrated ones are very usable.
It stands out that the images with IT-8 profile have more natural colors as the originals look like in reality and on the film. We did not do manually corrections like adjustments in the scan software in order to present an objective impression of the quality improvement.
As you see even the calibration of a high class device like the Nikon Super Coolscan 5000 ED leads still to improvements of the image result. In contrast the differences regarding the low-priced Reflecta ProScan 7200 are very big. Generally speaking: An IT-8 color calibration effects the image quality the more the cheaper the scanner is.
Not to speak of the time saving you have with a IT-8 calibration because of the image editing shortfall it becomes clear how important an IT-8 scanner calibration for raising image quality is. Most scanner achieve their full performance only through a professional scan software like SilverFast Ai Studio in combination with an IT-8 calibration.
Summary, Conclusion
No input or output device can be so easily calibrated like a film scanner or a flatbed scanner. The IT-8 calibration with SilverFast Ai Studio takes only a few mouse clicks and minutes.
The raise in image quality from the IT-8 color calibration for scanners is very large. Without a color calibration you perhaps have to correct the scan faults of thousand or tenthousand of image files. With the help of an IT-8 color calibration the scan faults are detected once and are corrected automatically for every scan. The IT-8 calibration supplies a considerable image quality improvement and saves time for the user, because the scans are only little in need of image editing.
Back to the index colour management
|
)
)
)
)
)
)
)
)
)
)
)
)