Test report Plustek OpticFilm 135
After 5 years without news from Plustek in its film scanner area the Plustek company introduced with the OpticFilm 135 a new device on the market in spring 2017. Like the older film scanners also this device is named OpticFilm. The nomber 135 makes clear for which film type the scanner has been built, namely for 35mm films.
While the 35mm film scanners of Plustek had the same construction for more than a decade the OpticFilm 135 has a brand new case. Thus it can hardly be classified into the former series of OpticFilm scanners. Furthermore, it was not presented as a successor of an older device but rather as a new, independent one. Since the Plustek OpticFilm 135 has no automatic dust and scratch removal function according to the technical data sheet, one might consider it as a successor of the Plustek OpticFilm 8100. The OpticFilm 135, however, is so different, that we do better not consider it as successor of a former device but rather as a really new scanner.
While the most scanner manufacturers have given up theier scanner production long ago and other manufacturers only upgrade existing models Plustek indeed brought a brand new scanner on the market. With the OpticFilm 135 Plustek goes a totally different way compared to its former film scanners, existing for more than a decade: The Plustek OpticFilm 135 is not delivered with the SilverFast scan software but with an own scan software with the name QuickScan Plus. In the following review we have tested the Plustek OpticFilm 135 in detail.
Equipment, accessories and performance data of the film scanner
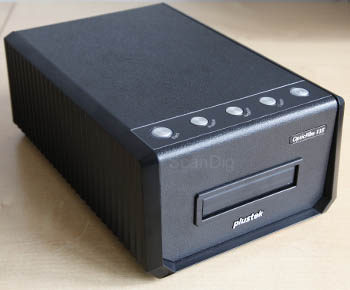
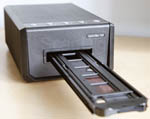
The Plustek OpticFilm 135 is delivered in a small cardbox including accessories. The scanner is very compact with its proportions 175mm x 259mm x 104mm so that it hardly takes place on your desk. With its approx. 1,6kg weight it is very light so that it can be shifted easily and carried to another place. In spite of the small dimensions and the light weight the scanner makes a very solid impression from outside. The design is very good; with it it excels all other models of the house Plustek.
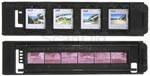
There are 2 film holders in the scope of delivery of the scanner. The slide mount holder can take 4 mounted slides; in the film strip holder you can insert a 35mm film strip with a length of up to 6 pictures or 6 singular pictures. In the scope of delivery there is furthermore a power cord, a USB cord and a software DVD and a quick start guide. There is not more in the small cardbox, and you even don't need more. So you get all you need for scanning negatives and slides.
The OpticFilm 135 has a LED light source which samples the films line by line with an optic resolution of 3600 ppi. With an optical nominal resolution of onlay 3600 ppi Plustek goes a reasonable way, since the OpticFilm scaners of the last years came up with astronomical nominal resolutions, which could not achieved in practice, not even by 50%. So the nominal resolution of 3600 ppi gives hope that they can be achieved nearly and so artificially blown up scan files ares avoided. Plustek indicates a density range of 3,4. That is a very low value for a film scanner and does not let you expect a good image quality. Especially on films with high contrast, with very dark or very bright motives, the small density range has a negative impact.
The Plustek OpticFilm 135 can produces colour scans both with the usual 24 bit and with 48 bit colour depth. In 48 bit colour depth scans 16 bit are used for each colour channel instead of 8 bit. Since grey scans have only one colour channel the output reduces to 8 bit or 16 bit, respectively. Plustek indicates a scan speed of 40s for a 600ppi scand and 205s for a scan with the nominal resolution of 3600 ppi.
When going through the data sheet of the Plustek OpticFilm 135 one misses an essential important feature: The scanner has no hardware dust and scratch removal procedure via infrared scan included. An automatic dust and scratch removal fuction is very usefull for scanning slides and negatives and normally is standard in film scanners in this price field. For us it is mysterious why Plustek has done without this important feature. Most certainly we can expect a successor model soon including this important feature.
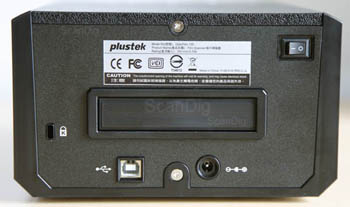
On its back side the scanner has a plug for the power cord and for an USB 2.0 cable for the connection with a PC or MAC. Furthermore there is a small switch on the back side for switching off the scanner completely. You can also switch it off with the energy save button at the top of the scanner. This button corresponds to a Stand-by mode, which you certainly know from your PC. Using the energy save button the scanner is switched off, however, it still consumes energy in order to be prepared to by immediately available when pressing that button. On the top of the case there are 5 buttons for operating the scanner. Next to the just described standby button there is an eject button which ejects the film holder from the scanner. Additionally there are 3 buttons for operating the scanner: a positive button, a negative button and a custom button. We will come the them later.

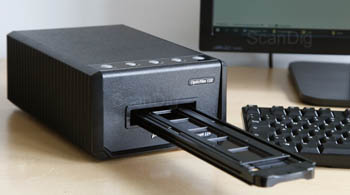
When mentioning an eject button this indicates a powerful feature of the scanner: Compared to the former film scanners of the Plustek OpticFilm series the OpticFilm 135 has an automatic film transport included. A film holder (no matter if the one for framed slides or the one for film strips) is automatically feed in and while scanning it is moved forewards step by step automatically. The film holders are inserted at the front side of the scanner case. While scanning they stick out at the back side ofthe scanner. So you need a certain destance to the wall in order to avoid the film holder striking against it. By pressing the eject button the film holder will be ejected at the front side of the scanner. So you operate the scanner comfortably at its front side and you can enjoy the automatic batch mode.
In the scope of delivery of the Plustek OpticFilm 135 there is a DVD which contains the scanner driver and the scan software. As described at the beginning Plustek goes a completely new way in terms of software compared to the previous models of the OpticFilm series: As scan software SilverFast is not included any more but an own scan software with the name QuickScan Plus with integrated Easy-to-share function for Facebook, Flickr, Picasa and Twitter is included. When you have a look at the technical data and the features of the scan software you will notice that Plustek addresses a different audience compared to its previous film scanners. The target group are not photographers which intend to make high quality scans and archive their film material, but highly networked people who just want to quickly scan a couple of slides or negatives in order to spread the in the internet.
Installation and setup of the Plustek OpticFilm 135
The installation of the Plustek OpticFilm 135 is a quick and simple matter. The only essential thing one should consider is that the software including the driver has to be installed first. So one puts the included DVD in its DVD drive and starts the installation program. After a couple of clicks during the installation both the scan driver and the QuickScan-Plus Software will be installed and the scanner can be plugged to the computer. Plustek allowes Windows operating systems version 7 or higher and Mac OS-X systems version 10.8 or higher.
Since with the software installation the driver has been installed, too, the scanner will be automatically recognized after connecting it to the computer with the USB cable and after switching it on. Then the scanner is ready to work and you can start scanning. Within our test this complete installation procedure has taken only a couple of minutes, which is exemplary and comfortable.
Plustek does not deliver its OpticFilm 135 with a comprehensive manual but rather with a quick-start guide in 10 different languages. That quick start guide is ona a poster sized leaflet, on which one column is for one language. This sounds scarce and modest, however, is sufficient in order to describe the installation procedure and the first scan steps in detail. One can find detailed help to the scan software in the online help of the scan software and in the online manual, which is installed automatically.
Scanning mounted 35mm slides with the Plustek OpticFilm 135
For scanning mounted 35mm slides with the Plustek OpticFilm 135 you insert up to 4 frames into the slide mount holder which is a part of the standard delivery content. We can mention here, that is is no problem to insert mounted negative films, too. In order to avoid mirroring the scans within the software we recommend to insert the frames in that way that they are upside down and not side-inverted if you look at the film holder with the arrow on the left side in front of you. Also portrait photos have to be turned into the landscape format, otherwise they will be cut automatically. In the step View and Edit they can be rotated by 90° later.
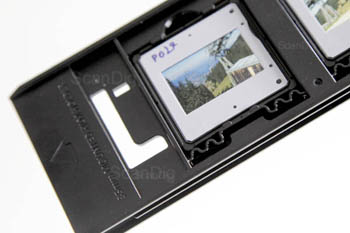
When the film holder is loaded it must be inserted into the slot at the front side of the scanner. You will notice a small resistance and the eject button lights. Now the scanner grabs the film holder and feeds it inside later during the scan procedure. As soon as the scanner has grabbed the film holder the eject button lights in a blue colour.
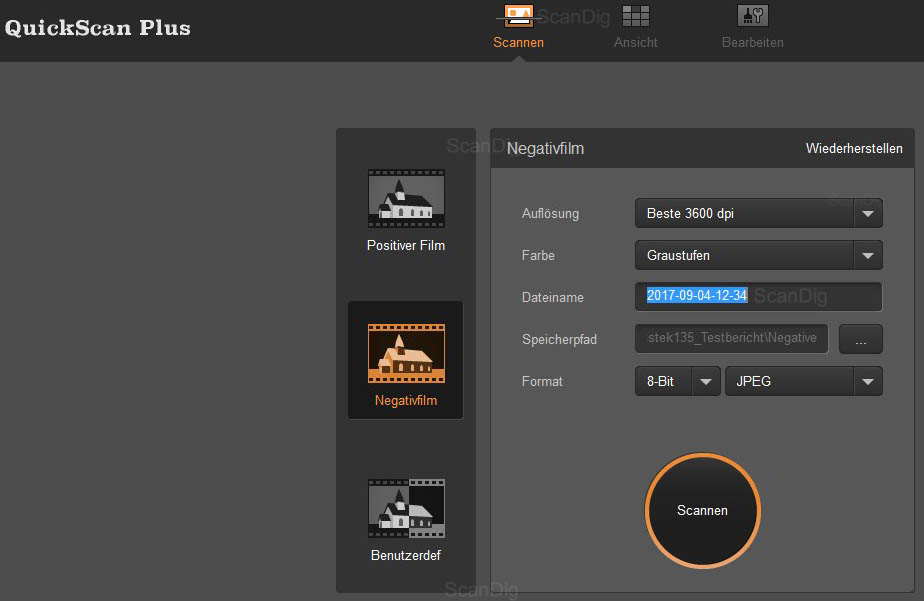
In the QuickScan Plus sofware you have to select if a positive or negative film used. Then you can choose within a drop down menu the desired resolution, colour/grey, colour depth and the file format. You can also select the file name and the storage path. After having selected all these seetings you can start the scan either by pressing the scan button or by pressing the corresonding button positive/negative/custom at the top side of the scanner.

After the complete film holder has been digitized it will not be ejected automatically. It will be ejected by pressing the eject button at the top side of the scanner. In the scan software after finishing the scan process the scanned pictures are opened in the step Views. With this step you start editing the scans. You can rotate portrait format photos by selecting the corresonding scans and clicking on the function rotate clockwisen or rotate counterclockwise. In order to the edit the pictures more you select the corresponding picture and then change into the Edit mode. Here you find a small palette of tools and several filters, which you find under the term Effect. Which possibilities QuickScan Plus offers we will describe later in the software chapter.
It is important to know that the editing in Quick Scan Plus is only possible directly after scanning. If you go back to the scan dialogue or if you start the next scan by pressing the buttons at the top side of the scanner you cannot reopen the images in QuickScan Plus. That's why we recommend you to use an additional image editing software.
Since you cannot indicate if the slide mount holder is fully or only partly loaded always the complete film holder will be scanned, even if only one or two mounted slides are in it. In our tests it turned out as arbitrary if white, empty images were saved or not.
Scanning 35mm film strips with the OpticFilm 135
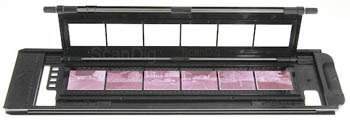
The Plustek OpticFilm 135 includes one film holder for 35mm film strips. This offers place for film strips up to a length of 6 pictures. You can open the film holder by folding it open in order to fill it with film strips. And you close it with a magnetic system in order to hold the film strip safely at the desired position. This is important, since the separating strips of the film holder might be in image otherwise. If you want to scan the images in the order of the film so you insert the film upside down into the film holder, when it it lies in front of you with the arrow indicating to the left side. In the Edit-Mode you can then rotate the pictures by 180°.
The film holder will then be shifted into the scanner slot at its front side until the eject button at the top of the scanner lights orange. Then the scanner pulls the film holder inside and the eject button changes to the colour blue. If all settings are made within the scan software you can start the scan directly by pressing the buttons at tht top side of the scanner.
As for the mounted slides holder also for the film holder the procedure is that way that the scanner digitizes the complete film holder, even if it is loaded not completely.
Subsequently to the scan process you can rotate and edit the scans before you start the next scan process.
The included software of the Plustek OpticFilm 135

Whilst the former OpticFilm scanners all came with the SilverFast scan software this OpticFilm 135 comes with an own software named Quick Scan Plus. The software which appears in grey, black and orange includes the most neccessary scan functions and a limited choice of editing functions. The software can be installed in the languates English, German, French, Italian, Spanish, Portuguese, Polish, Rusian and Chinese. For our test we have worked with the version 1.0.0.2.

The above described buttons at the top of the scanner with their labelling postive, negative and custom can be found again at the start screen of the QuickScan Plus software, however under the name in the chosen language. So the first setting you make is the choice of the scan material: Positive film or negative film. In the menu which belongs to the corresponding selection you can select the desired resolution. Here there are fixed given dpi values in the steps 3600, 2400, 1800, 1200 and 600. In the positive mode you can select between Colour and Grey steps. Then you can select an own file name which will be complemented with an index, or the scan will be named corresponding to the presettings with date, time and an index.
The last two steps consist of selecting the file path and the file format. For the file format you can choose in a drop down menu between JPEG, TIFF, PENG and Windows Bitmap. If you make 48 bit colour scans or 16 bit grey scans TIFF will be chosen automatically. After this selection you can start the scan either by pressing one of the buttons at the top of the scanner or the corresponding button in the software.


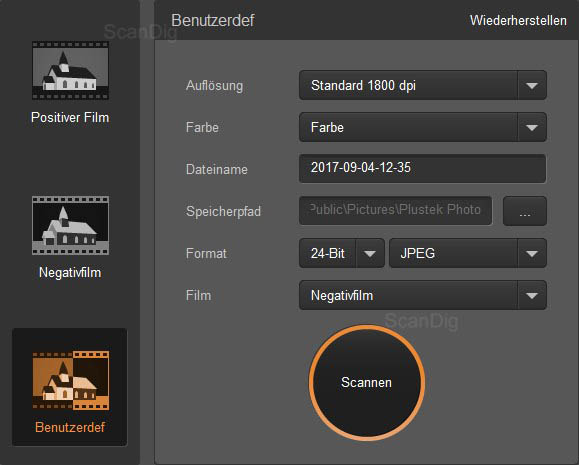
Exceptthe two described modes positive and negative there is also a user-defined option. One might hope that individual ppi values are similar settings can be made, however, the custom mode offers only another drop down menu for film. Which advantage brings this function? During our tests we found it as helpful using this function as follows: Since the scan can be started both within the software and by pressing a button at the top side of the scanner you can make a special setting for black and white negatives on the custom-button. So you have a button for colour negatives and one for b/w negatives thus accelerating your work when you change between these two film types. Another variant might be to use the buttons for positives and negatives with high resolution and the custom button with a low resolution.

As soon as the scanner has scanned the complete film holder the View mode opens within the scan software and you get an overview about the digitized pictures. These have been already saved at the selected file path. In the View mode you can rotate portrait films by 90° and store them again. Furthermore you can publish pictures directly in social networks.
In this step you can also make general software settings and look for upgrades. There is also a possibility to read out the scanner counter by pressing Settings - Info. The counter does not count the pictures having been scanned but the number of film holders which have been pulled through the scanner.


If you want to edit a picture, just select that picture by clicking on it. You can also select several pictures if they have to be applied with the same settings. You recognize the selected pictures by a white hook on the left side over the picture. Now you click Edit and thus change to the Edit-mode from the View-Mode. Here the selected pictures are shown. On the right side you find a palette with effect-tools or modify-tools.
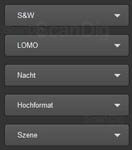

Under Effect filters are meant. However, the labelling of the different filters is rather unusual and not a usual way you might know from Photoshop® Elements, for instance. With the filters S&W, LOMO, Night, Portrait and Scene the pictures can be rather alienated than optimized. More useful is the palette Adjust. Here you find well-known functions like scrim diffuser, sharpening, automatic exposure and automatic white balance. Also you find functions for rotating, mirroring and cutting. All in all the possibilities are pretty much restricted in order to make a good post process.
What is really missing, especially since the scanner has no automatic dust and scratch removal function, is the possibility of a retouching brush or a copy brush. Dust and scratches cannot be retouched within Quick Scan Plus.
Due to the restricted image editing possibilites and the missing option to retouch dust and scratches, we recommend to use an additional image editing software like Adobe® Photoshop® Elements.
You can change between View and Edit for editing and selecting again and again. However, it is important to know, that the images can be edited only immediately after scanning. A later opening and editing is not possible in this software.

If want to go back to the scan mode the message shown in the picture appears, that after changing to the scan mode no editing is possible any more. This message also appears when you enter the next film holder and press one of the buttons at the top of the scanner.
All in all one can summarize that the software Quick Scan Plus deserves its name. With this software it is indeed possible to make a scan very quickly. And furthermore, you can quickly to simple editing work. Of course this simple software cannot cope with a professional scan software like SilverFast, but it is perfectly suited to make simple, quick scans.
The image quality of the Plustek OpticFilm 135
In order to evaulate the image quality of a scanner several factors are decisive; one of the most important factors is the effective resolution. In order to determine the effective resolution we use an USAF test chart and scan it with the highest possible scan resolution. This nominal resolution is 3600 ppi at the Plustek OpticFilm 135.
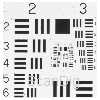
Watching the scan of the USAF target you can hardly recognize the horizontal lines of the element 5.6 and the vertical lines of the element 6.2. According to our resolution chart this indicates an effective resolution of about 3280 ppi. Compared to the nominal resolution of 3600 ppi this means, that the Plustek OpticFilm 135 brings about 91% of its nominal resolution in practice. In contrast to the other Plustek OpticFilm scanners Plustek goes a user friendly way with the OpticFilm 135: The nominal resolution is only 3600 ppi, however, they are achieved by 91% in practice. For other OpticFilm scanners the optical resolution is given with 7200 ppi, however, they are not even achieved by 50% in practice.
As another creterion of the image quality we look at the colours, the scanner yields. As already described the optimization of the scans is done after scanning. So it is decisive which quality the scanner brings directly after the scan process. Our 3 example images show from left to right a scan from a positive slide, from a colour negative and from a black and white negative.


If you look at the 3 images in general you will conclude that the colour reproduction is good at the mounted slide, and it is more or less sufficient for the negatives. At both negative scans the missing contrast is noticeable, since the two scans are very bright. In the second scan you hardly can recognize contours in the clouds in the sky. Also the scans appear very slacky and not brilliant at all.

Since the Plustek OpticFilm 135 has not automatic scratch and dust removal function, this is a decisive feature considering the image quality. Even if you clean the slides and negatives carefully, for instance with anti dust spray and an anti static brush, many particles remain on the film and will be clearly visible in the scan. Also each scratch will be visible due to the high scan resolution. When you look at our positive scan in the adjacent picture you will recognize many spots in the sky, although it is not a 100% sized view of the image.
Since the scanner has no automatic scratch and dust removal function the film material should be cleaned before scanning by all means. For cleaning film material we recommend Anti dust spray and an anti static brush.
Forthe density range of the scanner Plustek specifies a value of 3,4, which is a very small value for a film scanner. You will notice this restriction always, when you scan high contrast pictures, e.g. if you have the bright sun in the background and a dark tree in the front. Furthermore you will notice this restriction when you scan very bright or very dark pictures.
All in all one can summarize that the Plustek OpticFilm 135 has an image quality which is sufficient for many purposes, if you desist from the missing dust and scratch removal function. For us it is a puzzle, why Plustek has done without that important automatic dust and scratch removal function, since other scanners in that price field like the Reflecta CrystalScan 7200 have exactly that important feature.
The scan speed of the Plustek OpticFilm 135
As already described the Plustek OpticFilm 135 always scans a complete film holder or slide mountholder. So there is no difference in the scanning time between one picture or several pictures. This means that digitizing one slide takes the same time as digitizing 4 slides. Furthermore we could not measure a difference between scanning positives or scanning negatives. So the scanning times given in the chart below mean scanning a complete slide mount holder with 1 to 4 framed pictures or scanning a complete film holder with 1 to 6 pictures on a film strip. The resolutions correspond to the possibilities the software offers.
| Process |
Duration |
| Index scan |
not possible |
| Scan with 3600 ppi |
3 minutes 50 seconds |
| Scan with 2400 ppi |
2 minutes 40 seconds |
| Scan with 1800 ppi |
1 minute 57 seconds |
| Scan with 1200 ppi |
1 minute 20 seconds |
| Scan with 600 ppi |
45 seconds |
Considering these scan time values the Plustek OpticFilm 135 is a pretty fast scanner, if you scan several mounted slides or negatives on a film strip at a time. However, if you scan only one picture, the scanning times are the same and the scanner appears rather slow.
Conclusion, summary
The Plustek OpticFilm 135 is a trendy small scanner, with which you can easily scan framed slides and film strips. Exactly for this purpose the Plustek scan software Quick-Scan-Plus has been developed.
If you want to scan quickly a mounted slide and publish it on Facebook etc, Plustek offers the ideal scanner for that purpose. The image quality of this scanner is sufficient for such purposes, even if the missing scratch and dust correction function is a significant deficit. Such an important feature normally is standard at scanners in this price field.
So the Plustek OpticFilm 135 is not suitable for archiving mounted slides or negatives. For that purpose the image quality is not sufficient enough. For archiving purposes Plustek has other scanners in its portfolio.
Back to the film scanner tests index
|
)
)
)
)
)


)
)
)
)
)
)
)
)